Video and audio tutorials of these techniques, and more, are
available at mrjamesnestor.com/breath.
Alternate Nostril
Breathing (Nadi Shodhana)
This standard pranayama technique improves lung function and lowers
heart rate, blood pressure, and sympathetic stress. It’s an effective
technique to employ before a meeting, an event, or sleep.
(Optional) Hand Positioning: Place the thumb of your right
hand gently over your right nostril and the ring finger of that same
hand on the left nostril. The forefinger and middle finger should rest
between the eyebrows.
Close the right nostril with the thumb and inhale through the left
nostril very slowly.
At the top of the breath, pause briefly, holding both nostrils
closed, then lift just the thumb to exhale through the right
nostril.
At the natural conclusion of the exhale, hold both nostrils closed
for a moment, then inhale through the right nostril.
Continue alternating breaths through the nostrils for five to ten
cycles.
Breathing Coordination
This technique helps to engage more movement from the diaphragm and
increase respiratory efficiency. It should never be forced; each breath
should feel soft and enriching.
Sit up so that the spine is straight and chin is perpendicular to
the body.
Take a gentle breath in through the nose. At the top of the breath
begin counting softly aloud from one to 10 over and over (1, 2, 3,
4, 5, 6, 7, 8, 9, 10; 1, 2, 3, 4, 5, 6, 7, 8, 9, 10).
As you reach the natural conclusion of the exhale, keep counting but
do so in a whisper, letting the voice softly trail out. Then keep going
until only the lips are moving and the lungs feel completely empty.
Take in another large and soft breath and repeat.
Continue for anywhere from 10 to 30 or more cycles.
Once you feel comfortable practicing this technique while sitting,
try it while walking or jogging, or during other light exercise. For
classes and individual coaching, visit http://www.breathingcoordination.ch/training.
Resonant (Coherent)
Breathing
A calming practice that places the heart, lungs, and circulation into
a state of coherence, where the systems of the body are working at peak
efficiency. There is no more essential technique, and none more
basic.
Sit up straight, relax the shoulders and belly, and exhale.
Inhale softly for 5.5 seconds, expanding the belly as air fills the
bottom of the lungs.
Without pausing, exhale softly for 5.5 seconds, bringing the belly
in as the lungs empty. Each breath should feel like a circle.
Repeat at least ten times, more if possible.
Several apps offer timers and visual guides. My favorites are
Paced Breathing and My Cardiac
Coherence, both of which are free. I try to practice this
technique as often as possible.
Buteyko Breathing
The point of Buteyko techniques is to train the body to breathe in
line with its metabolic needs. For the vast majority of us, that means
breathing less. Buteyko had an arsenal of methods, and almost all of
them are based on extending the time between inhalations and
exhalations, or breathholding. Here are a few of the simplest.
Control Pause
A diagnostic tool to gauge general respiratory health and breathing
progress.
Place a watch with a second hand or mobile phone with a stopwatch
close by.
Sit up with a straight back.
Pinch both nostrils closed with the thumb and forefinger of either
hand, then exhale softly out your mouth to the natural conclusion.
Start the stopwatch and hold the breath.
When you feel the first potent desire to breathe, note the time and
take a soft inhale.
It’s important that the first breath in after the Control Pause is
controlled and relaxed; if it’s labored or gasping, the breathhold was
too long. Wait several minutes and try it again. The Control Pause
should only be measured when you’re relaxed and breathing normally,
never after strenuous exercise or during stressed states. And like all
breath restriction techniques, never attempt it while driving, while
underwater, or in any other conditions where you might be injured should
you become dizzy.
Mini Breathholds
A key component to Buteyko breathing is to practice breathing less
all the time, which is what this technique trains the body to do.
Thousands of Buteyko practitioners, and several medical researchers,
swear by it to stave off asthma and anxiety attacks.
Exhale gently and hold the breath for half the time of the Control
Pause. (For instance, if the Control Pause is 40 seconds, the Mini
Breathhold would be 20.)
Repeat from 100 to 500 times a day.
Setting up timers throughout the day, every 15 minutes or so, can be
helpful reminders.
Nose Songs
Nitric oxide is a powerhouse molecule that widens capillaries,
increases oxygenation, and relaxes the smooth muscles. Humming increases
the release of nitric oxide in the nasal passages 15-fold. There is the
most effective, and simple, method for increasing this essential
gas.
Breathe normally through the nose and hum, any song or sound.
Practice for at least five minutes a day, more if possible.
It may sound ridiculous, and feel ridiculous, and annoy those nearby,
but the effects can be potent.
Walking/Running
Less extreme hypoventilation exercises (other than the misery I
experienced jogging in Golden Gate Park) offer many of the benefits of
high-altitude training. They are easy and can be practiced anywhere.
Walk or run for a minute or so while breathing normally through the
nose.
Exhale and pinch the nose closed while keeping the same pace.
When you sense a palpable air hunger, release the nose and breathe
very gently, at about half of what feels normal for about 10 to 15
seconds.
Return to regular breathing for 30 seconds.
Repeat for about ten cycles.
Decongest the Nose
Sit up straight and exhale a soft breath, then pinch both nostrils
shut.
Try to keep your mind off the breathholding; shake your head up and
down or side to side; go for a quick walk, or jump and run.
Once you feel a very potent sense of air hunger, take a very slow
and controlled breath in through the nose. (If the nose is still
congested, breathe softly through the mouth with pursed lips.)
Continue this calm, controlled breathing for at least 30 seconds to
1 minute.
Repeat all these steps six times.
Patrick McKeown’s book The Oxygen Advantage offers
detailed instructions and training programs in breathing less.
Personalized instruction in Buteyko’s method is available through www.consciousbreathing.com,
www.breathingcenter.com, www.buteykoclinic.com, and with
other certified Buteyko instructors.
Chewing
Hard chewing builds new bone in the face and opens airways. But for
most of us, gnawing several hours a day—the amount of time and effort it
takes to get such benefits—isn’t possible, or preferable. A number of
devices and proxies can fill the gap.
Gum
Any gum chewing can strengthen the jaw and stimulate stem cell
growth, but harder textured varieties offer a more vigorous workout.
Falim, a Turkish brand, is as tough as shoe leather and each
piece lasts for about an hour. I’ve found the Sugarless Mint to be the
most palatable. (Other flavors, such as Carbonate, Mint Grass, and
sugar-filled varieties, tend to be softer and grosser.)
Mastic gum, which comes from the resin of the evergreen shrub
Pistacia lentiscus, has been cultivated in the Greek
islands for thousands of years. Several brands are available through
online retailers. The stuff can taste nasty but offers a rigorous jaw
workout.
Oral Devices
As of this writing, Ted Belfor and his colleague, Scott Simonetti,
received FDA approval for a device called the POD (Preventive Oral
Device), a small retainer that fits along the bottom row of teeth and
simulates chewing stress. For more information, see www.discoverthepod.com and www.drtheodorebelfore.com.
Palatal Expansion
There are dozens of devices to expand the palate and open airways,
each with its own advantages and disadvantages. Begin by contacting a
dental professional who specializes in functional orthodontics.
Dr. Marianna Evans’s Infinity Dental Specialists (at http://www.infinitydentalspecialists.com/) on the East
Coast, and Dr. William Hang’s Face Focused (https://facefocused.com)
on the West Coast are among the most well-known and respected clinics in
the United States, and good places to start. Across the pond, Britons
can contact Dr. Mike Mew’s clinic at https://orthodontichealth.co.uk.
Tummo
There are two forms of Tummo: one that stimulates the sympathetic
nervous system, and another which triggers a parasympathetic response.
Both work, but the former, made popular by Wim Hof, is much more
accessible.
It’s worth mentioning again that this technique should never be
practiced near water, or while driving or walking, or in any other
circumstances where you might get hurt should you pass out. Consult your
doctor if you are pregnant or have a heart condition.
Find a quiet place and lie flat on your back with a pillow under the
head. Relax the shoulders, chest, legs.
Take 30 very deep, very fast breaths into the pit of the stomach and
let it back out. If possible, breathe through the nose; if the nose
feels obstructed, try pursed lips. The movement of each inhalation
should look like a wave, filling up in the stomach and softly moving up
through the lungs. Exhales follow the same movement, first emptying the
stomach then the chest as air pours through the nose or pursed lips of
the mouth.
At the end of 30 breaths, exhale to the “natural conclusion,”
leaving about a quarter of the air in the lungs. Hold that breath for as
long as possible.
Once you’ve reached your absolute breathhold limit, take one huge
inhale and hold it another 15 seconds. Very gently, move that fresh
breath around the chest and to the shoulders, then exhale and start the
heavy breathing again.
This is the most powerful technique I’ve learned, and one of the most
involved and difficult to get through. Sudarshan Kriya consists of four
phases: Om chants, breath restriction, paced breathing
(inhaling for 4 seconds, holding for 4 seconds, exhaling for 6, then
holding for 2), and, finally, 40 minutes of very heavy
breathing.
A few YouTube tutorials are available, but to get the motions
correct, deeper instruction is highly recommended. The Art of Living
offers weekend workshops to guide new students through the practice. See
more at www.artofliving.org.
•••
Below are several breathing practices that didn’t make the cut in the
main text of this book for one reason or another. I regularly practice
them, as do millions of others. Each is useful and powerful in its own
way.
Yogic Breathing (Three-Part)
A standard technique for any aspiring pranayama student.
Phase I
Sit in a chair or cross-legged and upright on the floor and relax
the shoulders.
Place one hand over the navel and slowly breathe into the belly. You
should feel the belly expand with each breath in, deflate with each
breath out. Practice this a few times.
Next, move the hand up a few inches so that it’s covering the bottom
of the rib cage. Focus the breath into the location of the hand,
expanding the ribs with each inhale, retracting them with each exhale.
Practice this for about three to five breaths.
Move the hand to just below the collarbone. Breathe deeply into this
area and imagine the chest spreading out and withdrawing with each
exhale. Do this for a few breaths.
Phase II
Connect all these motions into one breath, inhaling into the
stomach, lower rib cage, then chest.
Exhale in the opposite direction, first emptying the chest, then the
rib cage, then the stomach. Feel free to use a hand and feel each area
as you breathe in and out of it.
Continue this same sequence for about a dozen rounds.
These motions will feel very awkward at first, but after a few
breaths they get easier.
Box Breathing
Navy SEALs use this technique to stay calm and focused in tense
situations. It’s simple.
Inhale to a count of 4; hold 4; exhale 4; hold 4. Repeat.
Longer exhalations will elicit a stronger parasympathetic response. A
variation of Box Breathing to more deeply relax the body that’s
especially effective before sleeping is as follows:
Inhale to a count of 4; hold 4; exhale 6; hold 2. Repeat.
Try at least six rounds, more if necessary.
Breathhold Walking
Anders Olsson uses this technique to increase carbon dioxide and,
thus, increase circulation in his body. It’s not much fun, but the
benefits, Olsson told me, are many.
Go to a grassy park, beach, or anywhere else where the ground is
soft.
Exhale all the breath, then walk slowly, counting each step.
Once you feel a powerful sense of air hunger, stop counting and take
a few very calm breaths through the nose while still walking.
Breathe normally for at least a minute, then repeat the
sequence.
The more you practice this technique, the higher the count. Olsson’s
record is 130 steps; mine is about a third of that.
4-7-8 Breathing
This technique, made famous by Dr. Andrew Weil, places the body into
a state of deep relaxation. I use it on long flights to help fall
asleep.
Take a breath in, then exhale through your mouth with a
whoosh sound.
Close the mouth and inhale quietly through your nose to a mental
count of four.
Hold for a count of seven.
Exhale completely through your mouth, with a whoosh, to the count of eight.
Repeat this cycle for at least four breaths.
Weil offers a step-by-step instructional on YouTube, which
has been viewed more than four million times. ## Yoga
Breathing Techniques
Dirgha Pranayama
(Deep Breathing Technique)
It’s important, right from the beginning, to learn to breathe deeply
and slowly in a controlled manner. This is known as dirgha pranayama (or
simply, long or prolonged breathing).
The greatest amount of prana is absorbed by the nerve endings which
line the lungs. Shallow breathing limits the amount of absorption, and
therefore is a major cause of many of the chronic health problems that
people face. The re-establishment of deep, full breathing is so
important to re-gaining and maintaining good health.
Technique
Sit comfortably with your eyes closed and spine straight
Allow yourself to breathe naturally for a few minutes, letting go of
any tension in your body and calming your mind.
In the beginning breathe in and out deeply through the nose several
times to ventilate the air that might have been stagnating in the
respiratory tracts.
After several ventilating breaths, exhale the air through the mouth,
trying to empty the lungs. Maintain the empty lungs for a moment,
without straining or forcing yourself.
Inhale slowly and uniformly through the nose, filling your lungs
with as much air as possible. Hold your breath with your lungs filled
with air for a moment, but again do not force yourself to hold it for
too long. In time, you will manage to hold your breath for longer
intervals.
Slowly and uniformly exhale through the mouth, avoiding an explosive
elimination of the air.
Note: Do every step in a controlled and calm
manner.
Relax and take a few comfortable breaths in your own rhythm, and
then try again a little deeper, as described above.
Again relax your breath for a few rounds when you feel the urge to
do so.
Try a third set, without forcing yourself too much, or overdoing
it.
When complete, lie down (in Shava Asana) and breathe in a relaxed
fashion, inhaling and exhaling only through the nose now. Allow your
body to let go of all tension, while at the same time just keeping your
attention on your breath without trying to affect or direct it in any
way. Try to maintain your attention for at least 5 minutes before
allowing yourself to let go off all efforts and relax completely.
Sukha Pranayama (The Easy
Breath)
Sukha is the Sanskrit word for ‘easy’. We use this yoga breathing
technique, (the easy breath) to help develop a slow and steady breathing
rhythm.
Technique
Sit comfortably with your eyes closed and spine straight
Allow yourself to breathe naturally for a few minutes, letting go of
any tension in your body and calming your mind.
When you feel at ease, begin inhaling and exhaling deeply and
slowly, counting to 6 (roughly 6 seconds) during the inhalation, and
likewise, 6 counts for the exhalation.
Perform 6 to 10 rounds of this breath and then allow yourself relax
and breathe in an calm manner.
After a few moments, perform another 6 to 10 rounds of the sukha
breathing rhythm.
Finish by lying down for 5 to 10 minutes, relaxing the breath and
letting go of all tension.
After a few days, begin to increase the duration of practice,
breathing in the sukha rhythm (6-count in and 6-count out) eventually up
to 5 minutes at a time.
Sukha Purvaka
Pranayama (The Four Part Breath)
The Sanskrit word sukha means ‘easy or pleasant’. Purvah refers to
‘that which precedes’. Therefore, sukha purvaka pranayama means the
simple breath which must be mastered before proceeding to more difficult
pranayamas’.
In this yoga breathing technique, we are introduced to the four
distinct stages (or functions) of the breath:
The inhalation (puraka)
The held-in breath (kumbhaka)
The exhalation (rechaka)
The held-out breath (shunyaka)
Technique
Again, sit comfortably with your eyes closed and spine
straight.
Allow yourself to breathe naturally for a few minutes, letting go of
any tension in your body and calming your mind.
In this yoga breathing technique, breathing happens only through the
nose.
One full round consists of the following:
Inhale slowly, for a 6-count
Hold the breath in for a 6-count
Exhale slowly, for a 6-count
Hold the lungs empty for a 6-count
Perform 6 to 9 rounds
Relax the breath for a few moments, and then repeat another 6 to 9
rounds again if able.
Finish by lying down for 5 to 10 minutes, relaxing the breath and
letting go of all tension.
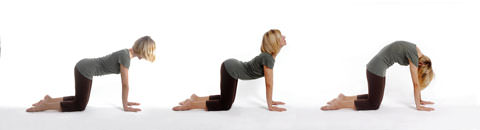
Vyaghrah Pranayama (The
Tiger Breath)
A wonderful yoga breathing technique to help open up the lungs and
improve breathing capacity is the vyaghrah pranayama, the
‘tiger-breath’. It is performed in chatus pada asana (on the hands and
knees).
Technique
Inhale (to a 6-count) while slowly lowering the abdomen toward the
floor and raising the head, neck and chin skyward into a nice back
bend.
Exhale (again to a 6-count) and slowly lower the head, drawing your
chin in towards the chest, while at the same time pushing firmly with
the arms and raising the back into a nice high arch.
Repeat this movement with the corresponding breath 3 to 6
times.
Relax for a few breaths and then repeat another round of 6 to 9
repetitions.
Finish by lying down for 5 to 10 minutes, relaxing the breath and
letting go of all tension.
When you do pranayama 80 percent of the toxins in our body are
released through the outgoing breath. Regular practice of Kapal Bhati
pranayama detoxifies all the systems in our body. And the obvious sign
of a healthy body is a shining forehead. Kapal Bhati literally
translates to ‘the shining forehead’ and this is exactly what happens
with regular practice of this pranayama. A forehead that glows not just
from outside but also an intellect that becomes sharp and refined. >
Dr. Sejal Shah, Art Of Living Yoga teacher, explains the importance of
Kapal Bhati.
Technique
Sit comfortably with your spine erect. Place your hands on the
knees, palms open to the sky. Kapalbhati Pranayama
Take a deep breath in.
As you exhale, pull your stomach. Pull your navel in back towards
the spine. Do as much as you comfortably can. You may keep your right
hand on the stomach to feel the abdominal muscles contract. Pull the
navel in.
As you relax the navel and abdomen, the breath flows into your lungs
automatically.
Take 20 such breaths to complete one round of Kapal Bhati
pranayama.
After completing the round, relax with your eyes closed and observe
the sensations in your body.
Do two more rounds of Skull Shining breathing technique (Kapal Bhati
pranayama).
Tips
The exhalation in Skull Shining Breathing Technique (Kapal Bhati
Pranayama) is active and forceful. So just throw out your breath.
Don’t worry about the inhalation. The moment you relax your
abdominal muscles, inhalation will happen naturally.
Just keep your awareness on breathing out.
Learn this technique from an Art of Living Yoga teacher and then you
can practice it at home on an empty stomach.
Nadis are subtle energy channels in the human body that can get
blocked due to various reasons. The Nadi Shodhan pranayama is a
breathing technique that helps clear these blocked energy channels, thus
calming the mind. This technique is also known as Anulom Vilom
pranayama.
Technique
Sit comfortably with your spine erect and shoulders relaxed. Keep a
gentle smile on your face.
Place your left hand on the left knee, palms open to the sky or in
Chin Mudra (thumb and index finger gently touching at the tips).
Place the tip of the index finger and middle finger of the right
hand in between the eyebrows, the ring finger and little finger on the
left nostril, and the thumb on the right nostril. We will use the ring
finger and little finger to open or close the left nostril and thumb for
the right nostril.
Press your thumb down on the right nostril and breathe out gently
through the left nostril.
Now breathe in from the left nostril and then press the left nostril
gently with the ring finger and little finger. Removing the right thumb
from the right nostril, breathe out from the right.
Breathe in from the right nostril and exhale from the left. You have
now completed one round of Nadi Shodhan pranayama. Continue inhaling and
exhaling from alternate nostrils.
Complete 9 such rounds by alternately breathing through both the
nostrils. After every exhalation, remember to breathe in from the same
nostril from which you exhaled. Keep your eyes closed throughout and
continue taking long, deep, smooth breaths without any force or
effort.
Cautions and Tips
Do not force the breathing, and keep the flow gentle and natural. Do
not breathe from the mouth or make any sound while breathing.
Do not use the Ujjayi breath.
Place the fingers very lightly on the forehead and nose. There is no
need to apply any pressure.
In case you feel dull and are yawning after practicing Nadi Shodhan
pranayama, check the time you take to inhale and exhale. Your exhalation
should be longer than inhalation.
It is a good idea to do a short meditation after doing Nadi Shodhan
pranayama.
This breathing technique can also be practiced as part of the Padma
Sadhana sequence.
Breathing is the most essential human activity, it needs to be deep
and comprehensive. While walking, the breathing needs to be coordinated
with the steps being taken. Breathing needs to be deep and in consonance
with the steps being taken while walking.
At the beginning of a walk, breath normally but make sure to
breath-in through the nose instead of breathing-in through the
mouth.
Next step is to make the breath slow, deep and controlled. Each
inhalation should last four walking
steps (fewer if you are nordic walking) and thereafter each
exhalation should also last four walking
steps. In other words one single act of inhalation and
exhalation should last eight walking steps (fewer if you are
nordic walking).
At no point of time, the breathing should feel deficient. The whole
point is to make the process comprehensive, as well as coordinated with
the walking.
If the co-ordination breaks, the process should be started again
without getting impatient or angry. Controlled breath walking produces
more stamina, reduces back ache and significantly improves heart
capacity.
During the whole process, the breathing should be deep, controlled
and through the nose. This act of breathing and walking should be
continued for a duration of five minutes.
After the five minutes, a break of
three minutes should be taken and the process continued
again. If practiced diligently, the controlled breathing can be done in
an instinctive and hence easier manner.
Practice deep breathing when you perform any type of exercise,
including walking, the American Lung Association
recommends.
Breathe in to a count of two
Breathe out to a count of four.
Breathing through your nose filters dust particles and conditions air
while helping you maintain the proper balance of oxygen and carbon
dioxide in your blood.
Walking Pace Effects
Breathing
When you’re walking at a moderate pace of 3.5 mph,
you should feel slightly breathless but able to speak in full sentences.
When walking at a brisk pace of 3.75 mph, you should
feel somewhat more breathless with conversation limited to short
sentences. Power walking at 4 mph and faster will make
you feel quite breathless and able only to speak a few words at a
time.
Breathwalk Meditation
Energise your stride with breath-walk meditation. Breath-walk
combines synchronised breathing with walking and directed meditation.
Breath-walk offers many benefits, including weight loss, decreased
anxiety and reduced back pain. In a report published by the
“World Journal of Gastroenterology” in 2007, M
Vazquez-Vandyck and colleagues found that breath-walk techniques had a
beneficial effect for patients suffering from hepatitis C, obesity and
insulin resistance.
How to Breath-walk
Begin a breath-walk meditation session by walking at a normal pace
and concentrating on breathing, feeling your diaphragm move up and
down.
Coordinate your breathing so that you inhale with four
steps, then exhale with four steps.
Continue for at least one minute.
Inhale through your nose with four short puffs coordinated with four
steps, taking in more air each time until your lungs are full.
Exhale using the same process.
Continue the cycle for 5 minutes, then take a break for 3 minutes to
breathe normally and walk at a regular pace.
Repeat the eight-minute pattern again, this time adding the silent
mantra “Sa Ta Na Ma,” while you inhale, and whispering the
mantra “Wah Hay Gu Roo” when you exhale.
Pursed Lip Breathing
Practice “pursed lip breathing” to maximise using your diaphragm
while breathing, the American Lung Association advises.
Relax and drop your shoulders. Breathe in through your nose. Pucker your
lips as if you were whistling, then breathe out slowly. The breathing
out motion should take approximately twice as long as breathing in. Your
abdomen should expand when you inhale and deflate when you exhale with
little or no movement in your chest. Practice the exercise first while
lying down, then gradually work your way toward being able to perform
pursed lip breathing while you walk.
Simply get comfortable in any position and put your hands on your
chest and stomach.
To maximise oxygen intake, it’s important to learn to breathe from
your abdomen (“belly breathing”) rather than your chest. Focus on your
breath until you feel your stomach rise and fall more dramatically than
your chest with each inhalation and exhalation.
Breathe in through your nose, hold the breath for a few seconds and
then exhale through your mouth. The time it takes to exhale should be
about twice what it is to inhale. Many suggest a 4:7:8 pattern – 4 to
inhale, 7 to hold, and 8 to exhale. Let go of other thoughts while you
breathe.
Here is a set of simple breathing exercises designed to increase your
qi energy flow. I recommend that you do them in the given order, when
you try them out. Once you’ve become familiar with them, you can do them
in any order you please. Trust your instincts. (ed. I didn’t write
this!)
Extend your Exhalation
You can stand, sit, or lie down, just what you like. It does not
matter. But try to have the good posture that you have learned from
previous exercises, and avoid any clothing that sits tight on your body.
Wear loose clothes, and as few as possible.
Inhale normally, through your nose.
Exhale through your mouth - as much as you can, without losing your
good posture. Continue the exhalation as long as possible - and then
some.
Close your mouth and let the inhalation happen automatically. Do not
let your conscious mind control your inhalation. You will observe that
you breathe in as suddenly as if the air was pushed down your lungs,
like a vacuum suddenly opening to the outside world. This way, the
inhaled air feels particularly fresh and refreshing.
When this sudden rush of air has entered your lungs, you should not
consciously continue with the inhalation. Instead, you open your mouth
and breathe out, at least as much as last time.
Repeat as long as it feels good. Remember to keep your good posture.
If you get dizzy by the increased oxygen intake this kind of breathing
causes, slow down by prolonging your exhalations. You can also take
short pauses between inhalation and exhalation, but do not try to change
the speed of the former.
Lower your Breath
You can stand or sit in this exercise, but the best is probably if
you lie down on your back, like in some of the previous exercises. When
you have learned to find a deep belly breathing, it is not necessary
anymore to do it lying down. By then you should be able to do it
sitting, standing, or even walking. Loose clothing is helpful, and in
the beginning probably quite necessary. Loosen what might be tight,
especially around your belly. The less clothes the better. Even very
loose garments have a tendency to slightly inhibit your breathing.
Relax and take a few normal breaths, so that you calm down.
Put the palm of one of your hands on your belly, between the navel
and the crotch. There should be good contact, but do not press the hand
on your belly. Observe that it is the palm of your hand that is
important, and not the fingers. They should be passive. Otherwise they
can confuse and disturb your breathing.
Breathe in and then start a slow exhalation. Do not breathe out
through your mouth, which tends to bring the breathing up toward your
chest, but through your nose.
Now, make a sudden and forceful exhalation, by which you try to push
the hand on your belly. Make it bump, only by your sudden exhalation. Do
not push with your body. The hips should not move at all. The push
should come from within your stomach. In the beginning it is probably a
kind of wave from your chest and downward, but by time you should be
able to do the push with your stomach, and nothing else. It is tricky at
first. Try again and again, until you succeed.
Take a new breath and repeat the pushing of your hand with your
exhalation. Remember to start the exhalation slowly, before you make the
push. Otherwise the body tends to resist and get tense. You should
repeat the exercise until you feel that you manage to push the palm of
your hand from inside your stomach, without the rest of the body helping
noticeably.
Belly Breathing
You can walk, stand, or sit down, but in the beginning the easiest
is to lie on your back. Your clothes should be loose, especially on the
belly, and the less clothes you have on, the better.
Put the palm of one of your hands on your belly, about midway
between your navel and your crotch - or closer to the crotch if you can
get your breathing that low. Remember to keep a good contact between
your palm and belly, without pushing.
Start a slow and deep inhalation through your nose, and try to do it
in such a way that your belly pushes on the hand. This means that the
belly expands when you breathe in.
Continue with a long exhalation through your mouth - and this time,
too, there should be a pressure from your belly onto your hand. That may
seem odd, but both when you inhale and when you exhale the belly should
expand, pressing on your hand. Thereby, the belly seems to be constantly
growing, which is fine. Do not worry about your figure, since this is
just how it feels.
Go on with this breathing, your belly pressing on your hand. When
you feel that you do it right without any particular effort, you can
take away the hand - but continue with the same breathing for a
while.
If your breathing tends to move up toward your chest, and you notice
that the chest starts moving at each breath, then put your hand back on
the belly, and try again.
Continue to breathe this way as long as you want. Take your time -
it is supposed to become a new habit of yours. If you notice that you
get very tense when trying to belly breathe, you should not do it for
more than a few minutes. Instead, repeat the exercise at another
time.
Breathe in a Square
For this exercise you should assume a relaxed and peaceful position.
Therefore you should avoid standing up, which would demand of you to
keep your balance. That can cause some tension and disturbance. So, sit
down with a good posture, or lie on your back. Loose clothing is fine,
but not as important as with most of the previous exercises.
Breathe normally through your nose for a while, so that you slow
down and relax. Belly breathing is great, but actually not necessary.
Already before you have learned a good belly breathing, you can get a
lot from this exercise. But of course, the deeper you breathe, the more
you get.
Now, start a strictly regulated breathing: choose a fixed time for
each phase of it. Do not make it too long. Later on, you will notice
why. Settle for something like five seconds. That means you should make
an inhalation, which lasts for five seconds, followed by a just as long
exhalation. You do not have to time it with a clock. It needs not be
that exact. It is enough that you count slowly to five. Do it silently,
or it will interfere with your breathing.
When this works smoothly, you should add the same length of time
after the inhalation, where you hold your breath with a feeling of
continued inhalation. Do not tighten your body to hold your breath, but
sort of continue with the inhalation although you get no more air.
After exhaling for the same length of time, add an equal period
where you have a feeling of continued exhalation, although no more air
leaves you. You will notice that it is harder to extend the period after
an exhalation. The body is eager to get new air. That is why you should
not choose a longer period of time than you manage comfortably.
Now you are breathing in a square: Five seconds of inhaling, five
seconds of a continued feeling of inhaling, five seconds of exhaling,
and five seconds of a continued feeling of exhaling. Do it over and
over. You can keep it up as long as you like, but only if you are able
to feel like breathing in or out at the intervals when you actually hold
your breath.
That feeling of inhaling and exhaling is qi. It is not more odd than
that. When you feel that you inhale something, or exhale something, and
it is not air - then it is qi. The more clear this sense of breathing
without air is to you, the stronger your qi flows.
Breathing Tests
Breathing Volume
and Oxygen Uptake Efficiency
Take a deep breath and count to as high a number as possible.
Number Count
Percentage of Users
Rating
150+
2%
Excellent
110-149
5%
Very Good
90-109
10%
Good
60-89
35%
Fair
2-59
47%
Poor
Breathing Pause Extension
Breathe in and out as usual but pause after the exhalation and hold
as long as possible.
How can
we identify the extent of incorrect breathing?
By measuring “the control pause” and pulse. All known publications
describe measuring of the control pause quite vaguely. Below is a
clearer description:
The control pause should be preferably measured in standard
conditions, after a 10 minute breath-equalizing rest.
Sit conveniently.
Take a beautiful, correct posture, spread out your shoulders. The
stomach will straighten up.
Inhale normally, relax the stomach. Involuntary exhalation will come
out by itself.
As the exhalation is finished, note the position of the second hand
visually and hold breath.
During the time of measuring, do not follow the second hand, just
focus on a spot in front of you or shut your eyes.
Do not breathe in until it gets difficult, i.e. until diaphragm’s
“push” up. Simultaneously, stomach and neck muscles get push too:
patients normally describe this condition as a “push in the
throat”.
Read of the second hand’s position at the “push” point, and continue
breathing. Do not inhale deeper than prior to breath-holding.
Thus measured pairs of stable values “control pause - pulse”
determine the stage of your disease by the following rule:
Healthy - longer than 40 sec with the pulse below 70.
First stage - from 20 sec (pulse 80) to 40 sec.
Second stage - from 10 sec (pulse 90) to 20 sec.
Third stage - shorter than 10 sec.
Stability of values is the “repeatability” of such values within the
range corresponding to a specific stage of the disease during at least
several days.
The whole method can be summarized in the following two
sentences:
“Focus your attention on the two pauses that occur while breathing.
First – between inhalation and exhalation and then – between exhalation
and inhalation. Just by doing this you will start taking deep breath
automatically and unconsciously.”
Initially start focusing on these breathing pauses twice a day for 15
minutes each. Morning and evening are best time for this. These two 15
minutes session of pause breathing will prove very beneficial for you.
In order to avoid distraction, try to perform these pause breathing
session in a peaceful, lonely place if possible.
As you perform this method of focusing your attention on pauses, you
will find that even when you stop focusing your attention on pause (
that is after a 15 minute session), your breathing is still deeper and
relaxed. It is the most wonderful effect of this method. It leaves a
sort of cascading long lasting effect. A tiny 15 minute session of pause
breath will make your breathing deeper and relaxed for more than one
hour!
Mediation
Kandinsky
Simply focus on your breathing. You can put the emphasis on the rise
and fall of your stomach, chest, the sensation of air entering and
leaving your body… Let thoughts come and go maintaining the focus on
some aspect of your breathing.
Count you exhales up to 10. After reaching 10, start again. Should
you lose count at any point simply restart the count at 1.
Repeat the following phrases at your own pace: “I am happy”, “I am
healthy”, “I am at peace”. At some point in the session, change the
focus to another person or people: loved ones, family, friends, someone
you admire, anyone. Change the phrases to “He is/She is/They are/You are
happy”. Note, repeat the phrases silently in your mind.
Similar to the above, on the inhale repeat the phrase “breathing in,
I am calm” and on the exhale “breathing out, I am peaceful”.
There’s a lot of ways to meditate. Besides using mantras, you could
also focus on your breath, music, a real object, a mental visualization,
or nothing at all (Zen). If you’re just starting out, don’t feel like
you have to start by picking a mantra – you can start “meditation
shopping” the different approaches. Many of the guided meditations are
contemplative exercises for gratitude, cleansing, energy, and healing –
where it’s not a single idea that holds focus, but an exploration of
concepts or guided imagery.
You Might Want a
Meaningless Mantra
For that matter, even in mantra meditation you could pick nearly any
short phrase and have the same sort of cleansing, buffering effect
against the mental trivia that inevitably rises during meditation.
There’s some serious hitters backing the idea of your mantra having no
meaning:
Mantras in Transcendental Meditation are intended to have no
intellectual meaning and that’s very important in that approach – you
can read more here.
Clinically Standardized Meditation (which was created by a
psychologist using a scientific approach back in the 70s or 80s) also
uses a set of 16 possible mantras that have no English meaning but have
soothing sounds.
The meaning of the phrase is irrelevant to those who subscribe to
the idea that the phrase is really just a way at getting at the
underlying vibration. According to the Chopra Center, the ancient seers
behind the Vedic texts put down all of the primordial vibrations that
make up the universe – and that we can hear them too, if we listen
attentively enough to the background hum of the air. “As you meditate,
the mantra becomes increasingly abstract and indistinct, until you’re
finally led into the field of pure consciousness from which the
vibration arose.”
Despite those three very hefty precedents, though, repeating
something life-affirming and spiritual can add something positive to our
consciousnesses. There’s abundant cultural heritage behind choosing
something with meaning – or else I couldn’t supply you with this list,
which just scratches the surface. There’s a ton more Hindu and Buddhist
ones you could look at using, at least, and some people outside those
paths just go directly to using the Lord’s Prayer or the name of God
according to their religion of choice. My suggestion to you is that you
simply explore to see what feels best for you, especially if you’re just
getting started.
21 Mantras for Meditation
“Aum”, “Om”: Sanskrit/Hindu, meaning “It Is” or “To
Become”. This is considered most sacred in that tradition and to have
the vibration of intention manifesting in the physical realm, or more
simply the vibration of the universal consciousness. Also used in
Buddhism and other traditions. Link - YouTube
“Be the change you wish to see in the world.”:
Gandhi
“El Shaddai”: Hebrew, meaning “God Almighty”
“Elohim”: Hebrew, meaning “to whom one has recourse
in distress or when one is in need of guidance”
“Every day in every way I’m getting better and
better.”: Laura Silva
“Gate gate paragate parasamgate bodhi svaha”,
Buddhist meaning “Gone, gone, gone beyond, gone utterly beyond,
Enlightenment hail!”. There’s an MP3 on wildmind.org.
“Ham-Sah”, “So Ham” (often pronounced “So Hum”):
Sanskrit, meaning “I am THAT”. It is suggested to use “So” on inhale,
“Ham” on exhale. Link -
YouTube
“Hare Krishna, Hare Krishna, Krishna Krishna, Hare Hare,
Hare Rama, Hare Rama, Rama Rama, Hare Hare”: Hindu, read about
its meaning here
“I am that I am”: Hebrew, God’s answer to Moses
when asked for his name
“I change my thoughts, I change my world.”: Norman
Vincent Peale
“Maranatha”: Christian, meaning “Come Lord” and
understood by some as the final teaching of the Christian Bible
“Om A Ra Pa Ca Na Dhih”: Buddhist, and I’m not even
going to try to break out the meaning of this in a list. Read about it
here, link - YouTube
“Om Mani Padme Hum”: Buddhist, meaning “Hail the
Jewel in the Lotus” (the jewel being Buddha, but that interpretation
disagreed with by wildmind.org). Link - YouTube
“Om Namah Shivaya”: Hindu, meaning “I bow to
Shiva”
“Om Shanti Shanti Shanti”: Buddhist and Hindu, the
starting of Om followed by peace of mind, peace of body, and peace of
speech. Link - YouTube
“Om Vajrapani Hum”: Buddhist, read more and hear it
on Wildmind
“Namo Amita Bha”: meaning “Homage to the Buddha of
boundless light”
“Sabbe Satta Sukhi Hontu”: Buddhist, Pali phrase
meaning “May all beings be well (or happy)”. There’s an MP3 on wildmind.org.
“Sat, Chit, Ananda” “Existence, Consciousness,
Bliss”, Sanskrit, “Satcitananda”.
Deepak Chopra uses it, it refers to the subjective experience of
Brahman.