
A collection of tutorials and information regarding modern javascript.
Adrian Mejia
JavaScript has changed quite a bit in the last years. These are 12 new features that you can start using today!
The new additions to the language are called ECMAScript 6. It is also referred as ES6 or ES2015+.
Since JavaScript conception on 1995, it has been evolving slowly. New additions happened every few years. ECMAScript came to be in 1997 to guide the path of JavaScript. It has been releasing versions such as ES3, ES5, ES6 and so on.

As you can see, there are gaps of 10 and 6 years between the ES3, ES5, and ES6. The new model is to make small incremental changes every year. Instead of doing massive changes at once like happened with ES6.
All modern browser and environments support ES6 already!

source: https://kangax.github.io/compat-table/es6/
Chrome, MS Edge, Firefox, Safari, Node and many others have already built-in support for most of the features of JavaScript ES6. So, everything that you are going to learn in this tutorial you can start using it right now.
Let’s get started with ECMAScript 6!
You can test all these code snippets on your browser console!
So don’t take my word and test every ES5 and ES6 example. Let’s dig in 💪
With ES6, we went from declaring variables with var to
use let/const.
What was wrong with var?
The issue with var is the variable leaks into other code
block such as for loops or if blocks.
ES5
var x = "outer";
function test(inner) {
    if (inner) {
        var x = "inner"; // scope whole function
        return x;
    }
    return x; // gets redefined because line 4 declaration is hoisted
}
test(false); // undefined 😱
test(true); // inner
For test(false) you would expect to return
outer, BUT NO, you get undefined.
Why?
Because even though the if-block is not executed, the expression
var x in line 4 is hoisted.
var hoisting:
varis function scoped. It is availble in the whole function even before being declared.- Declarations are Hoisted. So you can use a variable before it has been declared.
- Initializations are NOT hoisted. If you are using
varALWAYS declare your variables at the top.- After applying the rules of hoisting we can understand better what’s happening:
ES5
var x = "outer";
function test(inner) {
    var x; // HOISTED DECLARATION
    if (inner) {
        x = "inner"; // INITIALIZATION NOT HOISTED
        return x;
    }
    return x;
}
ECMAScript 2015 comes to the rescue:
ES6
let x = "outer";
function test(inner) {
    if (inner) {
        let x = "inner";
        return x;
    }
    return x; // gets result from line 1 as expected
}
test(false); //
outertest(true); // inner
Changing var for let makes things work as
expected. If the if block is not called the variable
x doesn’t get hoisted out of the block.
Let hoisting and “temporal dead zone”
- In ES6,
letwill hoist the variable to the top of the block (NOT at the top of function like ES5).- However, referencing the variable in the block before the variable declaration results in a
ReferenceError.letis blocked scoped. You cannot use it before it is declared.- “Temporal dead zone” is the zone from the start of the block until the variable is declared.
IIFE
Let’s show an example before explaining IIFE. Take a look here:
ES5
{ var private = 1; }
console.log(private); // 1
As you can see, private leaks out. You need to use IIFE
(immediately-invoked function expression) to contain it:
ES5
(function(){
    var private2 = 1;
})();
console.log(private2); // Uncaught ReferenceError
If you take a look at jQuery/lodash or other open source projects you
will notice they have IIFE to avoid polluting the global environment and
just defining on global such as _, $ or
jQuery.
On ES6 is much cleaner, We also don’t need to use IIFE anymore when
we can just use blocks and let:
ES6
{  let private3 = 1; }
console.log(private3); // Uncaught ReferenceErrorYou can also use const if you don’t want a variable to
change at all.

Bottom line: ditch
varforletandconst.
- Use
constfor all your references; avoid usingvar.- If you must reassign references, use
letinstead ofconst.
We don’t have to do more nesting concatenations when we have template literals. Take a look:
ES5
var first = "Adrian";
var last = "Mejia";
console.log("Your name is " + first + " " + last + ".");
Now you can use backtick (`) and string interpolation
${}:
ES6
const first = "Adrian";
const last = "Mejia";
console.log(`Your name is ${first} ${last}.`);We don’t have to concatenate strings + \n anymore like
this:
ES5
var template = "<li *ngFor="let todo of todos" [ngClass]="{completed: todo.isDone}" >\n"
    +"  <div class="view">\n"
    +"    <input class="toggle" type="checkbox" [checked]="todo.isDone">\n"
    +"    <label></label>\n"
    +"    <button class="destroy"></button>\n"
    +"  </div>\n"
    +"  <input class="edit" value="">\n"
    +"</li>";
console.log(template);
On ES6 we can use the backtick again to solve this:
ES6
const template = `<li *ngFor="let todo of todos" [ngClass]="{completed: todo.isDone}">
    <div class="view">
        <input class="toggle" type="checkbox" [checked]="todo.isDone">
        <label></label>
        <button class="destroy"></button>
    </div>
    <input class="edit" value="">
</li>`;
console.log(template);
Both pieces of code will have exactly the same result.
ES6 desctructing is very useful and consise. Follow this examples:
Getting elements from an arrays
ES5
var array = [1, 2, 3, 4];
var first = array[0];
var third = array[2];
console.log(first, third); // 1 3
Same as:
ES6
const array = [1, 2, 3, 4];
const [first, ,third] = array;
console.log(first, third); // 1 3
Swapping values
ES5
var a = 1;
var b = 2;
var tmp = a;
a = b;
b = tmp;
console.log(a, b); // 2 1
same as
ES6
let a = 1;
let b = 2;
[a, b] = [b, a];
console.log(a, b); // 2 1ES5
function margin() {
    var left = 1, right = 2, top = 3, bottom = 4;
    return {
        left: left,
        right: right,
        top: top,
        bottom: bottom
    };
}
var data = margin();
var left = data.left;
var bottom = data.bottom;
console.log(left, bottom); // 1 4
In line 3, you could also return it in an array like this (and save some typing):
return [left, right, top, bottom];but then, the caller needs to think about the order of return data.
var left = data[0];
var bottom = data[3];
With ES6, the caller selects only the data they need (line 6):
ES6
function margin() {
    const left = 1, right = 2, top = 3, bottom = 4;
    return {
        left,
        right,
        top,
        bottom
    };
}
const { left, bottom } = margin();
console.log(left, bottom); // 1 4
Notice: Line 3, we have some other ES6 features going on. We
can compact { left: left } to just { left }.
Look how much concise it is compare to the ES5 version. Isn’t that
cool?
ES5
var user = {firstName: "Adrian", lastName: "Mejia"};
function getFullName(user) {
    var firstName = user.firstName;
    var lastName = user.lastName;
    return firstName + " " + lastName;
}
console.log(getFullName(user)); // Adrian Mejia
Same as (but more concise):
ES6
const user = {firstName: "Adrian", lastName: "Mejia"};
function getFullName({ firstName, lastName }) {
    return `${firstName} ${lastName}`;
}
console.log(getFullName(user)); // Adrian MejiaES5
function settings() {
    return {
        display: { color: "red" },
        keyboard: { layout: "querty"}
    };
}
var tmp = settings();
var displayColor = tmp.display.color;
var keyboardLayout = tmp.keyboard.layout;
console.log(displayColor, keyboardLayout); // red querty
Same as (but more concise):
ES6
function settings() {
    return {
        display: { color: "red" },
        keyboard: { layout: "querty"}
    };
}
const {
    display: { color: displayColor },
    keyboard: { layout: keyboardLayout }
} = settings();
console.log(displayColor, keyboardLayout); // red querty
This is also called object destructing.
As you can see, destructing is very useful and encourages good coding styles.
Best practices:
- Use array destructing to get elements out or swap variables. It saves you from creating temporary references.
- Don’t use array destructuring for multiple return values, instead use object destructuring
With ECMAScript 6, We went from “constructor functions” 🔨 to “classes” 🍸.
In JavaScript every single object has a prototype, which is another object. All JavaScript objects inherit their methods and properties from their prototype.
In ES5, we did Object Oriented programming (OOP) using constructor functions to create objects as follows:
ES5
var Animal = (function () {
    function MyConstructor(name) {
        this.name = name;
    }
    MyConstructor.prototype.speak = function speak() {
        console.log(this.name + " makes a noise.");
    };
    return MyConstructor;
})();
var animal = new Animal("animal");
animal.speak(); // animal makes a noise.
In ES6, we have some syntax sugar. We can do the same with less
boiler plate and new keywords such as class and
constructor. Also, notice how clearly we define methods
constructor.prototype.speak = function () vs
speak():
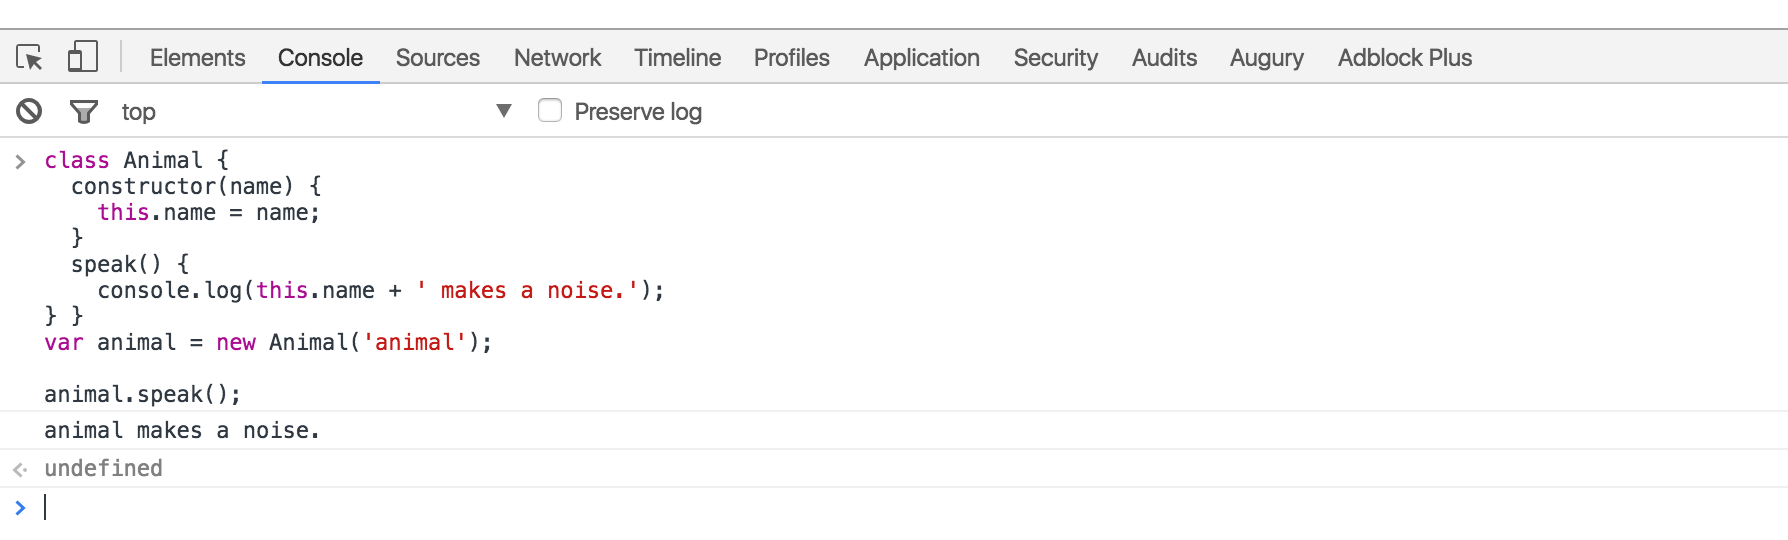
ES6
class Animal {
    constructor(name) {
        this.name = name;
    }
    speak() {
        console.log(this.name + " makes a noise.");
    }
}
const animal = new Animal("animal");
animal.speak(); // animal makes a noise.
As we saw, both styles (ES5/6) produces the same results behind the scenes and are used in the same way.
Best practices:
- Always use
classsyntax and avoid manipulating theprototypedirectly. Why? because it makes the code more concise and easier to understand.- Avoid having an empty constructor. Classes have a default constructor if one is not specified.
Building on the previous Animal class. Let’s say we want
to extend it and define a Lion class
In ES5, It’s a little more involved with prototypal inheritance.
ES5
var Lion = (function () {
    function MyConstructor(name){
        Animal.call(this, name);
    }  // prototypal inheritance
    MyConstructor.prototype = Object.create(Animal.prototype);
    MyConstructor.prototype.constructor = Animal;
    MyConstructor.prototype.speak = function speak() {
        Animal.prototype.speak.call(this);
        console.log(this.name + " roars 🦁");
    };
    return MyConstructor;
})();
var lion = new Lion("Simba");
lion.speak(); // Simba makes a noise.// Simba roars.
I won’t go over all details but notice:
Animal constructor with the
parameters.Lion prototype to
Animal‘s prototype.speak method from the parent class
Animal.In ES6, we have a new keywords extends and
super  .
.
ES6
class Lion extends Animal {
    speak() {
        super.speak();
        console.log(this.name + " roars 🦁");
    }
}
const lion = new Lion("Simba");
lion.speak(); // Simba makes a noise.// Simba roars.
Looks how legible this ES6 code looks compared with ES5 and they do exactly the same. Win!
Best practices:
- Use the built-in way for inherintance with
extends.
We went from callback hell 👹 to promises 🙏
ES5
function printAfterTimeout(string, timeout, done){
    setTimeout(function(){
        done(string);
    }, timeout);
}
printAfterTimeout("Hello ", 2e3, function(result){
    console.log(result);  // nested callback
    printAfterTimeout(result + "Reader", 2e3, function(result){
        console.log(result);
    });
});
We have one function that receives a callback to execute when is
done. We have to execute it twice one after another. That’s
why we called the 2nd time printAfterTimeout in the
callback.
This can get messy pretty quickly if you need a 3rd or 4th callback. Let’s see how we can do it with promises:
ES6
function printAfterTimeout(string, timeout){
    return new Promise((resolve, reject) => {
        setTimeout(function(){
            resolve(string);
        }, timeout);
    });
}
printAfterTimeout("Hello ", 2e3).then((result) => {
    console.log(result);
    return printAfterTimeout(result + "Reader", 2e3);
    }).then((result) => {
        console.log(result);
    });
As you can see, with promises we can use then to do
something after another function is done. No more need to keep nesting
functions.
ES6 didn’t remove the function expressions but it added a new one called arrow functions.
In ES5, we have some issues with this:
ES5
var _this = this; // need to hold a reference
$(".btn").click(function(event){  _this.sendData(); // reference outer this
});
$(".input").on("change",function(event){
    this.sendData(); // reference outer this
}.bind(this)); // bind to outer this
You need to use a temporary this to reference inside a
function or use bind. In ES6, you can use the arrow
function!
ES6
// this will reference the outer one
$(".btn").click((event) =>  this.sendData());// implicit returns
const ids = [291, 288, 984];
const messages = ids.map(value => `ID is ${value}`);We went from for to forEach and then to
for...of:
ES5
// for
var array = ["a", "b", "c", "d"];
for (var i = 0; i < array.length; i++) {
    var element = array[i];
    console.log(element);
}// forEach
array.forEach(function (element) {
    console.log(element);
});
The ES6 for…of also allow us to do iterations.
ES6
// for ...of
const array = ["a", "b", "c", "d"];
for (const element of array) {
    console.log(element);
}We went from checking if the variable was defined to assign a value
to default parameters. Have you done something like this
before?
ES5
function point(x, y, isFlag){
    x = x || 0;  y = y || -1;
    isFlag = isFlag || true;
    console.log(x,y, isFlag);
}
point(0, 0) // 0 -1 true 😱
point(0, 0, false) // 0 -1 true 😱😱
point(1) // 1 -1 truepoint() // 0 -1 true
Probably yes, it’s a common pattern to check is the variable has a value or assign a default. Yet, notice there are some issues:
0, 0 and get 0, -1false but get true.If you have a boolean as a default parameter or set the value to zero, it doesn’t work. Do you know why??? I’ll tell you after the ES6 example ;)
With ES6, Now you can do better with less code!
ES6
function point(x = 0, y = -1, isFlag = true){
    console.log(x,y, isFlag);
}
point(0, 0) // 0 0 true
point(0, 0, false) // 0 0 false
point(1) // 1 -1 true
point() // 0 -1 true
Notice line 5 and 6 we get the expected results. The ES5 example
didn’t work. We have to check for undefined first since
false, null, undefined and
0 are falsy values. We can get away with numbers:
ES5
function point(x, y, isFlag){
    x = x || 0;
    y = typeof(y) === "undefined" ? -1 : y;
    isFlag = typeof(isFlag) === "undefined" ? true : isFlag;
    console.log(x,y, isFlag);
}
point(0, 0) // 0 0 true
point(0, 0, false) // 0 0 false
point(1) // 1 -1 true
point() // 0 -1 true
Now it works as expected when we check for
undefined.
We went from arguments to rest parameters and spread operator.
On ES5, it’s clumpsy to get an arbitrary number of arguments:
ES5
function printf(format) {
    var params = [].slice.call(arguments, 1);
    console.log("params: ", params);
    console.log("format: ", format);
}
printf("%s %d %.2f", "adrian", 321, Math.PI);
We can do the same using the rest operator ....
ES6
function printf(format, ...params) {
    console.log("params: ", params);
    console.log("format: ", format);
}
printf("%s %d %.2f", "adrian", 321, Math.PI);We went from apply() to the spread operator. Again we
have ... to the rescue:
Reminder: we use
apply()to convert an array into a list of arguments. For instance,Math.max()takes a list of parameters, but if we have an array we can useapplyto make it work.

As we saw in earlier, we can use apply to pass arrays as
list of arguments:
ES5
Math.max.apply(Math, [2,100,1,6,43]) // 100In ES6, you can use the spread operator:
ES6
Math.max(...[2,100,1,6,43]) // 100Also, we went from concat arrays to use spread
operator:
ES5
var array1 = [2,100,1,6,43];
var array2 = ["a", "b", "c", "d"];
var array3 = [false, true, null, undefined];
console.log(array1.concat(array2, array3));
In ES6, you can flatten nested arrays using the spread operator:
ES6
const array1 = [2,100,1,6,43];
const array2 = ["a", "b", "c", "d"];
const array3 = [false, true, null, undefined];
console.log([...array1, ...array2, ...array3]);JavaScript has gone through a lot of changes. This article covers most of the core features that every JavaScript developer should know. Also, we cover some best practices to make your code more concise and easier to reason about.
If you think there are some other MUST KNOW feature let me know in the comments below and I will update this article.
Now you can set a variable key’s value within an object literal declaration.
// old way - myKey used after the object declaration
const myKey = "key3";
const obj = {
    key1 : "One",
    key2 : "Two"
};
obj[ myKey ] = "Three";

// new way
const obj2 = {
    key1 : "One",
    key2 : "Two",
    [ myKey ] : "Three"
};A simple way to write anonymous functions and great for one liners and simple predicates.
const calculateTotal = total => total * 1.1;
calculateTotal( 10 ) // 11

// Cancel an event - another tiny task
const brickEvent = e => e.preventDefault();
document.querySelector( "div" ).addEventListener( "click", brickEvent );
As you can see from the examples arrow functions utilise implicit returns and a massive reduction of syntax like curly braces and parenthesis.
These two functions are an expanded indexOf() which
allows you to specify methods to calculate the desired item
condition.
const ages = [ 12, 19, 6, 4 ];
const firstAdult = ages.find( age => age >= 18 ); // 19
const firstAdultIndex = ages.findIndex( age => age >= 18 ) // 1
The spread operator signals that an array or iterable object should have its contents split into separate arguments within a call.
// Pass to function that expects separate multiple arguments
const numbers = [ 9, 4, 7, 1 ];
Math.min( ...numbers ); // 1

// Convert NodeList to Array
const divArray = [ ...document.querySelectorAll( "div" )];

// Convert Arguments to Array
const argsArray = [ ...arguments ];
In the past developers have had to use workarounds to convert things like NodeLists into usable arrays with all the methods available.
Developers are used to generating strings with concatenation when
variables are part of the output. You are probably familiar with
something like
console.log( "This is the result : " + result );. Template
literals bring a new syntax to write such statements.
// Multiline String
const myString = `Hello
I'm a new line`; // no error

// Basic interpolation
const obj = { x : 1, y : 2 };
console.log( `You total is: ${ obj.x + obj.y }` ); // your total is: 3Developers used to other languages might be perplexed by the lack of default parameters in javascript. In other languages a function will not run unless all the arguments, with the correct type, is supplied when called but not javascript. Now with ES6 one can provide default arguments that will be used if not supplied when the function is called.
// Basic usage
function greet( name = "Anon" ){
    console.log( `Hello ${ name }!` );
}
greet() // Hello Anon!

// You can have a function too!
function greet( name = "Anon", callback = function(){}){
    console.log( `Hello ${ name }!` );
    // No more "callback && callback()" (no conditional)
    callback();
}
And there we have it. Only small features but the type that you will use all the time and wonder why it’s taken this long for them to appear. Enjoy.
A Tutorial and discussion about three dots in ES6
Workarounds to utilise the arguments object within an internal function and mapping it to a proper array allowing array-style functions
function outerFunction() {
    // store arguments into a separated variable
    var argsOuter = arguments;
    function innerFunction() {
        // args is an array-like object
        var even = Array.prototype.map.call(argsOuter, function(item) {
            // do something with argsOuter
            return item;
        });
        console.log('The arguments accessed in another function in an array structure', even);
    }
    innerFunction();
}

outerFunction([{
    'test' : 'ming face',
    'best' : 'ming taste'
}, 'a string of finest strung', 78, [1,2,3,4,5]
]);
The current ES5 way to merge arrays without having to iterate over each item and push
var fruits = ['banana'];
var moreFruits = ['apple', 'orange'];
Array.prototype.push.apply(fruits, moreFruits);
console.log('A merged array using ES5-styled Array.prototype.slice.call', fruits);
// => ['banana', 'apple', 'orange']function countArguments(...args) {
return args.length;
}
console.log('How many arguments are we passing? : ', countArguments('welcome', 'to', 'Earth'));let cold = ['autumn', 'winter'];
let warm = ['spring', 'summer'];
// construct an array
console.log([...cold, ...warm]);
//destruct an array
let otherSeasons, autumn, ming;
// with deconstruction, the first two items in the cold array are set to the variables autumn and ming while the rest of the entries are passed to otherSeasons. Now, this final invocation yields an empty array as there are only two items in the cold array.
[autumn, ming, ...otherSeasons] = cold;
console.log(otherSeasons, autumn, ming);
// function arguments from an array
cold.push(...warm);
console.log(cold);
// Improved parameters access
// Rest parameter
function sumOnlyNumbers() {
var args = arguments;
var numbers = filterNumbers();
return numbers.reduce((sum, element) => sum + element);
function filterNumbers() {
return Array.prototype.filter.call(args, element => typeof element === 'number');
}
}This is a rewritten version using the three dots to set the arguments object to a parameter named args. Since there is no naming conflict with the arguments object of the inner function we can use args in both functions. Also worth noting is that args is an array so we can call filter directly without using Array.prototype.filter.call(uh, uh)
function sumOnlyNumbers(...args) {
    let numbers = filterNumbers();
    return numbers.reduce((sum, element) => sum + element);
    function filterNumbers() {
        return args.filter(element => typeof element === 'number');
    }
}

console.log(sumOnlyNumbers(1, 'Hello', 5, false, {'obj' : 'Not a number'}, ['also', 'not', 'a', 'number'], 'Answer should be 6'));
A final note about the ‘rest’ parameter. It’s unlikely that all of your functions take no additional named parameters so ensure that the ‘rest’ parameter comes last of all when declaring your function.
In this example, the first parameter is assigned to ‘type’ and the rest are part of the ‘items’ array. We then return an array of items that match the type. The items array does not contain the first param : that is assigned to type only.
function filter(type, ...items) {
    return items.filter(item => typeof item === type);
}

console.log(filter('boolean', true, 0, false));
console.log(filter('number', 9, false, 'Fifty', '90', 60, 459));(function() {
let outerArguments = arguments;
const concat = (...items) => {
console.log(arguments === outerArguments) // => true
return items.reduce((result, item) => result + item, '');
};
console.log(concat(1, 5, 'nine')); // => '15nine'
})();An example of the .apply() method of ES5
let tcountries = ['Moldova', 'Ukraine'];
tcountries.push.apply(tcountries, ['USA', 'Japan']);
console.log(tcountries);
// => mol, ukr, usa, japón
You can see the redundancy of supplying the array as part of the apply() method. Using the ‘spread’ operator we could do it like this :
let countries = ['Moldova', 'Ukraine'];
countries.push(...['USA', 'Japan']);
countries.push('tUSA', 'tJapan');
console.log(countries);
This example is a little trite as witnessed above. One can simply push multiple items outside of the array structure. I guess this becomes more useful when one has many items within an existing array.
class King {
    constructor(name, country) {
        this.name = name;
        this.country = country;
    }
    getDescription() {
        return `${this.name} leads ${this.country}`;
    }
}
You cannot do this with apply : spread operator configures the constructor invocation arguments from an array
var details = ['Alexander the Great', 'Greece'];
var Alexander = new King(...details);
console.log(Alexander.getDescription());

// You can mix spread operators and regular arguments together, observe
var numbers = [1, 2];
var evenNumbers = [4, 8];
const zero = 0;
numbers.splice(0, 2, ...evenNumbers, zero);
console.log(numbers); // => 4, 8, 0// create array with initial elements from another array :
var initial = [0, 1];
var numbers1 = [...initial, 5, 7];
let numbers2 = [4, 8, ...initial];
console.log(numbers2);
// concatenate 2 or more arrays :
var odds = [1, 5, 7];
var evens = [4, 6, 8];
var all = [...odds, ...evens];
console.log(all); // concatenates odds and evens into all
// Clone an array instance :
var words = ['Hi', 'Hello', 'Good day'];
var otherWords = [...words];
console.log(otherWords); // words array
console.log(otherWords === words) // false
// So it clones the array but not 'on the contained elements' ; it's not a deep clone (?)Destructing assignments are powerful expressions to extract data from arrays and objects
var seasons = ['invierno', 'primavera', 'verano', 'otoño'];
var coldSeason, otherSeason;
[coldSeason, ...otherSeason] = seasons;
console.log('Cold : ', coldSeason, 'Others : ', otherSeason);The spread operator can extract data from any object or primitive that is iterable and adheres to the iterable protocol…
var str = 'hi';
var iterator = str[Symbol.iterator]();
console.log(iterator.toString()) // => '[object String Iterator]'
console.log(iterator.next());
console.log(iterator.next());
console.log(iterator.next());
console.log([...str]);
// you can see that the string variable has the iteration protocol that calls next() until done(). This allows us to store the characters of the string in an array using the spread operator similar to [].explode();

function ito() {
    var index = 0;
    return {
        next : () => ({ // Conform to Iterator Protocol
            done : index >= this.length,
            value : this[index++]
        })
    };
}
var arrayLike = {
    0 : 'Cat',
    1 : 'Bird',
    length : 2
};
arrayLike[Symbol.iterator] = ito;
var array = [...arrayLike];
console.log(array); // => boom? BOOM! Note, the tutorial suggested the function above be called iterator but this failed me. This only worked by changing the function name to ito, eh.ES 2017 introduces two new Object methods. Let’s explore. In javascript an object is a collection of related data that is stored in key/value pairs. We will work with this object in this guide:
const population = {
    tokyo : 37833000,
    delhi : 24953000,
    shangahi : 22991000
};
The entries on the left (city names) are the keys whilst the right entries (populations) are the values.
This is not a new method in ES 2017 but quite handy.
Object.keys() iterates over all the keys in the object. It
works like so:
Object.keys( population );
// [ 'tokyo', 'delhi', 'shangai' ];The very same as Object.keys but, claro, it will return
the values rather than the keys. Once more:
Object.values( population );
// [ 37833000, 24953000, 22991000 ]Now heres a thing. Why not return both bits of data in the object?
This should prove useful when iterating over an object as one can use
the lovely Array methods that make such traversals easy and
easier to read. The resulting output will be an array of arrays:
Object.entries( population );
// [[ 'tokyo', 37833000 ], [ 'delhi', 2453000 ], [ 'shanghai', 22991000 ]]
And that’s a wrap! Very easy but could prove very useful. Go forth and use these methods when you see fit.
Before we begin we must understand what an iterator is. Let’s summarise the key points:
next() method
which returns the next item in the sequence.This method returns a new Array Iterator object
containing the keys for each item in the array. It can
be advanced with next():
let arr = [ 'a', 'b', 'c' ];
let iterator = arr.keys();

iterator.next(); // { value : 0, done : false }
iterator.next(); // { value : 1, done : false }
iterator.next(); // { value : 2, done : false }
iterator.next(); // { value : undefined, done : true }This method works similarly as Array.keys but bare in
mind it isn’t well supported in browsers as yet:
let arr = [ 'a', 'b', 'c' ];
let iterator = arr.values();

iterator.next().value(); // a
iterator.next().value(); // b
iterator.next().value(); // c
iterator.next().value(); // undefinedAs you may have guessed this method returns an object with both the
key and the value that can be iterated
using the next() method:
let arr = [ 'a', 'b', 'c' ];
let iterator = arr.entries();

iterator.next().value(); // [ 0, 'a' ]
iterator.next().value(); // [ 1, 'b' ]
iterator.next().value(); // [ 2, 'c' ]
iterator.next().value(); // undefined
Fin. Wait a minute. This doesn’t seem particularly useful compared to
the Object.entries method but I’m sure one can find uses to
programatically iterate through an array with access to the
keys and values. I can’t think of one
off the top of my head but I’m sure they exist.
A brief lesson on two ES6 Array methods;
Array.find and Array.findIndex.
The Array.find() method returns the first element in an
array that passes a given test. The rules that govern this are as
follows :
find() method executes a callback function once for
each element in the array until it finds a value that matches the
predicate.find() does not mutate or change the original
array.A basic example to get us up and running:
const arr = [ "a", "b", "c" ];
arr.find( k => k == "b" );
// "b"
We pass an anonymous function to find() with the
predicate item equals character “b”. The function then iterates over the
array checking if each entry is equal to “b”. In this case the second
entry matches the condition and the value is returned.
For our next example we will attempt to extract an odd number from an array of all-but-one even numbered array item values.
const arr = [ 2, 4, 6, 8, 9, 10, 12, 14 ];
function isOdd( i ){
    return i % 2 != 0;
}
arr.find( isOdd );
// 9
All pretty straightforward I trust. In this case we pass in a named
function to find() that checks for an odd number. This
function accepts one parameter which will be the array item.
This method is exactly the same as the find() method in
deed and intention but will of course return the key rather than the
value. Should the method prove false then -1 is returned to
denote nothing was found; similar to indexOf().
Using the same example as above, searching for an item with the value
“b”, we pass the same anonymous function to findIndex() and
get the index in return:
const arr = [ "a", "b", "c" ];
arr.findIndex( k => k == "b" );
// 1 Let’s use the same example again for example 2, what will the answer be?
const arr = [ 2, 4, 6, 8, 9, 10, 12, 14 ];
function isOdd( i ){
    return i % 2 != 0;
}
arr.findIndex( isOdd );
// 4
And that’s it for Array.find() and
Array.findIndex().
ES 2017 introduced asynchronous functions. Async functions are
essentially a cleaner way to work with asynchronous code in
javascript. In order to understand exactly what these
are, and how they work, we first need to understand Promises.
Promises and
callbacks).Promises.Promise. If the function
throws an error, the Promise will be rejected. If the
function returns a value the Promise will be resolved.Writing an async function is quite simple. You just need to add the
async keyword prior to function:
// Normal function
function add( x, y ){
    return x + y;
}
// Async function
async function add( x ,y ){
    return x + y;
}Async functions can make use of the await expression.
This will pause the async function and wait for the
Promise to resolve prior to moving on.
You have the gist of it so let’s try it out. First we’re going to
create some code using Promises. Once we’ve got something
working we’ll rewrite our function using async/await so you can see just
how much simpler it is…
function doubleAfter2Seconds( x ){
    return new Promise( resolve => {
        setTimeout(() => {
            resolve( x * 2 );
        }, 2000 );
    });
}
In this code we have a function called
doubleAfter2Seconds. This function will take a number as
input and will resolve two seconds later with the number doubled.
We can invoke our function and pass in in the number 10
to try it out. To do this, we’ll call our function while passing in
10. Then, after the Promise has resolved,
we’ll take our returned value and log it to the console. Here’s what
this would look like:
doubleAfter2Seconds( 10 ).then( r => { console.log( r ); });
Super! But what if we want to run a few different values through our function and add the result? Unfortunately we can’t simply add our invocations together and log them:
let sum =   doubleAfter2Seconds( 10 ) +
            doubleAfter2Seconds( 20 ) +
            doubleAfter2Seconds( 30 );
console.log( sum ); // undefined
The problem with the above code is it doesn’t actually wait for our
Promises to resolve before logging to the console. One
possible solution if to set up a promise chain. To do this we’ll create
a new function called addPromise. Our function will take an
input value and will return a Promise. Here’s what the
boilerplate code looks like:
function addPromise( x ){
    return new Promise( resolve => {
        // Code goes here…
        // resolve()
    });
}
Great. Now we can add in our calls to our
doubleAfter2Seconds function Once we’re done, we can
resolve with our new sum. In this example we should be returning
x + 2*a + 2*b + 2*c.
function addPromise( x ){
    return new Promise( resolve => {
        doubleAfter2Seconds( 10 ).then( a => {
            doubleAfter2Seconds( 20 ).then( b => {
                doubleAfter2Seconds( 30 ).then( c => {
                    resolve( x + a + b + c );
                })
            })
        })
    });
}
Yikes! Isn’t that the type of horrible, nested crap modern javascript was supposed to move away from? And what is actually going on here?
addPromise. This function
accepts one parameter.new Promise that we’ll be
returning. Note that for the sake of simplicity we’re not handling
rejections/errors.doubleAfter2Seconds. The first
call takes 10 as its parameter and two seconds later the
value of 20 is returned to the next function
(.then) in the form of the parameter a.20, 30 returning 40, 60 respectively.doubleAfter2Seconds we then
resolve the Promise and return the sum of all the numbers
processed (130).Promises to Async/AwaitEven that small example was horrible to write wasn’t it? Remove the
addPromise function and create a new function called
addAsync. This function will have the exact same purpose as
our addPromise did.
async function addAsync( x ){
    const a = await doubleAfter2Seconds( 10 );
    const b = await doubleAfter2Seconds( 20 );
    const c = await doubleAfter2Seconds( 30 );
    return x + a + b + c;
}
Huh. That’s the summation of the refactor. I must say I’m disappointed. It would seem to be a bizarrely specific function that doesn’t have much use. Let’s try and rewrite it to be a bit more useful.
I tried rewriting it using Array methods but it turns
out one can’t use async/await in this fashion. For example, using
.map() would allow one to pass any function to the
parent function and use it as the .map() parameter prefixed
with await. This seems logical to me but alas all that is
mapped are the individual Promises. They do resolve but one
can’t grab the results in order to then .reduce() the
values to a total. So maybe you have to pass an async function that then
calls the actual function you want to run (although I did that with an
async arrow function). This all begins to sound like unnecessary
complexity for something very simple. Actually, you know, thinking about
it none of this makes sense. Using .map() of course expects
synchronous behaviour as you are moving sequentially through an
array. Bleh.
Sometimes modern Javascript projects get out of hand. A major culprit in this can be the messy handling of asynchronous tasks, leading to long, complex, and deeply nested blocks of code. Javascript now provides a new syntax for handling these operations, and it can turn even the most convoluted asynchronous operations into concise and highly readable code.
First a brief bit of history. In the late 1990s, Ajax was the first major breakthrough in asynchronous Javascript. This technique allowed websites to pull and display new data after the HTML had been loaded, a revolutionary idea at a time when most websites would download the entire page again to display a content update. The technique (popularized in name by the bundled helper function in jQuery) dominated web-development for all of the 2000s, and Ajax is the primary technique that websites use to retrieve data today, but with XML largely substituted for JSON.
When NodeJS was first released in 2009, a major focus of the server-side environment was allowing programs to gracefully handle concurrency. Most server-side languages at the time handled I/O operations by blocking the code completion until the operation had finished. Nodejs instead utilized an event-loop architecture, such that developers could assign “callback” functions to be triggered once non-blocking asynchronous operations had completed, in a similar manner to how the Ajax syntax worked.
A few years later, a new standard called “Promises” emerged in both NodeJS and browser environments, offering a powerful and standardized way to compose asynchronous operations. Promises still used a callback based format, but offered a consistent syntax for chaining and composing asynchronous operations. Promises, which had been pioneered by popular open-source libraries, were finally added as a native feature to Javascript in 2015.
Promises were a major improvement, but they still can often be the cause of somewhat verbose and difficult-to-read blocks of code.
Now there is a solution.
Async/await is a new syntax (borrowed from .NET and C#) that allows us to compose Promises as though they were just normal synchronous functions without callbacks. It’s a fantastic addition to the Javascript language, added last year in Javascript ES7, and can be used to simplify pretty much any existing JS application.
We’ll be going through a few code examples.
No libraries are required to run these examples. Async/await is fully supported in the latest versions of Chrome, Firefox, Safari, and Edge, so you can try out the examples in your browser console. Additionally, async/await syntax works in Nodejs version 7.6 and higher, and is supported by the Babel and Typescript transpilers, so it can really be used in any Javascript project today.
If you want to follow along on your machine, we’ll be using this dummy API class. The class simulates network calls by returning promises which will resolve with simple data 200ms after being called.
class Api {
  constructor () {
    this.user = { id: 1, name: 'test' }
    this.friends = [ this.user, this.user, this.user ]
    this.photo = 'not a real photo'
  }

  getUser () {
    return new Promise((resolve, reject) => {
      setTimeout(() => resolve(this.user), 200)
    })
  }

  getFriends (userId) {
    return new Promise((resolve, reject) => {
      setTimeout(() => resolve(this.friends.slice()), 200)
    })
  }

  getPhoto (userId) {
    return new Promise((resolve, reject) => {
      setTimeout(() => resolve(this.photo), 200)
    })
  }

  throwError () {
    return new Promise((resolve, reject) => {
      setTimeout(() => reject(new Error('Intentional Error')), 200)
    })
  }
}
Each example will be performing the same three operations in sequence: retrieve a user, retrieve their friends, retrieve their picture. At the end, we will log all three results to the console.
Here is an implemention using nested promise callback functions.
function callbackHell () {
  const api = new Api()
  let user, friends
  api.getUser().then(function (returnedUser) {
    user = returnedUser
    api.getFriends(user.id).then(function (returnedFriends) {
      friends = returnedFriends
      api.getPhoto(user.id).then(function (photo) {
        console.log('callbackHell', { user, friends, photo })
      })
    })
  })
}
This probably looks familiar to anyone who has worked on a Javascript project. The code block, which has a reasonably simple purpose, is long, deeply nested, and ends in this…
      })
    })
  })
}
In a real codebase, each callback function might be quite long, which can result in huge and deeply indented functions. Dealing with this type of code, working with callbacks within callbacks within callbacks, is what is commonly referred to as “callback hell”.
Even worse, there’s no error checking, so any of the callbacks could fail silently as an unhandled promise rejection.
Let’s see if we can do any better.
function promiseChain () {
  const api = new Api()
  let user, friends
  api.getUser()
    .then((returnedUser) => {
      user = returnedUser
      return api.getFriends(user.id)
    })
    .then((returnedFriends) => {
      friends = returnedFriends
      return api.getPhoto(user.id)
    })
    .then((photo) => {
      console.log('promiseChain', { user, friends, photo })
    })
}
One nice feature of promises is that they can be chained by returning another promise inside each callback. This way we can keep all of the callbacks on the same indentation level. We’re also using arrow functions to abbreviate the callback function declarations.
This variant is certainly easier to read than the previous, and has a better sense of sequentiality, but is still very verbose and a bit complex looking.
What if it were possible to write it without any callback functions? Impossible? How about writing it in 7 lines?
async function asyncAwaitIsYourNewBestFriend () {
  const api = new Api()
  const user = await api.getUser()
  const friends = await api.getFriends(user.id)
  const photo = await api.getPhoto(user.id)
  console.log('asyncAwaitIsYourNewBestFriend', { user, friends, photo })
}
Much better. Calling “await” in front of a promise pauses the flow of the function until the promise has resolved, and assigns the result to the variable to the left of the equal sign. This way we can program an asynchronous operation flow as though it were a normal synchronous series of commands.
I hope you’re as excited as I am at this point.
Note that “async” is declared at the beginning of the function declaration. This is required and actually turns the entire function into a promise. We’ll dig into that later on.
Async/await makes lots of previously complex operations really easy. For example, what if we wanted to sequentially retrieve the friends lists for each of the user’s friends?
Here’s how fetching each friend list sequentially might look with normal promises.
function promiseLoops () {
  const api = new Api()
  api.getUser()
    .then((user) => {
      return api.getFriends(user.id)
    })
    .then((returnedFriends) => {
      const getFriendsOfFriends = (friends) => {
        if (friends.length > 0) {
          let friend = friends.pop()
          return api.getFriends(friend.id)
            .then((moreFriends) => {
              console.log('promiseLoops', moreFriends)
              return getFriendsOfFriends(friends)
            })
        }
      }
      return getFriendsOfFriends(returnedFriends)
    })
}
We’re creating an inner-function that recursively chains promises for the fetching friends-of-friends until the list is empty. Ugh. It’s completely functional, which is nice, but this is still an exceptionally complicated solution for a fairly straightforward task.
Note - Attempting to simplify the
promiseLoops()function usingPromise.all()will result in a function that behaves in significantly different manner. The intention of this example is to run the operations sequentially (one at a time), whereasPromise.all()is used for running asynchronous operations concurrently (all at once).Promise.all()is still very powerful when combined with async/await, however, as we’ll see in the next section.
This could be so much easier.
async function asyncAwaitLoops () {
  const api = new Api()
  const user = await api.getUser()
  const friends = await api.getFriends(user.id)

  for (let friend of friends) {
    let moreFriends = await api.getFriends(friend.id)
    console.log('asyncAwaitLoops', moreFriends)
  }
}
No need to write any recursive promise closures. Just a for-loop. Async/await is your friend.
It’s a bit slow to get each additional friend list one-by-one, why not do them in parallel? Can we do that with async/await?
Yeah, of course we can. It solves all of our problems.
async function asyncAwaitLoopsParallel () {
  const api = new Api()
  const user = await api.getUser()
  const friends = await api.getFriends(user.id)
  const friendPromises = friends.map(friend => api.getFriends(friend.id))
  const moreFriends = await Promise.all(friendPromises)
  console.log('asyncAwaitLoopsParallel', moreFriends)
}
To run operations in parallel, form an array of promises to be run,
and pass it as the parameter to Promise.all(). This returns
a single promise for us to await, which will resolve once all of the
operations have completed.
There is, however, one major issue in asynchronous programming that we haven’t addressed yet: error handling. The bane of many codebases, asynchronous error handling often involves writing individual error handling callbacks for each operation. Percolating errors to the top of the call stack can be complicated, and normally requires explicitly checking if an error was thrown at the beginning of every callback. This approach is tedious, verbose and error-prone. Furthermore, any exception thrown in a promise will fail silently if not properly caught, leading to “invisible errors” in codebases with incomplete error checking.
Let’s go back through the examples and add error handling to each. To test the error handling, we’ll be calling an additional function, “api.throwError()”, before retrieving the user photo.
Let’s look at a worst-case scenario.
function callbackErrorHell () {
  const api = new Api()
  let user, friends
  api.getUser().then(function (returnedUser) {
    user = returnedUser
    api.getFriends(user.id).then(function (returnedFriends) {
      friends = returnedFriends
      api.throwError().then(function () {
        console.log('Error was not thrown')
        api.getPhoto(user.id).then(function (photo) {
          console.log('callbackErrorHell', { user, friends, photo })
        }, function (err) {
          console.error(err)
        })
      }, function (err) {
        console.error(err)
      })
    }, function (err) {
      console.error(err)
    })
  }, function (err) {
    console.error(err)
  })
}
This is just awful. Besides being really long and ugly, the control flow is very unintuitive to follow since it flows from the outside in, instead of from top to bottom like normal, readable code. Awful. Let’s move on.
We can improve things a bit by using a combined Promise “catch” method.
function callbackErrorPromiseChain () {
  const api = new Api()
  let user, friends
  api.getUser()
    .then((returnedUser) => {
      user = returnedUser
      return api.getFriends(user.id)
    })
    .then((returnedFriends) => {
      friends = returnedFriends
      return api.throwError()
    })
    .then(() => {
      console.log('Error was not thrown')
      return api.getPhoto(user.id)
    })
    .then((photo) => {
      console.log('callbackErrorPromiseChain', { user, friends, photo })
    })
    .catch((err) => {
      console.error(err)
    })
}
This is certainly better; by leveraging a single catch function at the end of the promise chain, we can provide a single error handler for all of the operations. However, it’s still a bit complex, and we are still forced to handle the asynchronous errors using a special callback instead of handling them the same way we would normal Javascript errors.
We can do better.
async function aysncAwaitTryCatch () {
  try {
    const api = new Api()
    const user = await api.getUser()
    const friends = await api.getFriends(user.id)

    await api.throwError()
    console.log('Error was not thrown')

    const photo = await api.getPhoto(user.id)
    console.log('async/await', { user, friends, photo })
  } catch (err) {
    console.error(err)
  }
}
Here, we’ve wrapped the entire operation within a normal try/catch block. This way, we can throw and catch errors from synchronous code and asynchronous code in the exact same way. Much simpler.
I mentioned earlier that any function tagged with “async” actually returns a promise. This allows us to really easily compose asynchronous control flows.
For instance, we can reconfigure the earlier example to return the user data instead of logging it. Then we can retrieve the data by calling the async function as a promise.
async function getUserInfo () {
  const api = new Api()
  const user = await api.getUser()
  const friends = await api.getFriends(user.id)
  const photo = await api.getPhoto(user.id)
  return { user, friends, photo }
}

function promiseUserInfo () {
  getUserInfo().then(({ user, friends, photo }) => {
    console.log('promiseUserInfo', { user, friends, photo })
  })
}
Even better, we can use async/await syntax in the receiver function too, leading to a completely obvious, even trivial, block of asynchronous programing.
async function awaitUserInfo () {
  const { user, friends, photo } = await getUserInfo()
  console.log('awaitUserInfo', { user, friends, photo })
}
What if now we need to retrieve all of the data for the first 10 users?
async function getLotsOfUserData () {
  const users = []
  while (users.length < 10) {
    users.push(await getUserInfo())
  }
  console.log('getLotsOfUserData', users)
}
How about in parallel? And with airtight error handling?
async function getLotsOfUserDataFaster () {
  try {
    const userPromises = Array(10).fill(getUserInfo())
    const users = await Promise.all(userPromises)
    console.log('getLotsOfUserDataFaster', users)
  } catch (err) {
    console.error(err)
  }
}With the rise of single-page javascript web apps and the widening adoption of NodeJS, handling concurrency gracefully is more important than ever for Javascript developers. Async/await alleviates many of the bug-inducing control-flow issues that have plagued Javascript codebases for decades and is pretty much guaranteed to make any async code block significantly shorter, simpler, and more self-evident. With near-universal support in mainstream browsers and NodeJS, this is the perfect time to integrate these techniques into your own coding practices and projects.
Krasimir Tsonev
Sometimes when you learn something new you get really excited. Excited to that level so you want to teach it to someone. That is the case with the concept which I found a couple of months ago. It is an implementation of the command pattern using generators. Or the well known saga used in the redux-saga library. In this article we will see how the idea makes our asynchronous code simpler and easy to read. We will also implement it ourself using generators.
If you are lazy and don’t want to ready everything check the banica repo. It is all the stuff that we say here but wrapped in a library.
A generator is an object that conforms iterable
and iterator
protocols. Which means that it is an object that has a
Symbol.iterator key responding to a function returning an
iterator. And the iterator defines a standard way to produce values.
Every string in JavaScript for example has this characteristics. For
example:
const str = 'hello';const iterator = str[Symbol.iterator]();
iterator.next(); // {value: "h", done: false}
iterator.next(); // {value: "e", done: false}
iterator.next(); // {value: "l", done: false}
iterator.next(); // {value: "l", done: false}
iterator.next(); // {value: "o", done: false}
iterator.next(); // {value: undefined, done: true}
By calling the iterator’s next method we are asking for
the next value in a sequence of values. It is the same with generators.
Once we initialize a generator we may fetch values from it.
To define a generator we use a special type of function syntax
containing an asterisk before the name of the function and
after the function keyword.
function* createGenerator() {  /* ... */ }
const generator = createGenerator();generator.next();
// {value: undefined, done: true}
Once we call that function we receive a generator object with an
iterator-ish API. We also have a return method that
completes the generator with a given value and throw which
resumes the generator and throws an error inside.
The most exciting part in the generators is done via the
yield keyword. The yield expression allows us
to pause the function and gives control to the code that runs the
generator. Later when we call next we resume the generator
with an optional input. Here is an example:
function* formatAnswer() {
    const answer = yield 'foo';
    return `The answer is ${ answer }`;
}
const generator = formatAnswer();
console.log(generator.next()); // {value: "foo", done: false}
console.log(generator.next(42)); // {value: "The answer is 42", done: true}
The first next pauses the function just before assigning
a value to the answer constant. We receive foo
as a value and done is false
because the generator is not finished yet. The followed
next call resumes the function with 42 which
gets assigned to answer. And because we have a
return statement the generator is completed and we have
done set to true.
This type of communication between the generator and the code that iterates it is what we will be using for implementing the command pattern. That is what excited me the most because we are able to handle asynchronous processes by writing code that looks synchronous.
The big deal using the command pattern is to split the code that wants to do something from the code that is actually doing it. Let’s take the following example:
const player = function (name) {
    return {
        moveLeft() {
            console.log(`${ name } moved to the left`);
        },
        moveRight() {
            console.log(`${ name } moved to the right`);
        },
        jump() {
            console.log(`${ name } jumped`);
        }
    }
}
const p = player('Foo');
p.moveLeft(); // Foo moved to the leftp.jump(); // Foo jumped
We see how the code that wants to make the player jumping is actually
doing it (p.jump() call). That is fine but we may use
another implementation:
const player = function (name) {
    const commands = {
        moveLeft() {
            console.log(`${ name } moved to the left`);
        },
        moveRight() {
            console.log(`${ name } moved to the right`);
        },
        jump() {
            console.log(`${ name } jumped`);
        }
    }

    return {
        execute(command) {
            commands[command.action]();
        }
    }
}
const p = player('Foo');
p.execute({ action: 'moveLeft' }); // Foo moved to the left
p.execute({ action: 'jump' }); // Foo jumped
We see how that new implementation introduces one more level of
abstraction. Now the code that wants to make the player move/jump is not
actually doing it. This helps a lot if we have to change the API of the
player. Like for example if we want to rename
moveLeft to moveBackward and
moveRight to moveForward. We don’t have to
amend all the places which are using these methods but only create an
alias in the execute function. Having such separation also
helps us inject logic before the actual method invocation. And if that
method is an asynchronous operation we may simply handle it at this
level.
Let’s keep the idea of having a player that we need to
move and jump. We also want to provide command objects like
{ action: 'jump' } and someone else handle the actual
work.
function iterateOverTheGenerator(gen, name) {
    const status = gen.next();
    if (status.done) return;
    switch (status.value.action) {
        case 'moveLeft': console.log(`${ name } moved to the left`);
            break;;
        case 'moveRight': console.log(`${ name } moved to the right`);
            break;
        case 'jump': console.log(`${ name } jumped`);
            break;
        }
        return iterateOverTheGenerator(gen, name);
}
function* createGenerator() {
    yield { action: 'moveLeft' };
    yield { action: 'jump' };
}
const generator = createGenerator();/*It prints:  Foo moved to the left  Foo jumped*/
iterateOverTheGenerator(generator, 'Foo');
Very often when working with a generator we have a helper that loops
over the produced values. Remember how the generator object is actually
an iterator. What happens when calling next is that the
function pauses at the first yield expression and the
value in the
{ done: <boolean>, value: <something> } object
is what is yielded. In our example this is the command
object. We see what’s the desired action and call again
iterateOverTheGenerator so we could fetch another
instruction. The process continues till we reach the end of the
generator (done is true).
Of course iterateOverTheGenerator is really specific and
it knows a lot about what kind of commands we want to execute. The goal
in this article is to produce a more robust utility that accepts a
generator, iterates over its values and execute functions.
More or less the commands that we want to handle outside of the generator are:
That is pretty much all the different types of function calls that I see in my daily JavaScript work. Let’s start with the simplest one - handle synchronous function call outside of the generator.
First we need a function for creating the command object. We don’t
want to write { action: <something> } all the time so
it will be nice if we have a helper for that.
function call(func, ...args) {
    return { type: 'call', func, args };
}
call(mySynchronousFunction, 'foo', 'bar');// { type: 'call', func: <mySynchronousFunction>, args: ['foo', 'bar' ] }
For the purpose of this article we may skip the type key
because all we are going to do is calling functions but it is a good
idea to make that process explicit. Later we may decide to extend this
layer and add something different like fetching data from a store or
dispatching an action (if we work in Flux-ish context).
Let’s use the same player concept and say that our main
object has just two methods - moveLeft and
moveRight. They will update an internal variable
position by given steps. We also have a
getPosition which simply returns the value of the
position variable.
const player = function () {
    var position = 0;
    return {
        moveLeft(steps) {
            position -= steps;
        },
        moveRight(steps) {
            position += steps;
        },
        getPosition() {
            return position;
        }
    }
}
Now it gets interesting. We have to write a generator function that
uses the call helper to execute the methods of the
player.
function* game(player) {
    yield call(player.moveLeft, 2);
    yield call(player.moveRight, 1);
    const position = yield call(player.getPosition);
    console.log(`The position is ${ position }.`);
}
We basically say “Move the player two steps to the left and one
step to the right. Then give me the player’s position”. The
game generator itself is doing nothing. That is because we
yield only JavaScript objects. Instructions of what we want
to happen but without doing it. We could easily write the following
equivalent:
function* game(player) {
    yield { type: 'call', func: player.moveLeft, args: [2] };
    yield { type: 'call', func: player.moveRight, args: [1] };
    const position = yield { type: 'call', func: player.getPosition, args: [] };
    console.log(`The position is ${ position }.`);
}
The next step in our implementation is to build the receiver. The bit which iterates the generator and executes our commands.
function receiver(generator) {
    const iterate = function ({ value, done }) {
        if (done) return value;
        if (value.type === 'call') {
            const result = value.func(...value.args);
            return iterate(generator.next(result));
        }
    }
    return iterate(generator.next());
}
receiver(game(player()));/*The result in the console is "The position is -1".*/
The first thing that we do in the receive is to call
generator.next and pass the result to our internal
iterate function. It will be responsible for recursively
calling next till we complete the generator. It also makes
sure that we resume the generator with the result of the last executed
command. There are four calls of iterate:
done is false and value
contains a moveLeft commanddone is false and value
contains a moveRight commanddone is false and value
contains a getPosition commanddone is true and value is
undefined because we don’t have a return statement in our
game generator.What if we want to save the position in a database via API. Let’s
write a save function in our player which
simulates an async process.
function player() {
    var position = 0;
    return {
        moveLeft(steps) {...},
        moveRight(steps) {...},
        getPosition() {...},
        save() {
            return new Promise(resolve => setTimeout(() => resolve('successful'), 1000));
        }
    }
}
When we call save we will receive a promise which gets
resolved a second later. Inside the game generator the
usage of that function will look synchronous but in fact is not:
function* game(player) {
    yield call(player.moveLeft, 2);
    yield call(player.moveRight, 1);
    const position = yield call(player.getPosition);
    console.log(`The position is ${ position }.`);
    const resultOfSaving = yield call(player.save);
    console.log(`Saving is ${ resultOfSaving }.`);
}
Our receiver now has to be smart enough to understand
that the result of this particular command is a promise. It should also
wait till that promise is resolved and resume the generator with the
resolved value.
function receiver(generator) {
    const iterate = function ({ value, done }) {
        if (done) return value;
        if (value.type === 'call') {
            const result = value.func(...value.args);
            if (result && typeof result.then !== 'undefined') { // <-- Oh wait, that's a promise
                result.then(resolvedValue => iterate(generator.next(resolvedValue)));
            } else {
                return iterate(generator.next(result));
            }
        }
    }
    return iterate(generator.next());
}
We now examine the result of the command and check if it has a
then method. If yes we assume that this is a promise. We
wait till it is resolved and again continue with the same recursion. If
we run the code we will see The position is -1. and then a
second later Saving is successful.. Here we can see the
beauty of this pattern. Because of the pause-resume characteristic of
the generator we are able to handle an asynchronous operation and hide
it behind synchronous code.
Let’s extract the two console logs into a separate generator called
finish:
function* finish(player) {
    const position = yield call(player.getPosition);
    console.log(`The position is ${ position }.`);
    const resultOfSaving = yield call(player.save);
    console.log(`Saving is ${ resultOfSaving }.`);
}
function* game(player) {
    yield call(player.moveLeft, 2);
    yield call(player.moveRight, 1);
    yield call(finish, player);
    console.log('finish');
}
The trivial approach for handing this case is to call the
receiver again with the result of the command. The code
looks like this:
function receiver(generator) {
    const iterate = function ({ value, done }) {
        if (done) return value;
        if (value.type === 'call') {
            const result = value.func(...value.args);
            if (result && typeof result.then !== 'undefined') {
                result.then(resolvedValue => iterate(generator.next(resolvedValue)));
            } else if (result && typeof result.next !== 'undefined') { // <-- Oh wait, that's a generator
                return iterate(generator.next(receiver(result)));
            } else {
                return iterate(generator.next(result));
            }
        }
    }
    return iterate(generator.next());
}
So, if it happens that the result of the command is another generator
we iterate over it again using the same receiver function.
The thing is that the new line
iterate(generator.next(receiver(result))) is actually
synchronous while we may have asynchronous processes in that new
generator. If we run the code above we will see:
The position is -1.
finishSaving is successful.
While finish should be displayed at the end. So,
yield call(finish, player) is not blocking the
generator.
We have to be smarter and say “Ok, run the new generator but let
me know when it is completed so I can continue iterating the main
one.”. To satisfy this case we have to make our
receiver a little bit more complicated and assume that it
always works asynchronously.
function receiver(generator) {
    return new Promise(generatorCompleted => {
        const iterate = function ({ value, done }) {
            if (done) {
                return generatorCompleted(value);
            }
            if (value.type === 'call') {
                const result = value.func(...value.args);
                if (result && typeof result.then !== 'undefined') {
                    result.then(resolvedValue => iterate(generator.next(resolvedValue)));
                } else if (result && typeof result.next !== 'undefined') {
                    receiver(result).then(resultOfGenerator => {
                        iterate(generator.next(resultOfGenerator))
                        });
                } else {
                    return iterate(generator.next(result));
                }
            }
        }
        iterate(generator.next());
    });
}
Now the receiver function returns a promise. It gets
resolved when the generator is completed. If done is
true we simply resolve the promise. Which perfectly cover
our case and helps us asynchronously handle the internal generator.
receiver(result).then(resultOfGenerator => {
    iterate(generator.next(resultOfGenerator))
});Instead of using call for chaining with another
generator we could simply yield it like so:
function* game(player) {
    yield call(player.moveLeft, 2);
    yield call(player.moveRight, 1);
    yield * finish(player);
    console.log('finish');
}
Guess what? We don’t have to change our receiver to make
this work. It just works because when we use yield * we are
delegating a generator. For the code that iterates, the whole thing
looks like a single generator. We just continue calling
next until we pass all the yield statements
(in the main AND delegated generators).
So far everything was working with no issues. But what if some of our commands throws an error. Let’s say that our player can not jump. If someone tries to make it jump we throw an error:
function player() {
    var position = 0;
    return {
        moveLeft(steps) {...},
        moveRight(steps) {...},
        getPosition() {...},
        save() {...},
        jump() {
            throw new Error(`You ain't jump!`);
        }
    }
}
To handle the error we have to wrap the execution of the command in a try-catch block:
function receiver(generator) {
    return new Promise(generatorCompleted => {
        const iterate = function ({ value, done }) {
            if (done) {
                return generatorCompleted(value);
            }
            if (value.type === 'call') {
                try { // calling
                    value.func(...value.args) // checking for a promise or another generator
                } catch(error) {
                    iterate(generator.throw(error));
                }
            }
        }
        iterate(generator.next());
    });
}
This is the first time where we see generator.throw
method. It resumes the generator by throwing an error inside. It is a
really nice way to say “Hey, I got an error from your command. Here
it is, handle it.”. Together with throwing an error
throw is a little bit like calling next it
moves the generator forward and we got again
{ done: ..., value: ... } object as a result. So, we just
pass it to the iterate function in order to continue the
recursion. Here is how we handle the error in the game
generator function:
function* game(player) {
    yield call(player.moveLeft, 2);
    yield call(player.moveRight, 1);
    try {
        yield call(player.jump);
    } catch(error) {
        console.log(`Ops, ${ error }`);
    }
    yield call(finish, player);
    console.log('finish');
}
And the result in the console is:
Ops, Error: You ain't jump!
The position is -1.
Saving is successful.finish
That is nice, we handled a synchronous command error. What if some of our async processes fail? Let’s create another method in our player that again returns a promise but that promise gets rejected:
function player() {
    var position = 0;
    return {
        moveLeft(steps) { position -= steps; },
        moveRight(steps) { position += steps; },
        getPosition() { return position; },
        save() {...},
        jump() {...},
        cheat() {
            return new Promise((resolve, reject) => {
                setTimeout(() => reject('sorry'), 1000)
            });
        }
    }
}
The receiver now has to be aware of the fact that the
promise may be rejected and should again use throw to send
the error in our game generator. The change that we have to
do is around the code that handles the promise. then method
accepts a second argument which is function fired when the promise is
rejected. We just do the same - continue the iteration by calling
iterate with generator.throw’s result as a
parameter.
if (result && typeof result.then !== 'undefined') {
    result.then(resolvedValue =>
        iterate(generator.next(resolvedValue)),
        error => iterate(generator.throw(error))
    );
}
In order to catch the error we have to again wrap our
yield call into a try-catch block.
function* game(player) {
    yield call(player.moveLeft, 2);
    yield call(player.moveRight, 1);
    try {
        yield call(player.jump);
    } catch(error) {
        console.log(`Ops, ${ error }`);
    } try {
        yield call(player.cheat);
    } catch (error) {
        console.log(`Ops, ${ error }`);
    }
    yield call(finish, player);
    console.log('finish');
}
Now the result of the whole thing becomes:
Ops, Error: You ain't jump!
Ops, sorry
The position is -1.
Saving is successful.finish
This is how we handle errors. It first happens in the code that
iterates (the receiver) and then the errors are passed down
to the generator.
Here is the final code of our receiver:
function receiver(generator) {
    return new Promise(generatorCompleted => {
        const iterate = function ({ value, done }) {
            if (done) { return generatorCompleted(value); }
            if (value.type === 'call') {
                try {
                    const result = value.func(...value.args);
                    if (result && typeof result.then !== 'undefined') {
                        result.then(              resolvedValue =>
                            iterate(generator.next(resolvedValue)),
                            error => iterate(generator.throw(error))
                        );
                    } else if (result && typeof result.next !== 'undefined') {
                        receiver(result).then(resultOfGenerator => {
                                iterate(generator.next(resultOfGenerator))
                            });
                    } else {
                        return iterate(generator.next(result));
                    }
                } catch(error) {
                    iterate(generator.throw(error));
                }
            }
        }
        iterate(generator.next());
    });
}
And here is a CodePen to play with it:
See the Pen Implementation of the command pattern using generators by Krasimir Tsonev (@krasimir) on CodePen.
I learned this pattern from the redux-saga project. You will see a
similar call helper there but the library is Redux
specific. So I decided to extract the code above into a npm module. Here
is the same example but using banica library.
import { run, call } from 'banica';
function player() {
    var position = 0;
    return {
        moveLeft(steps) { ... },
        moveRight(steps) { ... },
        getPosition() { ... },
        save() { ... },
        jump() { ... },
        cheat() { ... }
    }
}
function* finish(player) {
    const position = yield call(player.getPosition);
    console.log(`The position is ${ position }.`);
    const resultOfSaving = yield call(player.save);
    console.log(`Saving is ${ resultOfSaving }.`);
}
function* game(player) {
    yield call(player.moveLeft, 2);
    yield call(player.moveRight, 1);
    try {
        yield call(player.jump);
    } catch(error) {
        console.log(`Ops, ${ error }`);
    } try {
        yield call(player.cheat);
    } catch (error) {
        console.log(`Ops, ${ error }`);
    }
    yield call(finish, player);
    console.log('finish');
}
run(game(player()));
(Why I call it “banica”? Well, that’s one of my favorite Bulgarian dishes. More about it here).
This type of command pattern implementation together with the idea of the state machines are game changers for me this year. I hope you enjoy this article and I made you experiment more with generators. And why not try redux-saga or banica libraries.
Peleke Sengstacke | April 11, 2016
With the ES2015 spec finalized and Node.js shipping with a substantial subset of its functionailty, it’s safe to say it: The Future is Upon Us.
…I’ve always wanted to say that.
But, it’s true. The V8 Engine is swiftly approaching spec-compliance, and Node ships with a good selection of ES2015 features ready for production. It’s this latter list of features that I consider the Essentials™, as it represents the set of feature we can use without a transpiler like Babel or Traceur.
This article will cover three of the more popular ES2015 features available in Node:
let and const;Let’s get to it.
let and constScope refers to where in your program your variables are visible. In other words, it’s the set of rules that determines where you’re allowed to use the variables you’ve declared.
We’ve mostly all heard the claim that JavaScript only creates new scopes inside of functions. While a good 98% of the useful scopes you’ve created were, in fact, function scopes, there are actually three ways to create a new scope in JavaScript. You can:
catch block. I’m
not kidding.let or const within a
code block restricts their visibility to that block
only. This is called block scoping.A block is just a section of code wrapped in curly braces.
{ like this }. They appear naturally around
if/else statements and
try/catch/finally blocks. You can
also wrap arbitrary sections of code in braces to create a code block,
if you want to take advantage of block-scoping.
Consider this snippet.
// You have to use strict to try this in Node
"use strict";

var foo = "foo";
function baz() {
    if (foo) {
        var bar = "bar";
        let foobar = foo + bar;
    }
    // Both foo and bar are visible here
    console.log("This situation is " + foo + bar + ". I'm going home.");

    try {
        console.log("This log statement is " + foobar + "! It threw a ReferenceError at me!");
    } catch (err) {
        console.log("You got a " + err + "; no dice.");
    }

    try {
        console.log("Just to prove to you that " + err + " doesn't exit outside of the above `catch` block.");
    } catch (err) {
        console.log("Told you so.");
    }
}

baz();

try {
    console.log(invisible);
} catch (err) {
    console.log("invisible hasn't been declared, yet, so we get a " + err);
}
let invisible = "You can't see me, yet"; // let-declared variables are inaccessible before declaration
A few things to note.
foobar isn’t visible outside of the
if block, because we declared it with
let;foo anywhere, because we defined it as a
var in the global scope; andbar anywhere inside of baz,
because var-declared variables are accessible throughout
the entirety of the scope they’re defined.let or const-declared
variables before we’ve defined them. In other words, they’re not hoisted
by the compiler, as var-declarations are.The const keyword behaves similarly to let,
with two differences.
const-declared
variable after you create it. If you try, you’ll get a
TypeError.let & const:
Who Cares?Since we’ve gotten by just fine with var for a good
twenty years, now, you might be wondering if we really need new
variables.
Good question. The short answer – no. Not really. But there
are a few good reasons to use let and const
where possible.
let nor const-declared variables
are hoisted to the top of their scopes, which can make for more
readable, less confusing code.const helps enforce immutable
variable references.Another use case is that of let in for
loops.
"use strict";

var languages = ['Danish', 'Norwegian', 'Swedish'];

// Pollutes global namespace. Ew!
for (var i = 0; i < languages.length; i += 1) {
    console.log(`${languages[i]} is a Scandinavian language.`);
}

console.log(i); // 4

for (let j = 0; j < languages.length; j += 1) {
    console.log(`${languages[j]} is a Scandinavian language.`);
}

try {
    console.log(j); // Reference error
} catch (err) {
    console.log(`You got a ${err}; no dice.`);
}
Using var to declare the counter in a for
loop doesn’t actually keep the counter local to the loop. Using
let instead does.
let also has the major advantage of rebinding the loop
variable on every iteration, so each loop gets its own copy,
rather than sharing the globally-scoped variable.
"use strict";

// Simple & Clean
for (let i = 1; i < 6; i += 1) {
    setTimeout(function() {
        console.log("I've waited " + i + " seconds!");
    }, 1000 * i);
}

// Totally dysfunctional
for (var j = 0; j < 6; j += 1) {
        setTimeout(function() {
        console.log("I've waited " + j + " seconds for this!");
    }, 1000 * j);
}
The first loop does what you think it does. The bottom one prints “I’ve waited 6 seconds!”, every second.
Pick your poison.
thisJavaScript’s this keyword is notorious for doing
basically everything except for you want it to.
The truth is, the rules
are really quite simple. Regardless, there are situations where
this can encourage awkward idioms.
"use strict";

const polyglot = {
    name : "Michel Thomas",
    languages : ["Spanish", "French", "Italian", "German", "Polish"],
    introduce : function () {
        // this.name is "Michel Thomas"
        const self = this;
        this.languages.forEach(function(language) {
            // this.name is undefined, so we have to use our saved "self" variable
            console.log("My name is " + self.name + ", and I speak " + language + ".");
        });
    }
}

polyglot.introduce();
Inside of introduce, this.name is
undefined. Right outside of the callback, in our
forEach loop, it refers to the polyglot
object. Often, what we want in cases like this is for this
within our inner function to refer to the same object that
this refers to in the outer function.
The problem is that functions in JavaScript always define their own
this values upon invocation, according to a well-established
set of four rules. This mechanim is known as dynamic
this.
Not a single one of these rules involves looking up what
this means “nearby”; there is no conceivable way for the
JavaScript engine to define this based on its meaning
within a surrounding scope.
This all means that, when the engine looks up the value of
this, it will find one, but it will not
be the same as the value outside of the callback. There are two
traditional workarounds to the problem.
this in the outer function to a variable, usually
called self, and use that within the inner function;
orbind
on the inner function to permanently set its this
value.These methods work, but they can be noisy.
If, on the other hand, inner functions did not set their own
this values, JavaScript would look up the value of
this just as it would look up the value of any other
variable: By stepping through parent scopes until it finds one with the
same name. That would let us use the value of this from
“nearby” source code, and is known as lexical
this.
Quite a bit of code would be quite a bit cleaner if we had such a feature, don’t you think?
this
with Arrow FunctionsWith ES2015, we do. Arrow functions do not bind a
this value, allowing us to take advantage of lexical
binding of the this keyword. We can refactor the broken
code from above like this:
"use strict";

let polyglot = {
    name : "Michel Thomas",
    languages : ["Spanish", "French", "Italian", "German", "Polish"],
    introduce : function () {
        this.languages.forEach((language) => {
            console.log("My name is " + this.name + ", and I speak " + language + ".");
        });
    }
}
…And all would work as expected.
Arrow functions have a few types of syntax.
"use strict";

let languages = ["Spanish", "French", "Italian", "German", "Polish"];

// In a multiline arrow function, you must use curly braces,
//  and you must include an explicit return statement.
let languages_lower = languages.map((language) => {
    return language.toLowerCase()
});

// In a single-line arrow function, curly braces are optional,
//   and the function implicitly returns the value of the last expression.
//   You can include a return statement if you'd like, but it's optional.
let languages_lower = languages.map((language) => language.toLowerCase());

// If your arrow function only takes one argument, you don't need to wrap it in
//   parentheses.
let languages_lower = languages.map(language => language.toLowerCase());

// If your function takes multiple arguments, you must wrap them in parentheses.
let languages_lower = languages.map((language, unused_param) => language.toLowerCase());

console.log(languages_lower); // ["spanish", "french", "italian", "german", "polish"]

// Finally, if your function takes no arguments, you must include empty parentheses before the arrow.
(() => alert("Hello!"))();
The MDN docs on arrow functions are great for reference.
ES2015 also gives us a few new ways to define properties and methods on objects.
In JavaScript, a method is a property on an object that has a function value:
"use strict";

// Kudos to @_finico for catching a type in the first draft.
const myObject = {
    foo : function () {
        console.log('bar');
    },
}
In ES2015, we can simply write:
"use strict";

const myObject = {
    foo () {
        console.log('bar');
    },
    * range (from, to) {
        while (from < to) {
            if (from === to)
                return ++from;
            else
                yield from ++;
        }
    }
}
Note that you can use generators to define methods, too. All you need to do is prepend the function’s name with an asterisk (*).
These are called method definitions. They’re similar to traditional functions-as-properties, but have a few key differences:
super from a method
definition;new.I’ll cover classes and the super keyword in a later
article. If you just can’t wait, Exploring ES6 has
all the goodies.
ES6 also introduces shorthand and computed properties.
If the name of your object’s keys are identical to the variables naming their values, you can initialize your object literal with just the variable names, rather than defining it as a redundant key-value pair.
"use strict";

const foo = 'foo';
const bar = 'bar';

// Old syntax
const myObject = {
    foo : foo,
    bar : bar
};

// New syntax
const myObject = { foo, bar }
Both syntaxes create an object with foo and
bar keys that refer to the values of the foo
and bar variables. The latter approach is semantically
identical; it’s just syntactically sweeter.
I often take advantage of shorthand properties to write succinct definitions of public APIs when using the revealing module pattern.
"use strict";

function Module () {
    function foo () {
        return 'foo';
    }

    function bar () {
        return 'bar';
    }

    // Write this:
    const publicAPI = { foo, bar }

    /* Not this:
    const publicAPI =  {
       foo : foo,
       bar : bar
    } */

    return publicAPI;
};
Here, we create and return a publicAPI object, whose key
foo refers to the foo method, and whose key
bar refers to the bar method.
This is a bit of a niche case, but ES6 also allows you to use expressions as property names.
"use strict";

const myObj = {
  // Set property name equal to return value of foo function
    [foo ()] () {
      return 'foo';
    }
};

function foo () {
    return 'foo';
}

console.log(myObj.foo() ); // 'foo'
According to Dr. Raushmayer in Exploring ES6, the main use case for this feature is in setting property names equal to Symbol values.
Finally, I’d like to remind you of the get and
set methods, which have been around since ES5.
"use strict";

// Example adapted from MDN's page on getters
//   https://developer.mozilla.org/en-US/docs/Web/JavaScript/Reference/Functions/get
const speakingObj = {
    // Track how many times "speak" has been called
    words : [],

    speak (word) {
        this.words.push(word);
        console.log('speakingObj says ' + word + '!');
    },

    get called () {
        // Returns latest word
        const words = this.words;
        if (!words.length)
            return 'speakingObj hasn\'t spoken, yet.';
        else
            return words[words.length - 1];
    }
};

console.log(speakingObj.called); // 'speakingObj hasn't spoken, yet.'

speakingObj.speak('blargh'); // 'speakingObj says blargh!'

console.log(speakingObj.called); // 'blargh'
There are a few things to keep in mind when using getters:
Object.defineProperty(OBJECT, "property name", { get : function () { . . . } })As an example of this last point, we could have defined the above getter this way:
"use strict";

const speakingObj = {
    // Track how many times "speak" has been called
    words : [],

    speak (word) {
        this.words.push(word);
        console.log('speakingObj says ' + word + '!');
    }
};

// This is just to prove a point. I definitely wouldn't write it this way.
function called () {
    // Returns latest word
    const words = this.words;
    if (!words.length)
        return 'speakingObj hasn\'t spoken, yet.';
    else
        return words[words.length - 1];
};

Object.defineProperty(speakingObj, "called", get : getCalled )
In addition to getters, we have setters. Unsurprsingly, they set properties on an object with custom logic.
"use strict";

// Create a new globetrotter!
const globetrotter = {
    // Language spoken in the country our globetrotter is currently in
    const current_lang = undefined,

    // Number of countries our globetrotter has travelled to
    let countries = 0,

    // See how many countries we've travelled to
    get countryCount () {
        return this.countries;
    },

    // Reset current language whenever our globe trotter flies somewhere new
    set languages (language) {
        // Increment number of coutnries our globetrotter has travelled to
        countries += 1;

        // Reset current language
        this.current_lang = language;
    };
};

globetrotter.language = 'Japanese';
globetrotter.countryCount; // 1

globetrotter.language = 'Spanish';
globetrotter.countryCount; // 2
Everything we said about getters above applies to setters as well, with one difference:
Breaking either of these rules throws an error.
Now that Angular 2 is bringing TypeScript and the class
keyword to the fore, I expect get and set to
spike in popularity. . . But I kind of hope they don’t.
Tomorrow’s JavaScript is happening today, and it’s high time to get a grip on what it has to offer. In this article, we’ve looked at three of the more popular features from ES2015:
let and const;this with arrow functions;For detailed thoughts on let, const, and
the notion of block scoping, read Kyle Simpson’s take
on block scoping. If all you need is a quick practical reference,
check the MDN pages for let
and const.
Dr Rauschmayer has a wonderful
article on arrow functions and lexical this. It’s great
reading if you want a bit more detail than I had room to cover here.
Finally, for an exhaustive take on all of what we’ve talked about here – and a great deal more – Dr Rauschmayer’s book, Exploring ES6, is the best all-in-one reference the web has to offer.
What ES2015 feature are you most excited about? Is there anything you’d like to see covered in a future article? Let me know in the comments below, or hit me on Twitter (@PelekeS) – I’ll do my best to get back to everyone individually.
Note: This is part 1 of the Better JavaScript series. You can see parts 2 and 3 here:
Promises represent the eventual result of an asynchronous operation. They give us a way to handle asynchronous processing in a more synchronous fashion. A promise represents a value we can handle in the future, with the following guarantees:
pending: may transition to fulfilled or
rejectedfulfilled (kept promise): must have a valuerejected (broken promise): must have a reason for
rejecting the promiselet promise1 = new Promise( function( resolve, reject ) {
// call resolve( value ) to resolve a promise
// call reject( reason ) to reject a promise
});
// Create a resolved promise
let promise2 = Promise.resolve( 5 );When instantiating a promise, the handler function decides whether to
resolve or reject the promise. When you call resolve, the
promise moves to Fulfilled state. When you call reject, the
promise moves to Rejected state.
Promise.resolve( value ) creates a promise that’s
already resolved.
Promises can be passed around as values, as function arguments, and
as return values. Values and reasons for rejection can be handled by
handlers inside the then method of the promise.
promise.then( onFulfilled, onRejected );then may be called more than once to register multiple
callbacks. The callbacks have a fixed order of executionthen is chainable, it returns a promiseonFulfilled is called once with the argument of the
fulfilled value if it existsonRejected is called once with the argument of the
reason why the promise was rejectedlet promisePaymentAmount = Promise.resolve( 50 );
promisePaymentAmount
.then( amount => {
amount *= 1.25;
console.log( 'amount * 1.25: ', amount );
return amount;
}).then( amount => {
console.log( 'amount: ', amount );
return amount;
});Notice the return value of the callback function of the first
then call. This value is passed as amount in
the second then clause.
let promiseIntro = new Promise( function( resolve, reject ) {
    setTimeout( () => reject( 'Error demo' ), 2000 );
});

promiseIntro.then( null, error => console.log( error ) );
Instead of promise.then( null, errorHandler );, you can
also write promise.catch( errorHandler ); to make error
handling more semantic. It is best practice to always use
catch for handling errors, and place it at the end of the
promise handler chain. Reason: catch also catches errors
thrown inside the resolved handlers.
Example:
var p = Promise.resolve( 5 );

p.then( ( value ) => console.log( 'Value:', value ) )
 .then( () => { throw new Error('Error in second handler' ) } )
 .catch( ( error ) => console.log( 'Error: ', error.toString() ) );
As p is resolved, the first handler logs its value, and
the second handler throws an error. The error is caught by the
catch method, displaying the error message.
Promise.all() takes an iterable object of promises. In
this section, we will use arrays. Once all of them are fulfilled, it
returns an array of fulfilled values. One any of the promises in the
array fails, Promise.all() also fails.
var loan1 = new Promise( (resolve, reject) => {
  setTimeout( () => resolve( 110 ) , 1000 );
});
var loan2 = new Promise((resolve, reject) => {
  setTimeout( () => resolve( 120 ) , 2000 );
});
var loan3 = new Promise( (resolve, reject) => {
  reject( 'Bankrupt' );
});

Promise.all([ loan1, loan2, loan3 ]).then( value => {
  console.log(value);
}, reason => {
  console.log(reason);
} );
The output of the above code is Bankrupt, and it’s
displayed immediately.
ES6 introduces a new primitive type for JavaScript: Symbols. A
JavaScript symbol is created by the global Symbol()
function. Each time the Symbol() function is called, a new
unique symbol is returned.
let symbol1 = Symbol();
let symbol2 = Symbol();

console.log( symbol1 === symbol2 );
// false
Symbols don’t have a literal value. All you should know about the value of a symbol is that each symbol is treated as a unique value. In other words, no two symbols are equal.
Symbol is a new type in JavaScript.
console.log( typeof symbol1 );
// "symbol"
Symbols are useful, because they act as unique object keys.
let myObject = {
    publicProperty: 'Value of myObject[ "publicProperty" ]'
};

myObject[ symbol1 ] = 'Value of myObject[ symbol1 ]';
myObject[ symbol2 ] = 'value of myObject[ symbol2 ]';

console.log( myObject );
// Object
//    publicProperty: "Value of myObject[ "publicProperty" ]"
//    Symbol(): "Value of myObject[ symbol1 ]"
//    Symbol(): "value of myObject[ symbol2 ]"
//    __proto__: Object

console.log( myObject[ symbol1 ] );
// Value of myObject[ symbol1 ]
When console logging myObject, you can see that both
symbol properties are stored in the object. The literal
"Symbol()" is the return value of the
toString() method called on the symbol. This value denotes
the presence of a symbol key in the console. We can retrieve the
corresponding values if we have access to the right symbol.
Properties with a symbol key don’t appear in the JSON representation
of your object. Not even the for-in loop or Object.keys can
enumerate them:
JSON.stringify( myObject )
// "{"publicProperty":"Value of myObject[ \"publicProperty\" ] "}"

for( var prop in myObject ) {
    console.log( prop, myObject[prop] );
}
// publicProperty Value of myObject[ "publicProperty" ]

console.log( Object.keys( myObject ) );
// ["publicProperty"]
Even though properties with Symbol keys don’t appear in the above
cases, these properties are not fully private in a strict sense.
Object.getOwnPropertySymbols provides a way to retrieve the
symbol keys of your objects:
Object.getOwnPropertySymbols(myObject)
// [Symbol(), Symbol()]

myObject[ Object.getOwnPropertySymbols(myObject)[0] ]
// "Value of myObject[ symbol1 ]"
If you choose to represent private variables with Symbol keys, make sure you don’t use
Object.getOwnPropertySymbolsto retrieve properties that are intended to be private. In this case, the only use cases forObject.getOwnPropertySymbolsare testing and debugging.
As long as you respect the above rule, your object keys will be private from the perspective of developing your code. In practice however, be aware that others will be able to access your private values.
Even though symbol keys are not enumerated by for...of,
the spread operator, or Object.keys, they still make it to
shallow copies of our objects:
clonedObject = Object.assign( {}, myObject );

console.log( clonedObject );
// Object
//    publicProperty: "Value of myObject[ "publicProperty" ]"
//    Symbol(): "Value of myObject[ symbol1 ]"
//    Symbol(): "value of myObject[ symbol2 ]"
//    __proto__: Object
Naming your symbols properly is essential in indicating what your symbol is used for. If you need additional semantic guidance, it is also possible to attach a description to your symbol. The description of the symbol appears in the string value of the symbol.
let leftNode = Symbol( 'Binary tree node' );
let rightNode = Symbol( 'Binary tree node' );

console.log( leftNode )
// Symbol(Binary tree node)
Always provide a description for your symbols, and make your descriptions unique. If you use symbols for accessing private properties, treat their descriptions as if they were variable names.
Even if you pass the same description to two symbols, their value will still differ. Knowing the description does not make it possible for you to create the same symbol.
console.log( leftNode === rightNode );
// falseES6 has a global resource for creating symbols: the symbol registry.
The symbol registry provides us with a one-to-one relationship between
strings and symbols. The registry returns symbols using
Symbol.for( key ).
Symbol.for( key1 ) === Symbol.for( key2 ) whenever
key1 === key2. This correspondance works even across
service workers and iframes.
let privateProperty1 = Symbol.for( 'firstName' );
let privateProperty2 = Symbol.for( 'firstName' );

myObject[ privateProperty1 ] = 'Dave';
myObject[ privateProperty2 ] = 'Zsolt';

console.log( myObject[ privateProperty1 ] );
// Zsolt
As there is a one-to-one correspondence between symbol values and
their string keys in the symbol registry, it is also possible to
retrieve the string key. Use the Symbol.keyFor method.
Symbol.keyFor( privateProperty1 );
// "firstName"

Symbol.keyFor( Symbol() );
// undefinedCreating truly private properties and operations is feasible, but it’s not an obvious task in JavaScript. If it was as obvious as in Java, blog posts like this, this, this, this, and many more wouldn’t have emerged.
Check out Exercise 2 at the bottom of this article to find out more about how to simulate private variables in JavaScript to decide whether it’s worth for you.
Even though Symbols do not make attributes private, they can be used as a notation for private properties. You can use symbols to separate the enumeration of public and private properties, and the notation also makes it clear.
const _width = Symbol('width');
class Square {
    constructor( width0 ) {
        this[_width] = width0;
    }
    getWidth() {
        return this[_width];
    }
}
As long as you can hide the _width constant, you should
be fine. One option to hide _width is to create a
closure:
let Square = (function() {

    const _width = Symbol('width');

    class Square {
        constructor( width0 ) {
            this[_width] = width0;
        }
        getWidth() {
            return this[_width];
        }
    }

    return Square;

})();
The advantage of this approach is that it becomes intentionally
harder to access the private _width value of our objects.
It is also evident which of our properties are intended to be public, an
which are intended to be private. The solution is not bulletproof, but
some developers do use this approach in favor of indicating privacy by
starting a variable with underscore.
The drawbacks are also obvious:
Object.getOwnPropertySymbols, we can get
access to the symbol keys. Therefore, private fields are not truly
privateSome developers will express their opinion on using symbols for indicating privacy. In practice, your team has the freedom of deciding which practices to stick to, and which rules to follow. If you agree on using symbols as private keys, it is a working solution, as long as you don’t start writing workarounds to publicly access private field values.
If you use symbols to denote private fields, you have done your best to indicate that a property is not to be accessed publicly. When someone writes code violating this common sense intention, they should bear the consequences.
There are various methods for structuring your code such that you
indicate that some of your variables are private in JavaScript. None of
them looks as elegant as a private access modifier.
If you want true privacy, you can achieve it even without using ES6. Exercise 2 deals with this topic. Try to solve it, or read the reference solution.
The question is not whether it is possible to simulate private fields in JavaScript. The real question is whether you want to simulate them or not. Once you figure out that you don’t need truly private fields for development, you can agree whether you use symbols, weak maps (see later), closures, or a simple underscore prefix in front of your variables.
Enums allow you to define constants with semantic names and unique values. Given that the values of symbols are different, they make excellent values for enumerated types.
const directions = {
    UP   : Symbol( 'UP' ),
    DOWN : Symbol( 'DOWN' ),
    LEFT : Symbol( 'LEFT' ),
    RIGHT: Symbol( 'RIGHT' )
};When using symbols as identifiers for objects, we don’t have to set
up a global registry of available identifiers. We also save creation of
a new identifier, as all we need to do is create a
Symbol().
Same holds for external libraries.
There are some well known symbols defined to access and modify internal JavaScript behavior. You can do magic such as redefining built-in methods, operators, and loops.
It is cool to apply hacks to the language, but ask yourself, is this skill going to move you forward in your career?
We will not focus on well known symbols in this section. If there is a valid use case for it, I will signal it in the corresponding lesson. Otherwise, I suggest staying away from manipulating the expected behavior of your code.
What are the pros and cons of using an underscore prefix for expressing our intention that a field is private? Compare this approach with symbols!
let mySquare {
    _width: 5,
    getWidth() { return _width; }
}Pros:
Cons:
for..of loops, using
the spread operator, and Object.keysFind a way to simulate truly private fields in JavaScript!
When it comes to constructor functions, private members can be
declared inside a constructor function using var,
let, or const.
function F() {
   let privateProperty = 'b';
   this.publicProperty = 'a';
}

let f = new F();

// f.publicProperty returns 'a'
// f.privateProperty returns undefined
In order to use the same idea for classes, we have to place the
method definitions that use private properties in the constructor method
in a scope where the private properties are accessible. We will use
Object.assign to accomplish this goal. This solution was
inspired by an article I read on this topic by Dr. Axel Rauschmayer on
Managing
private data of ES6 classes.
class C {
    constructor() {
        let privateProperty = 'a';
        Object.assign( this, {
            logPrivateProperty() { console.log( privateProperty ); }
        } );
    }
}

let c = new C();
c.logPrivateProperty();
The field privateProperty is not accessible in the
c object.
The solution also works when we extend the C class.
class D extends C {
    constructor() {
        super();
        console.log( 'Constructor of D' );
    }
}

let d = new D()
// Constructor of D

d.logPrivateProperty()
// a
For the sake of completeness, there are two other ways for creating private variables:
By Stefan Judis, on Apr 4, 2017

Writing performant JavaScript applications is a complex matter these days. Years ago, everything started with script concatenation to save HTTP requests, and then it continued with minification and wrangling of variable names to squeeze out even the last tiny bit of the code we ship.
Today we have tree shaking and module bundlers, and we go back to code splitting to not block the main thread on startup and speed up the time to interactivity. We’re also transpiling everything: using future features today? No problem – thanks to Babel!
ES6 modules have been defined in the ECMAScript specification for a while
already. The community wrote tons of articles on how to use them
with Babel and how import differs from require
in Node.js, but it took a while until an actual implementation landed in
browsers. I was surprised to see that Safari was the first one shipping
ES6 modules in its technology preview channel, and now Edge and Firefox
Nightly also ship this feature – even though it’s behind a flag. After
having used tools like RequireJS and
Browserify (remember the AMD and CommonJS
discussions?) it looks like modules are finally arriving in the
browser landscape, so let’s see a look what the bright future will
bring. 🎉
The usual way to build web applications is to include one single bundle that is produced using Browserify, Rollup or Webpack (or any other tool out there). A classic website that’s not a SPA (single page application) consists of server-side generated HTML, which then includes a single JavaScript bundle.
<html>
  <head>
    <title>ES6 modules tryout</title>
    <!-- defer to not block rendering -->
    <script src="dist/bundle.js" defer></script>
  </head>
  <body>
    <!-- ... -->
  </body>
</html>
The combined file includes three JavaScript files bundled with Webpack. These files make use of ES6 modules:
// app/index.js
import dep1 from './dep-1';

function getComponent () {
  var element = document.createElement('div');
  element.innerHTML = dep1();
  return element;
}

document.body.appendChild(getComponent());

// app/dep-1.js
import dep2 from './dep-2';

export default function() {
  return dep2();
}

// app/dep-2.js
export default function() {
  return 'Hello World, dependencies loaded!';
}
The result of this app will be a “Hello world” telling us that all files are loaded.
The Webpack configuration to create this bundle is relatively straightforward. There is not much happening right now except for the bundling and minification of the JavaScript files using UglifyJS.
// webpack.config.js

const path = require('path');
const UglifyJSPlugin = require('uglifyjs-webpack-plugin');

module.exports = {
  entry: './app/index.js',
  output: {
    filename: 'bundle.js',
    path: path.resolve(__dirname, 'dist')
  },
  plugins: [
    new UglifyJSPlugin()
  ]
};
The three base files are relatively small and have a total size of 347 bytes.
$ ll app
total 24
-rw-r--r--  1 stefanjudis  staff    75B Mar 16 19:33 dep-1.js
-rw-r--r--  1 stefanjudis  staff    75B Mar  7 21:56 dep-2.js
-rw-r--r--  1 stefanjudis  staff   197B Mar 16 19:33 index.js
When I ran this through Webpack, I got a bundle with the size of 856 bytes, which is roughly 500 bytes boilerplate. These additional bytes are acceptable, as it’s nothing compared to the bundles most of us ship in production. Thanks to Webpack, we can already use ES6 modules.
$ webpack
Hash: 4a237b1d69f142c78884
Version: webpack 2.2.1
Time: 114ms
Asset       Size        Chunks  Chunk Names
bundle.js   856 bytes   0       [emitted]  main
  [0] ./app/dep-1.js 78 bytes {0} [built]
  [1] ./app/dep-2.js 75 bytes {0} [built]
[2] ./app/index.js 202 bytes {0} [built]Now that we have the “traditional bundle” for all the browsers that
don’t support ES6 modules yet, we can start playing around with the cool
stuff. To do so, let’s add in the index.html file a new
script element pointing to the ES6 module with
type="module".
<html>
  <head>
    <title>ES6 modules tryout</title>
    <!-- in case ES6 modules are supported -->
    <script src="app/index.js" type="module"></script>
    <script src="dist/bundle.js" defer></script>
  </head>
  <body>
    <!-- ... -->
  </body>
</html>
When we take a look at Chrome, we’ll see that there is not much more happening.

The bundle is loaded as before, “Hello world!” is shown, but that’s it. And that’s excellent, because this is how web works: browsers are forgiving, they won’t throw errors when they don’t understand markup we send down the wire. Chrome just ignores the script element with the type it doesn’t know.
Now, let’s check the Safari technology preview:
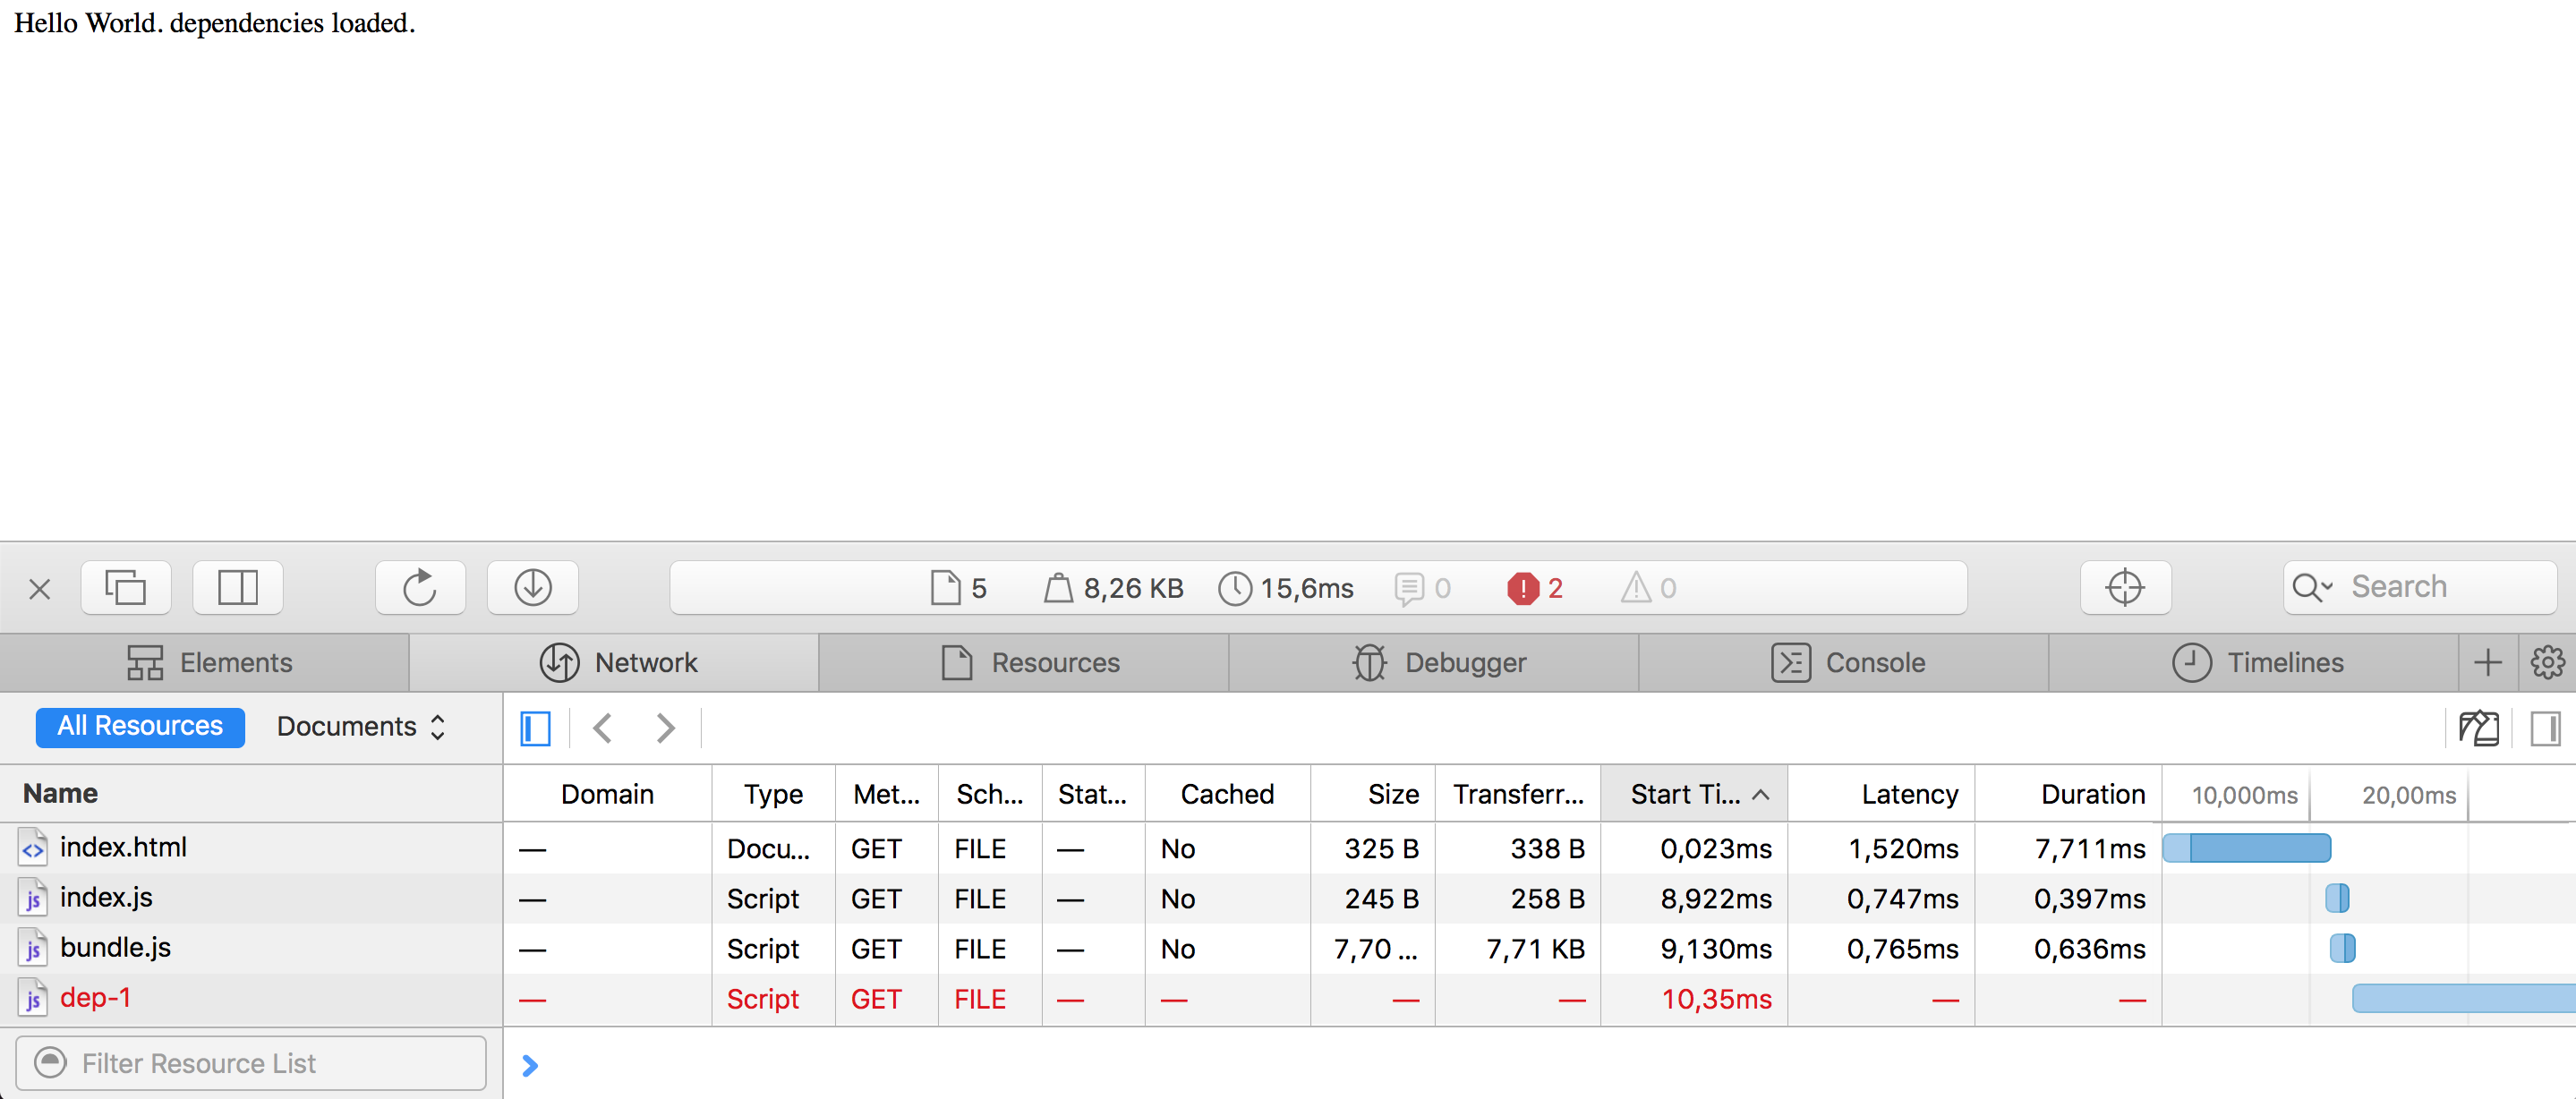
Sadly, there is no additional “Hello world” showing up. The reason is the difference between build tools and native ES modules: whereas Webpack figures out which files to include during the build process, when running ES modules in the browser, we need to define concrete file paths.
// app/index.js

// This needs to be changed
// import dep1 from './dep-1';

// This works
import dep1 from './dep-1.js';
The adjusted file paths work great, except for the fact that Safari preview now loads the bundle and the three individual modules, meaning that our code will be executed twice.

The solution is the nomodule attribute, which we can set
on the script element requesting the bundle. This attribute was
added to the spec quite recently and Safari Preview supports it as
of the end of
January. It tells Safari that this script is the “fallback” script
for the lack of ES6 modules support, and in this case shouldn’t be
executed.
<html>
  <head>
    <title>ES6 modules tryout</title>
    <!-- in case ES6 modules are supported -->
    <script src="app/index.js" type="module"></script>
    <!-- in case ES6 modules aren't supported -->
    <script src="dist/bundle.js" defer nomodule></script>
  </head>
  <body>
    <!-- ... -->
  </body>
</html>
That’s good. With the combination of type="module" and
nomodule, we can load a classic bundle in not supporting
browsers and load JavaScript modules in supporting browsers.
You can check out this state in production at es-module-on.stefans-playground.rocks.
There are a few gotchas here, though. First of all, JavaScript running in an ES6 module is not quite the same as in a regular script element. Axel Rauschmayer covers this quite nicely in his book Exploring ES6. I highly recommend you check it out but let’s just quickly mention the main differences:
'use strict' anymore).this is undefined.In my opinion, these are all huge advantages. Modules are local –
there is no need for IIFEs around everything, and also we don’t have to
fear global variable leaking anymore. Also running in strict mode by
default means that we can drop a lot of 'use strict'
statements.
And from a performance point of view (probably the most important
one) modules load and execute deferred by default. So
we won’t accidentally add blocking scripts to our website and there is
no SPOF
issue when dealing with script type="module" elements. We
could place an async attribute on it, which overwrites the
default deferred behavior, but defer is
a good choice these days.
<!-- not blocking with defer default behavior -->
<script src="app/index.js" type="module"></script>

<!-- executed after HTML is parsed -->
<script type="module">
  console.log('js module');
</script>

<!-- executed immediately -->
<script>
  console.log('standard module');
</script>
In case you want to check the details around that, the script element spec is an understandable read and includes some examples.
But we’re not quite there yet! We serve a minified bundle for Chrome and individual not minified files for Safari Preview now. How can we make these smaller? UglifyJS should do the job just fine, right?
It turns out that UglifyJS is not able to fully deal with ES6 code
yet. There is a harmony development branch available, but
unfortunately it didn’t work with my three JavaScript files at the time
of writing.
$ uglifyjs dep-1.js -o dep-1.min.js
Parse error at dep-1.js:3,23
export default function() {
                      ^
SyntaxError: Unexpected token: punc (()
// ..
FAIL: 1
But UglifyJS is in every toolchain today, how does this work for all the projects written in ES6 out there?
The usual flow is that tools like Babel transpile to ES5, and then Uglify comes into play to minify this ES5 code. I want to ignore ES5 transpilation in this article: we’re dealing with the future here, Chrome has 97% ES6 coverage and Safari Preview has already fabulous 100% ES6 coverage since version 10.
I asked the Twittersphere if there is a minifier available that can deal with ES6, and Lars Graubner pointed me towards Babili. Using Babili, we can easily minify the ES6 modules.
// app/dep-2.js

export default function() {
  return 'Hello World. dependencies loaded.';
}

// dist/modules/dep-2.js
export default function(){return 'Hello World. dependencies loaded.'}
With the Babili CLI tool, it’s almost too easy to minify all the files separately.
$ babili app -d dist/modules
app/dep-1.js -> dist/modules/dep-1.js
app/dep-2.js -> dist/modules/dep-2.js
app/index.js -> dist/modules/index.js
The result looks then as follows.
$ ll dist
-rw-r--r--  1 stefanjudis  staff   856B Mar 16 22:32 bundle.js

$ ll dist/modules
-rw-r--r--  1 stefanjudis  staff    69B Mar 16 22:32 dep-1.js
-rw-r--r--  1 stefanjudis  staff    68B Mar 16 22:32 dep-2.js
-rw-r--r--  1 stefanjudis  staff   161B Mar 16 22:32 index.js
The bundle is still roughly around 850B, and all the files are around 300B in total. I’m ignoring GZIP compression here as it doesn’t work well on such small file sizes (we’ll get back to that later).
The minification of the single JS files is a huge success. It’s 298B vs. 856B, but we could even go further and speed things up more. Using ES6 modules we are now able to ship less code, but looking at the waterfall again we’ll see that the requests are made sequentially because of the defined dependency chain of the modules.
What if we could throw
<link rel="preload" as="script"> elements in the mix
which can be used to tell the browser upfront that additionally requests
will be made soon? We have build tool plugins like Addy Osmani’s Webpack
preload plugin for code splitting already – is something like this
possible for ES6 modules? In case you don’t know how
rel="preload" works, you should check out the article
on this topic by Yoav Weiss on Smashing Magazine.
Unfortunately, preloading of ES6 modules is not so easy because they
behave differently than normal scripts. The question is how a link
element with a set rel="preload" attribute should treat an
ES6 module? Should it fetch all the dependent files, too? This is an
obvious question to answer, but there are more browser internal problems
to solve, too, if module treatment should go into the
preload directive. In case you’re interested in this topic
Domenic Denicola discusses
these problems in a
GitHub issue, but it turns out that there are too many differences
between scripts and modules to implement ES6 module treatment in the
rel="preload" directive. The solution might be another
rel="modulepreload" directive to clearly separate
functionalities, with the spec pull
request pending at the time of writing, so let’s see how we’ll
preload modules in the future.
Three files don’t make a real app, so let’s add a real dependency.
Fortunately, Lodash offers all of its
functionality also in split ES6 modules, which I then minified using
Babili. So let’s modify the index.js file to also include a
Lodash method.
import dep1 from './dep-1.js';
import isEmpty from './lodash/isEmpty.js';

function getComponent() {
  const element = document.createElement('div');
  element.innerHTML = dep1() + ' ' + isEmpty([]);

  return element;
}

document.body.appendChild(getComponent());
The use of isEmpty is trivial in this case, but let’s
see what happens now after adding this dependency.

The request count went up to over 40, the page load time went up from roughly 100ms to something between 400ms and 800ms on a decent wifi connection, and the shipped overall size increased to approximately 12KB without compression. Unfortunately, Safari Preview is not available on WebPagetest to run some reliable benchmarks.
Chrome receiving the bundled JavaScript, on the other hand, is at a slim ~8KB file size.
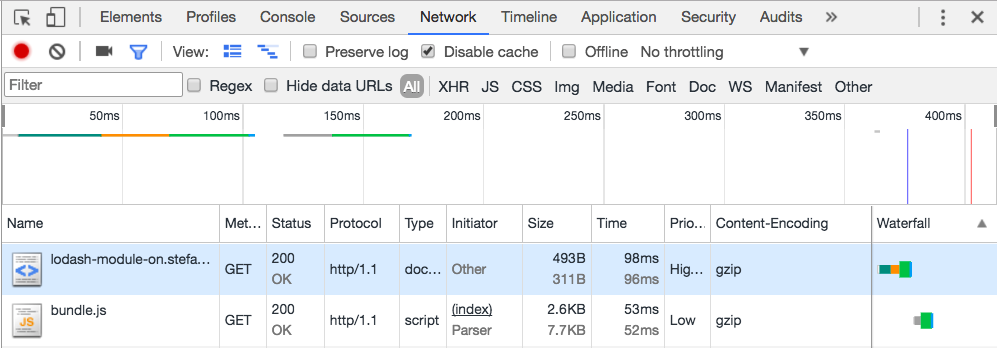
This 4KB difference is definitely something to check. You can find this example at lodash-module-on.stefans-playground.rocks.
In case you looked closely at the screenshots of the Safari developer tools, you might have noticed that the transferred file size was actually bigger than the source. Especially in a large JavaScript app, including a lot of small chunks makes a big difference and that’s because GZIP doesn’t play well with small file sizes.
Khan Academy discovered the same thing a while ago when experimenting with HTTP/2. The idea of shipping smaller files is great to guarantee perfect cache hit ratios, but at the end, it’s always a tradeoff and it’s depending on several factors. For a large code base splitting the code into several chunks (a vendor and an app bundle) makes sense, but shipping thousands of tiny files that can’t be compressed properly is not the right approach.
Another thing to point out is that thanks to the relatively new tree
shaking mechanism, build processes can eliminate code that’s not used
and imported by any other module. The first build tool that supported
this was Rollup, but now Webpack in version 2 supports it as well — as
long as we disable the module option in babel.
Let’s say we changed dep-2.js to include things that
won’t be imported by dep-1.js.
export default function() {
  return 'Hello World. dependencies loaded.';
}

export const unneededStuff = [
  'unneeded stuff'
];
Babili will simply minify the file and Safari Preview, in this case,
would receive several code lines that are not used. A Webpack or Rollup
bundle, on the other hand, won’t include unneededStuff.
Tree shaking offers huge savings that definitely should be used in a
real production code base.
So, ES6 modules are on their way, but it doesn’t look like anything will change when they finally arrive in all the major browsers. We won’t start shipping thousands of tiny files to guarantee good compression, and we won’t abandon build processes to make use of tree shaking and dead code elimination. Frontend development is and will be as complicated as always.
The most important thing to remember is that measuring is the key to succees. Don’t split everything and assume that it will lead to an improvement. Just because we might have support for ES6 modules in browsers soon, it doesn’t mean that we can get rid of a build process and a proper “bundle strategy”. Here at Contentful we’ll stick to our build processes, and continue to ship bundles including our JavaScript SDKs.
Yet, I have to admit that Frontend development still feels great. JavaScript evolves, and we’ll finally have a way to deal with modules baked into the language. I can’t wait to see how and if this influences the JavaScript ecosystem and what the best practices will be in a couple of years.
In 7 Surprising Things I Learned Writing a Fibonacci Generator in JavaScript, I covered one obvious use-case for ES6 generator functions: producing iterable sequences of values one at a time. If you haven’t read that yet, you should. Iterables are the foundation of a lot of things in ES6+, and it’s going to be important for you to understand how they work.
But in that article, I intentionally sidestepped another major use-case for generators. Arguably, the primary use case: Asynchronous flow control.
You may have heard of the as-yet not officially standard async/await proposal for JavaScript.
It did not make it into ES6. It will not make it into ES2016. It could become standard in ES2017, and then we’ll need to wait for all the JS engine implementations to land before we can use it. (Note: it works in Babel now, but that’s no guarantee. Tail call optimization worked in Babel for several months but got subsequently removed).
In spite of the wait, you’ll still find a bunch of articles talking about async/await. Why?
It can turn code like this:
const fetchSomething = () => new Promise((resolve) => {
  setTimeout(() => resolve('future value'), 500);
});

const promiseFunc = () => new Promise((resolve) => {
  fetchSomething().then(result => {
    resolve(result + ' 2');
  });
});

promiseFunc().then(res => console.log(res));
Into code like this:
const fetchSomething = () => new Promise((resolve) => {
  setTimeout(() => resolve('future value'), 500);
});

async function asyncFunction() {
  const result = await fetchSomething(); // returns promise

  // waits for promise and uses promise result
  return result + ' 2';
}

asyncFunction().then(result => console.log(result));
Notice that in the first version, our promise-based function has an
extra layer of nesting. The async/await version looks like regular,
synchronous code, but it’s not. It yields the promise and exits the
function, freeing the JS engine to do other things, and when the promise
from fetchSomething() resolves, the function resumes, and
the resolved promise value is assigned to result.
It’s asynchronous code that looks and feels synchronous. For JavaScript programmers who do a ton of asynchronous programming every day, this is basically the holy grail: All of the performance benefits of asynchronous code with none of the cognitive overhead.
What I’d like to take a deeper look at is how async / await might use generators under the hood… and how you can use them for synchronous style flow control right now, today, without waiting for async / await to arrive.
Generator functions are a new feature in ES6 that allow a function to
generate many values over time by returning an object which can
be iterated over… an iterable with a .next() method that
returns objects like this:
{
  value: Any,
  done: Boolean
}
The done property indicates whether or not the generator
has yielded its last value.
The iterator protocol is used by a lot of things in JavaScript,
including the new for…of loop, the array rest/spread
operator, and so on.
function* foo() {
  yield 'a';
  yield 'b';
  yield 'c';
}

for (const val of foo()) {
  console.log(val);
}
// a
// b
// c

const [...values] = foo();
console.log(values); // ['a','b','c']Here’s where things get really fun. Communication with generators can
happen in both directions. In addition to receiving values from
generators, you can inject values into the generator function. The
iterator .next() method can take values to be assigned.
function* crossBridge() {
  const reply = yield 'What is your favorite color?';
  console.log(reply);
  if (reply !== 'yellow') return 'Wrong!'
  return 'You may pass.';
}

{
  const iter = crossBridge();
  const q = iter.next().value; // Iterator yields question
  console.log(q);
  const a = iter.next('blue').value; // Pass reply back into generator
  console.log(a);
}

// What is your favorite color?
// blue
// Wrong!


{
  const iter = crossBridge();
  const q = iter.next().value;
  console.log(q);
  const a = iter.next('yellow').value;
  console.log(a);
}

// What is your favorite color?
// yellow
// You may pass.
There are a couple other ways to communicate to generators. You can
throw errors at them. Instead of calling next, you can call
iter.throw(error), for example, to communicate that
something went wrong fetching data for the generator. You can also force
the generator to return with iter.return().
Both of those might come in handy to add error handling to flow control code.
What if there was a function wrapping that generator that could
detect when you yield a promise, wait for it to resolve, and then pass
the resolved value back into the generator with the subsequent
.next() call?
Then you could write async/await style code like this:
const fetchSomething = () => new Promise((resolve) => {
  setTimeout(() => resolve('future value'), 500);
});

const asyncFunc = gensync(function* () {
  const result = yield fetchSomething(); // returns promise

  // waits for promise and uses promise result
  yield result + ' 2';
});

// Call the async function and pass params.
asyncFunc('param1', 'param2', 'param3')
  .then(val => console.log(val));
It turns out that a library like that already exists. It’s called Co.js. But instead of teaching you
how to use Co, let’s try to figure out how we could write something like
that ourselves. Looking at the crossBridge() example above,
it looks like it should be pretty easy.
We’ll start with a simple isPromise() function:
const isPromise = obj => Boolean(obj) && typeof obj.then === 'function';Next, we’ll need a way to iterate through the generator’s
.next() calls, unwrap the promises, and wait for them to
resolve before calling .next() again. Here’s a
straightforward approach with no error handling. This is just a
demonstration of the idea. You don’t want to use this in
production — your errors would get swallowed, and it would be very hard
to debug what’s going on:
const next = (iter, callback, prev = undefined) => {
  const item = iter.next(prev);
  const value = item.value;

  if (item.done) return callback(prev);

  if (isPromise(value)) {
    value.then(val => {
      setImmediate(() => next(iter, callback, val));
    });
  } else {
    setImmediate(() => next(iter, callback, value));
  }
};
As you can see, we’re passing in a callback to return the final
value. We communicate with the generator by passing the previous value
into the .next() call at the top of the function. That’s
what allows us to assign the result of the previous yield
call to identifier:
const next = (iter, callback, prev = undefined) => {
  // 2. The yielded value is extracted by calling
  // .next(). We pass the previous value back into
  // the generator for assignment.
  const item = iter.next(prev);
  const value = item.value;

  // 4. The final value gets passed to the callback.
  if (item.done) return callback(prev);

  if (isPromise(value)) {
    value.then(val => {
      setImmediate(() => next(iter, callback, val));
    });
  } else {
    setImmediate(() => next(iter, callback, value));
  }
};

const asyncFunc = gensync(function* () {
  // 1. yield value gets passed to the iterator.
  // The function exits at the yield call time,
  // and the `result` assignment doesn't happen
  // until the generator is resumed.
  const result = yield fetchSomething();

  // 3. Does not run until .next() is called again.
  // `result` will contain the value passed into
  // the previous `.next()` call.
  yield result + ' 2';
});
Of course, none of this works until you kick it all off — and what about the promise that actually returns the final value?
// Returns a promise and kicks things
// off with the first `next()` call.
// The callback resolves the promise.
const gensync = (fn) =>
    (...args) => new Promise(resolve => {
  next(fn(...args), val => resolve(val));
});
Let’s take a look at all of it together… the whole thing is about 22 lines of code, excluding the usage example:
const isPromise = obj => Boolean(obj) && typeof obj.then === 'function';

const next = (iter, callback, prev = undefined) => {
  const item = iter.next(prev);
  const value = item.value;

  if (item.done) return callback(prev);

  if (isPromise(value)) {
    value.then(val => {
      setImmediate(() => next(iter, callback, val));
    });
  } else {
    setImmediate(() => next(iter, callback, value));
  }
};

const gensync = (fn) =>
    (...args) => new Promise(resolve => {
  next(fn(...args), val => resolve(val));
});


/* How to use gensync() */

const fetchSomething = () => new Promise((resolve) => {
  setTimeout(() => resolve('future value'), 500);
});

const asyncFunc = gensync(function* () {
  const result = yield fetchSomething(); // returns promise

  // waits for promise and uses promise result
  yield result + ' 2';
});

// Call the async function and pass params.
asyncFunc('param1', 'param2', 'param3')
  .then(val => console.log(val)); // 'future value 2'
Now, if you want to start using this technique in your code, definitely use Co.js, instead. It has the error handling you’ll need (which I only skipped to avoid cluttering the example), it’s production tested, and it has a couple other nice features.
The example above is interesting, and Co.js is indeed useful to simplify asynchronous flow control. There’s just one problem: It returns a promise. As you’re probably aware, a promise can only emit a single value or rejection…
A generator is capable of emitting many values over time. What else do we know about that can emit many values over time? An observable. You may recall from 7 Surprising Things I Learned Writing a Fibonacci Generator in JavaScript:
Initially, I was very excited about generators, but now that I’ve been living with them for a while, I haven’t found a lot of good use cases for generators in my real application code. For most use-cases I might use generators for, I reach for RxJS instead because of its much richer API.
Because (unlike a generator function) a promise can only emit one value, and (like a generator function) an observable can emit many, I personally believe that the observable API is a much better fit for async functions than a promise.
What’s an observable?
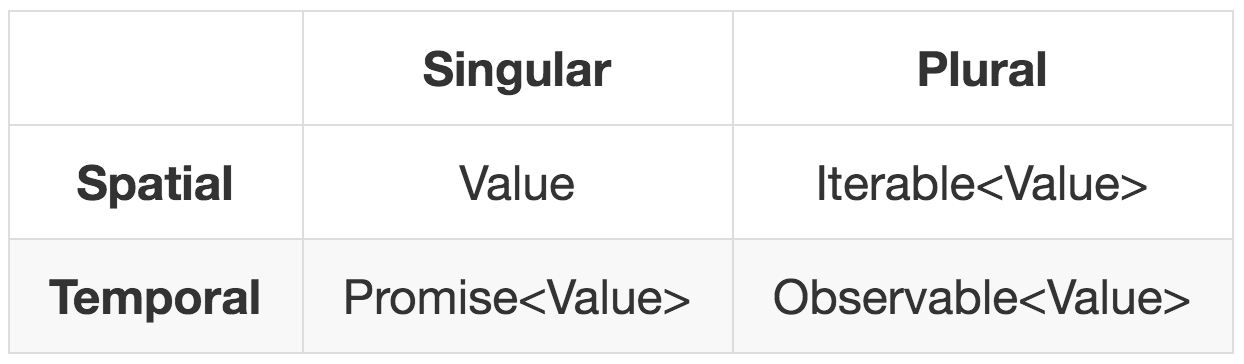
The table above is from the GTOR: A General Theory of Reactivity, by Kris Kowal. It breaks things down neatly across space & time. Values that can be pulled synchronously consume space (values in memory), but are detached from time. They are pull APIs.
Values which depend on some event in time can’t be consumed synchronously. You must wait for the values to be produced before you can consume them. Such values are push APIs, and always have some kind of subscription or notification mechanism. In JavaScript, that generally takes the form of a callback function.
When dealing with future values, you need to be notified when a value becomes available. That’s the push.
A promise is a push mechanism that calls some code after the promise has been resolved or rejected with a single value.
An observable is like a promise, but it calls some code every time a new value becomes available, and can emit many values over time.
The core feature of an observable is a .subscribe()
method which takes three values:
onCompleted will not be
called.onNext for the final time, but only if no errors were
encountered.So, if we want to implement an observable API for our
synchronous-style async functions, we just need a way to pass in those
parameters. Let’s take a crack at that, leaving onError for
later:
const isPromise = obj => Boolean(obj) && typeof obj.then === 'function';

const next = (iter, callbacks, prev = undefined) => {
  const { onNext, onCompleted } = callbacks;
  const item = iter.next(prev);
  const value = item.value;

  if (item.done) {
    return onCompleted();
  }

  if (isPromise(value)) {
    value.then(val => {
      onNext(val);
      setImmediate(() => next(iter, callbacks , val));
    });
  } else {
    onNext(value);
    setImmediate(() => next(iter, callbacks, value));
  }
};

const gensync = (fn) => (...args) => ({
  subscribe: (onNext, onError, onCompleted) => {
    next(fn(...args), { onNext, onError, onCompleted });
  }
});


/* How to use gensync() */

const fetchSomething = () => new Promise((resolve) => {
  setTimeout(() => resolve('future value'), 500);
});

const myFunc = function* (param1, param2, param3) {
  const result = yield fetchSomething(); // returns promise

  // waits for promise and uses promise result
  yield result + ' 2';
  yield param1;
  yield param2;
  yield param3;
}

const onNext = val => console.log(val);
const onError = err => console.log(err);
const onCompleted = () => console.log('done.');

const asyncFunc = gensync(myFunc);

// Call the async function and pass params.
asyncFunc('a param', 'another param', 'more params!')
  .subscribe(onNext, onError, onCompleted);
// future value
// future value 2
// a param
// another param
// more params!
// done.
I really like this version, because it feels a lot more versatile to
me. In fact, I like it so much, I’ve fleshed it out a bit, renamed it to
Ogen, added error handling and a true Rx Observable object (which means
you can .map(), .filter() and
.skip() to your heart’s content. Among
other things.
Check out Ogen on GitHub.
There are lots of ways observables can improve your asynchronous flow control, which is probably the main reason I haven’t used generators a lot more, but now that I can mix and match synchronous-style code and observables seamlessly with Ogen, maybe I’ll start to use generators a whole lot more.
Tamás Salla
Infinite and lazy collections are commonplace in many languages, and they are beginning to find their ways to mainstream Javascript too. With the new iterators and generators spec getting widespread adoption, you can now use them in your projects. They have some very specific use cases which may not come up in everyday coding, but are quite useful in certain situations. The specs are quite new, but libraries are starting to pop up to provide the most useful operations.
In this post, you can learn the basics of the specs as well as a particular use case where you’ll likely to use the new techniques. Also you’ll learn about one available library which provides most of the basic operations to work with these kinds of collections effectively.
Arrays are inherently finite, as they store all the elements in memory. There is no way to construct them dynamically and they also don’t support lazy evaluation. So a construct like this will result in an infinite loop and thus infeasible:
var naturalNums = [];
for(let i = 0;;i++){
    naturalNums.push(i);
}
ES6 Proxies might change this, as they add support to dynamic getters. You might think that a construct like this would result in an array containing all the natural numbers:
var naturalNums = new Proxy({},
    {get: (target, name) => {
        if (!isNaN(name)) {
            return Number(name);
        }else if (name === "length"){
            return Number.POSITIVE_INFINITY;
        }
    }
});
It indeed creates an array-like object that returns all the natural numbers, but unfortunately in practice it’s hardly usable. It is missing essential Array functions like splice; it makes them unsupported by libraries like Underscore.js. In theory, you can write utility functions like filter and map, but it’s definitely not mainstream.
Then iterators came to the rescue. They allow infinite collections and even have a built-in language construct to iterate them: the for-of loop. To construct an iterable, you need to return an iterator for the Symbol.iterator key. The iterator only needs a next() method that returns an object with a done and a value keys. The former indicates whether there are more elements, and the latter contains the actual element. You can create an iterator like this:
var naturalNums = {
    [Symbol.iterator]: (()=>{
        let i = 0;
        return {
            next: () => {
                return {done: false, value: i++};
            }
        }
    })
};
And you can iterate over it using the for-of loop (just don’t forget to terminate it, because it’s an infinite collection!):
for(let i of naturalNums){
    if(i > 10) break; // Don't forget to terminate!
    console.log(i);
}
Generators are just syntactic sugar over iterators. Instead of writing all the boilerplate, you can concentrate at the logic. The same iterable can be created using a generator:
var naturalNums = function* (){
    let i = 0;
    while(true){
        yield i++;
    }
}
And you need to call it when you are iterating over it:
for(let i of naturalNums()){
    if(i > 10) break;
    console.log(i);
}Why would you need infinite collections? They came handy when you don’t know how many elements you’ll need in advance. For example, calculating the sum of the first 100 positive numbers is pretty straightforward (this example uses Underscore.js):
const sum = _.chain(_.range(1, 101))
    .reduce((memo, val) => memo + val, 0)
    .value();
But calculating the first 100 primes are a bit harder:
const sum = _.chain(_.range(1, 100000)) // what should stop be?
    .filter(isPrime)
    .first(100)
    .reduce((memo, val) => memo + val, 0)
.value();The widely used libraries, like Underscore.js, do not support iterators. They are based on arrays and array-likes. Fortunately there are already a few projects filling the gap. It’s still early days, but they are slowly becoming mainstream. The one I’ve found quite usable is called Gentoo and it has the basic utility functions you’d need when you are working with collections, like filter, map, and reduce. The original repo seems abandoned, but feel free to use my fork, as it has some additional features like takeWhile and chaining. Just drop in the library and the babel polyfill for the generators and you’re good to go.
Despite being a relatively new and still little known technology, browser support is quite good. Chrome, Firefox, and Edge all have proper support, only Safari is lagging behind. But with compilers like Babel, you can transpile your code to ES5; just include the polyfill, as that’s required in runtime.
When you are working with infinite collections, always make sure you use an operator that limits the output. It is quite easy to make an infinite loop and break your app.
Using the gentoo library, the previous example can be written in a more effective and robust way:
const sum =
    gentoo.chain(gentoo.range(1, Number.POSITIVE_INFINITY))
        .filter(isPrime)
        .limit(100)
        .reduce((memo, val) => memo + val, 0)
        .value()
This solution does not have any magic numbers that are error-prone, making it a more robust way. It is also effective, as there are no wasted operations.
Generators are already supported by the major browsers, and you can compile your code with Babel to use them in older ones. You can use them today without any hassle, and while their use cases are quite limited, they will certainly make your code more readable if you use them effectively.
Posted on Friday, May 20th, 2016 at 12:01, by Kenneth Truyers
Last week I wrote about the yield return statement in c## and how it allows for deferred execution. In that post I explained how it powers LINQ and explained some non-obvious behaviors.
In this week’s post I want to do the same thing but for Javascript. ES6 (ES2015) is becoming more and more mainstream, but in terms of usage I mostly see the more common arrow-functions or block-scoping (with let and const).
However, iterators and generators are also a part of Javascript and I want to go through how we can use them to create deferred execution in Javascript.
An iterator is an object that can access one item at a time from a collection while keeping track of its current position. Javascript is a bit ‘simpler’ than c## in this aspect and just requires that you have a method called next to move to the next item to be a valid iterator.
The following is an example of function that creates an iterator from an array:
let makeIterator = function(arr){
    let currentIndex = 0;
    return {
        next(){
            return currentIndex < arr.length ?
             {
                value: arr[currentIndex++],
                done : false
             } :
             { done: true};
        }
    };
}
We could now use this function to create an iterator and iterate over it:
let iterator = makeIterator([1,2,3,4,5]);
while(1){
    let {value, done} = iterator.next();
    if(done) break;
       console.log(value);
}An iterable is an object that defines its iteration behavior. The for..of loop can loop over any iterable. Built-in Javascript objects such as Array and Map are iterables and can thus be looped over by the for..of construct. But we can also create our own iterables. To do that we must define a method on the object called @@iterator or, more conveniently, use the Symbol.iterator as the method name:
let iterableUser = {
    name: 'kenneth',
    lastName: 'truyers',
    [Symbol.iterator]: function*(){
        yield this.name;
        yield this.lastName;
    }
}

// logs 'kenneth' and 'truyers'
for(let item of iterableUser){
    console.log(item);
}Custom iterators and iterables are useful, but are complicated to build, since you need to take care of the internal state. A generator is a special function that allows you to write an algorithm that maintains its own state. They are factories for iterators. A generator function is a function marked with the * and has at least one yield-statement in it.
The following generator loops endlessly and spits out numbers:
function* generateNumbers(){
  let index = 0;
  while(true)
    yield index++;
}
A normal function would run endlessly (or until the memory is full), but similar to what I discussed in the post on yield return in C##, the yield-statement gives control back to the caller, so we can break out of the sequence earlier.
Here’s how we could use the above function:
let sequence = generateNumbers(); //no execution here, just getting a generator

for(let i=0;i<5;i++){
    console.log(sequence.next());
}Since we have the same possibilities for yielding return values in Javascript as in C##, the only what’s missing to be able to recreate LINQ in Javascript are extension methods. Javascript doesn’t have extension methods, but we can do something similar.
What we’d like to do is to be able to write something like this:
generateNumbers().skip(3)
                 .take(5)
                 .select(n => n * 3);
It turns out, we can do this, although we need to take a few hurdles.
To attach methods to existing objects (similar to what extension methods do in c##), we can use the prototype in Javascript. Generators however all have a different prototype, so we can’t easily attach new methods to all generators. Therefore, what we need to do is make sure that they all share the same prototype. To do that, we can create a shared prototype and a helper function that assigns the shared prototype to the function:
function* Chainable() {}
function createChainable(f){
  f.prototype = Chainable.prototype;
  return f;
}
Now that we have a shared prototype, we can add methods to this prototype. I’m also going to create a helper method for this:
function createFunction(f) {
  createChainable(f);
  Chainable.prototype[f.name] = function(...args) {
    return f.call(this, ...args);
  };
  return f;
}
In the above method:
With this in place we can now create our “extension methods” in Javascript:
// the base generator
let test = createChainable(function*(){
      yield 1;
      yield 2;
      yield 3;
      yield 4;
      yield 5;
});

// an 'extension' method
createFunction(function* take(count){
  for(let i=0;i<count;i++){
      yield this.next().value;
  }
});

// an 'extension' method
createFunction(function* select(selector){
  for(let item of this){
      yield selector(item);
  }
});

// now we can iterate over this and this will log 2,4,6)
for(let item of test.take(3).select(n => n*2)){
    console.log(item);
}
Note that in the above method, it doesn’t matter whether we first take and then select or the other way around. Because of the deferred execution, it will only fetch 3 values and do only 3 selects.
One problem with the above is that it doesn’t work on standard iterables such as Arrays, Sets and Maps because they don’t share the prototype. The workaround is to write a wrapper-method that wraps the iterable with a method that does use the shared prototype:
let wrap = createChainable(function*(iterable){
for(let item of iterable){
yield item;
}
});With the wrap function, we can now wrap any array, set or map and chain our previous function to it:
let myMap = new Map();
myMap.set("1", "test");
myMap.set("2", "test2");
myMap.set("3", "test3");
for(let item of wrap(myMap).select(([key,value]) => key + "--" + value).take(3)){
console.log(item);
}One more thing I want to add is the ability to execute a chain, so that it returns an array (for c## devs: the ToList-method). This method can be added on to the prototype:
Chainable.prototype.toArray = function(){
let arr = [];
for(let item of this){
arr.push(item);
}
return arr;
}If we implement the above, it allows us to write LINQ-style Javascript:
mySet.set("1", "test");
mySet.set("2", "test2");
mySet.set("3", "test3");
wrap(mySet).select(([key,value]) => key + "--" + value)
.take(3)
.toArray()
.forEach(item => console.log(item));Obviously, this only works in ES2015 and it’s probably not a good idea to actually write LINQ in Javascript using this method (and besides, there are already other implementations of LinqJS), but it does demonstrate the power of Iterators and Generators in Javascript.
It is worth for you to learn about iterators, especially if you are a fan of lazy evaluation, or you want to be able to describe infinite sequences. Understanding iterators also helps you understand generators, promises, sets, and maps better.
Once we cover the fundamentals of iterators, we will use our knowledge to understand how generators work.
ES6 comes with the iterable protocol. The protocol defines iterating behavior of JavaScript objects.
An iterable object has an iterator method with the key
Symbol.iterator. This method returns an iterator
object.
let iterableObject = {
[Symbol.iterator]() { return iteratorObject; }
};Symbol.iterator is a well known symbol. If you
don’t know what well known symbols are, read the
lesson about symbols.
We will now use Symbol.iterator to describe an iterable
object. Note that we are using this construct for the sake of
understanding how iterators work. Technically, you will hardly ever need
Symbol.iterator in your code. You will soon learn another
way to define iterables.
An iterator object is a data structure that has a
next method. When calling this method on the iterator, it
returns the next element, and a boolean signalling whether we reached
the end of the iteration.
// Place this before iterableObject
let iteratorObject = {
next() {
return {
done: true,
value: null
};
}
};The return value of the next function is an object with
two keys:
done is treated as a boolean. When done is
truthy, the iteration ends, and value is not considered in
the iterationvalue is the upcoming value of the iteration. It is
considered in the iteration if and only if done is falsy.
When done is truthy, value becomes the return
value of the iteratorLet’s create a countdown object as an example:
let countdownIterator = {
countdown: 10,
next() {
this.countdown -= 1;
return {
done: this.countdown === 0,
value: this.countdown
};
}
};
let countdownIterable = {
[Symbol.iterator]() {
return Object.assign( {}, countdownIterator )
}
};
let iterator = countdownIterable[Symbol.iterator]();
iterator.next();
> Object {done: false, value: 9}
iterator.next();
> Object {done: false, value: 8}Note that the state of the iteration is preserved.
The role of Object.assign is that we create a shallow
copy of the iterator object each time the iterable returns an iterator.
This allows us to have multiple iterators on the same iterable object,
storing their own internal state. Without Object.assign, we
would just have multiple references to the same iterator object:
let secondIterator = countdownIterable[Symbol.iterator]();
let thirdIterator = countdownIterable[Symbol.iterator]();
console.log( secondIterator.next() );
> Object {done: false, value: 9}
console.log( thirdIterator.next() );
> Object {done: false, value: 9}
console.log( secondIterator.next() );
> Object {done: false, value: 8}We will now learn how to make use of iterators and iterable objects.
Both the for-of loop and the spread operator can be used
to perform the iteration on an iterable object.
for ( let element of iterableObject ) {
console.log( element );
}
console.log( [...iterableObject] );Using the countdown example, we can print out the result of the countdown in an array:
[...countdownIterable]
> [9, 8, 7, 6, 5, 4, 3, 2, 1]Language constructs that consume iterable data are called data consumers. We will learn about other data consumers soon.
Some JavaScript types are iterables:
for-of
loop[...document.querySelectorAll('p')] in the consoleLet’s experiment with built-in iterables a bit.
let message = 'ok';
let stringIterator = message[Symbol.iterator]();
let secondStringIterator = message[Symbol.iterator]();
stringIterator.next();
> Object {value: "o", done: false}
secondStringIterator.next();
> Object {value: "o", done: false}
stringIterator.next();
> Object {value: "k", done: false}
stringIterator.next();
> Object {value: undefined, done: true}
secondStringIterator.next();
> Object {value: "k", done: false}Before you think how cool it is to use Symbol.iterator
to get the iterator of built-in datatypes, I would like to emphasize
that using Symbol.iterator is generally not cool. There is
an easier way to get the iterator of built-in data structures using the
public interface of built-in iterables.
You can create an ArrayIterator by calling the
entries method of an array. ArrayIterator
objects yield an array of [key, value] in each
iteration.
Strings can be handled as arrays using the spread operator:
let message = [...'ok'];
let pairs = message.entries();
for( let pair of pairs ) {
console.log( pair );
}
> [0, "o"]
> [1, "k"]The entries method is defined on sets and maps. You can
also use the keys and values method on a set
or map to create an iterator/iterable of the keys or values.
Example:
let colors = new Set( [ 'red', 'yellow', 'green' ] );
let horses = new Map( [[5, 'QuickBucks'], [8, 'Chocolate'], [3, 'Filippone']] );
console.log( colors.entries() );
> SetIterator {["red", "red"], ["yellow", "yellow"], ["green", "green"]}
console.log( colors.keys() );
> SetIterator {"red", "yellow", "green"}
console.log( colors.values() );
> SetIterator {"red", "yellow", "green"}
console.log( horses.entries() );
> MapIterator {[5, "QuickBucks"], [8, "Chocolate"], [3, "Filippone"]}
console.log( horses.keys() );
> MapIterator {5, 8, 3}
console.log( horses.values() );
> MapIterator {"QuickBucks", "Chocolate", "Filippone"}You don’t need these iterators though to perform the iteration. Sets and maps are iterable themselves, therfore, they can be used in for-of loops.
A common destructuring pattern is to iterate the keys and values of a map using destructuring in a for-of loop:
for ( let [key, value] of horses ) {
console.log( key, value );
}
> 5 "QuickBucks"
> 8 "Chocolate"
> 3 "Filippone"When creating a set or a map, you can pass any iterable as an argument, provided that the results of the iteration can form a set or a map:
let s = new Set( countdownIterable );
> Set {9, 8, 7, 6, 5, 4, 3, 2, 1}We can understand iterables a bit better by concentrating on data flow:
for-of loop, the ... operator, and
some other language constructs are data consumers. They consume
iterable dataWe can create independent iterator objects on the same iterable. Each iterator acts like a pointer to the upcoming element the linked data source can consume.
In the lesson on sets and maps, we have learned that it is possible
to convert sets to arrays using the spread operator:
let arr = [...set];.
You now know that a set is an iterable object, and the spread operator is a data consumer. The formation of the array is based on the iterable interface. ES6 makes a lot of sense once you start connecting the dots.
There is a relationship between iterators and generators: a generator is a special function that returns an iterator. There are some differences between generator functions and regular functions:
* after the function
keyword,yield keyword in the created iterator
function. By writing yield v, the iterator returns
{ value: v, done: false } as a valueExample:
function *getLampIterator() {
yield 'red';
yield 'green';
return 'lastValue';
// implicit: return undefined;
}
let lampIterator = getLampIterator();
console.log( lampIterator.next() );
> Object {value: "red", done: false}
console.log( lampIterator.next() );
> Object {value: "green", done: false}
console.log( lampIterator.next() );
> Object {value: "lastValue", done: true}When we reach the end of a function, it automatically returns
undefined. In the above example, we never reached the end,
as we returned 'lastValue' instead.
If the return value was missing, the function would return
{value: undefined, done: true}.
Use generators to define custom iterables to avoid using the well known symbol
Symbol.iterator.
Recall our string iterator example to refresh what iterable objects and iterators are:
let message = 'ok';
let stringIterator = message[Symbol.iterator]();We call the next method of stringIterator
to get the next element:
console.log( stringIterator.next() );
> Object {value: "o", done: false}Iterable objects have a [Symbol.iterator] method that
returns an iterator.
Iterator objects have a next method that returns an
object with keys value and done.
Generator functions return an object that is both an iterable and an iterator. Generator functions have:
[Symbol.iterator] method to return their
iterator,next method to perform the iterationAs a consequence, the return value of generator functions can be used
in for-of loops, after the spread operator, and in all
places where iterables are consumed.
for ( let ch of message ) {
console.log( ch );
}
> o
> kIn the above example, [...lampIterator] contains the
remaining values of the iteration in an array.
When equating an array to an iterable, iteration takes place.
function *getLampIterator() {
yield 'red';
yield 'green';
return 'lastValue';
// implicit: return undefined;
}
let lampIterator = getLampIterator();
console.log( lampIterator.next() );
> Object {value: "red", done: false}
console.log( [...lampIterator] );
> ["green"]The destructuring assignment is executed as follows:
lampIterator is substituted by an array of form
[...lampIterator]head is assigned to
the first element of the arraylampIterator was used to build an array with all
elements on the right hand side, [...lampIterator] is empty
in the console logIt is possible to combine two sequences in one iterable. All you need
to do is use yield * to include an iterable, which will
enumerate all of its values one by one.
let countdownGenerator = function *() {
let i = 10;
while ( i > 0 ) yield --i;
}
let lampGenerator = function *() {
yield 'red';
yield 'green';
}
let countdownThenLampGenerator = function *() {
yield *countdownGenerator();
yield *lampGenerator();
}
console.log( [...countdownThenLampGenerator()] );
> [9, 8, 7, 6, 5, 4, 3, 2, 1, 0, "red", "green"]The next method of iterators can be used to pass a value
that becomes the value of the previous yield statement.
let greetings = function *() {
let name = yield 'Hi!';
yield `Hello, ${ name }!`;
}
let greetingIterator = greetings();
console.log( greetingIterator.next() );
> Object {value: "Hi!", done: false}
console.log( greetingIterator.next( 'Lewis' ) );
> Object {value: "Hello, Lewis!", done: false}You now know everything to be able to write generator functions. This is one of the hardest topics in ES6, so you will get a chance to solve more exercises than usual.
After practicing the foundations, you will find out how to use generators in practice to:
For the sake of completeness, it is worth mentioning that generators can be used for asynchronous programming. Running asynchronous code is outside the scope of this lesson. We will use promises for handling asynchronous code.
These exercises help you explore in more depth how iterators and generators work. You will get a chance to play around with iterators and generators, which will result in a higher depth of learning experience for you than reading about the edge cases.
You can also find out if you already know enough to command these edge cases without learning more about iterators and generators.
I will post an article with the solutions of the exercises. I will hide the solutions for a couple of days so that you can try solving these exercises yourself.
If you liked this lesson, check out the course by clicking the book below, or visiting this link.

What happens if we use a string iterator in a for-of
loop?
let message = 'ok';
let messageIterator = message[Symbol.iterator]();
messageIterator.next();
for ( let item of messageIterator ) {
console.log( item );
}Create a countdown iterator that counts from 9 to 1. Use generator functions!
let getCountdownIterator = // Your code comes here
console.log( [ ...getCountdownIterator() ] );
> [9, 8, 7, 6, 5, 4, 3, 2, 1]Make the following object iterable:
let todoList = {
todoItems: [],
addItem( description ) {
this.todoItems.push( { description, done: false } );
return this;
},
crossOutItem( index ) {
if ( index < this.todoItems.length ) {
this.todoItems[index].done = true;
}
return this;
}
};
todoList.addItem( 'task 1' ).addItem( 'task 2' ).crossOutItem( 0 );
let iterableTodoList = // ???;
for ( let item of iterableTodoList ) {
console.log( item );
}
// Without your code, you get the following error:
// Uncaught TypeError: todoList[Symbol.iterator] is not a functionDetermine the values logged to the console without running the code. Instead of just writing down the values, formulate your thought process and explain to yourself how the code runs line by line.
let errorDemo = function *() {
yield 1;
throw 'Error yielding the next result';
yield 2;
}
let it = errorDemo();
// Execute one statement at a time to avoid
// skipping lines after the first thrown error.
console.log( it.next() );
console.log( it.next() );
console.log( [...errorDemo()] );
for ( let element of errorDemo() ) {
console.log( element );
}Create an infinite sequence that generates the next value of the Fibonacci sequence.
The Fibonacci sequence is defined as follows:
fib( 0 ) = 0fib( 1 ) = 1n > 1,
fib( n ) = fib( n - 1 ) + fib( n - 2 )Create a lazy filter generator function. Filter the
elements of the Fibonacci sequence by keeping the even values only.
function *filter( iterable, filterFunction ) {
// insert code here
}In my last article, I gave you six exercises. In this article, you can check the reference solutions.
Similarly to generators, in case of strings, arrays, DOM elements, sets, and maps, an iterator object is also an iterable.
Therefore, in the for-of loop, the remaining
k letter is printed out.
let getCountdownIterator = function *() {
let i = 10;
while( i > 1 ) {
yield --i;
}
}
console.log( [ ...getCountdownIterator() ] );
> [9, 8, 7, 6, 5, 4, 3, 2, 1]We could use well known symbols to make todoList iterable.
We can add a *[Symbol.iterator] generator function that
yields the elements of the array. This will make the
todoList object iterable, yielding the elements of
todoItems one by one.
let todoList = {
todoItems: [],
*[Symbol.iterator]() {
yield* this.todoItems;
}
addItem( description ) {
this.todoItems.push( { description, done: false } );
return this;
},
crossOutItem( index ) {
if ( index < this.todoItems.length ) {
this.todoItems[index].done = true;
}
return this;
}
};
let iterableTodoList = todoList;If you prefer staying away from well known symbols, it is possible to make your code more semantic:
let todoList = {
todoItems: [],
addItem( description ) {
this.todoItems.push( { description, done: false } );
return this;
},
crossOutItem( index ) {
if ( index < this.todoItems.length ) {
this.todoItems[index].done = true;
}
return this;
}
};
todoList.addItem( 'task 1' ).addItem( 'task 2' ).crossOutItem( 0 );
let todoListGenerator = function *() {
yield* todoList.todoItems;
}
let iterableTodoList = todoListGenerator();console.log( it.next() );
> Object {value: 1, done: false}
console.log( it.next() );
> Uncaught Error yielding the next result
console.log( [...errorDemo()] );
> Uncaught Error yielding the next result
for ( let element of errorDemo() ) {
console.log( element );
}
> Object {value: 1, done: false}
> Uncaught Error yielding the next resultWe created three iterables in total: it, one in the
statement in the spread operator, and one in the for-of
loop.
In the example with the next calls, the second call
results in a thrown error.
In the spread operator example, the expression cannot be evaluated, because an error is thrown.
In the for-of example, the first element is printed out,
then the error stopped the execution of the loop.
function *fibonacci() {
let a = 0, b = 1;
yield a;
yield b;
while( true ) {
[a, b] = [b, a+b];
yield b;
}
}function *filter( iterable, filterFunction ) {
for( let element of iterable ) {
if ( filterFunction( element ) ) yield element;
}
}
let evenFibonacci = filter( fibonacci(), x => x%2 === 0 );Notice how easy it is to combine generators and lazily evaluate them.
evenFibonacci.next()
> {value: 0, done: false}
evenFibonacci.next()
> {value: 2, done: false}
evenFibonacci.next()
> {value: 8, done: false}
evenFibonacci.next()
> {value: 34, done: false}
evenFibonacci.next()
> {value: 144, done: false}Lazy evaluation is essential when we work on a large set of data. For instance, if you have 1000 accounts, chances are that you don’t want to transform all of them if you just want to render the first ten on screen. This is when lazy evaluation comes into play.
Seva Zaikov | January 27, 2018
Reduce is a very powerful concept, coming from the functional
programming (also known as fold), which allows to build any
other iteration function – sum, product,
map, filter and so on. However, how can we
achieve asynchronous reduce, so requests are executed consecutively, so
we can, for example, use previous results in the future calls?
In our example, I won’t use previous result, but rely on the fact that we need to execute these requests in this specific order
Let’s start with a naïve implementation, using just normal iteration:
I use async/await here, which allows us to wait inside
for ... of, or regularforloop as it was a synchronous call!
async function createLinks(links) {
const results = [];
for (link of links) {
const res = await createLink(link);
results.push(res);
}
return results;
}
const links = [url1, url2, url3, url4, url5];
createLinks(links);This small code inside is, basically, a reducer, but with asynchronous flow! Let’s generalize it, so we’ll pass handler there:
async function asyncReduce(array, handler, startingValue) {
let result = startingValue;
for (value of array) {
// `await` will transform result of the function to the promise,
// even it is a synchronous call
result = await handler(result, value);
}
return result;
}
function createLinks(links) {
return asyncReduce(
array,
async (resolvedLinks, link) => {
const newResolvedLink = await createLink(link);
return resolvedLinks.concat(newResolvedLink);
},
[]
);
}
const links = [url1, url2, url3, url4, url5];
createLinks(links);Now we have fully generalized reducer, but as you can see, the amount
of code in our createLinks function stayed almost the same
in size – so, in case you use once or twice, it might be not that
beneficial to extract to a general asyncReduce
function.
Okay, but not everybody can have fancy async/await – some projects have requirements, and async/await is not possible in the near future. Well, another new feature of modern JS is generators, and you can use them to essentially repeat the same behaviour (and almost the syntax!) as we showed with async/await. The only problem is the following:
Have you ever used iterators/generators in JS?
— Asen Bozhilov (@abozhilov) December 11, 2017
Apparently, not so many projects/people dive into generators, due to
their complicated nature and alternatives, and because of that, I’ll
separate our asyncReduce immediately, so you can hide
implementation details:
import co from 'co';
function asyncReduce(array, handler, startingValue) {
return co(function* () {
let result = startingValue;
for (value of array) {
// however, `co` does not wrap simple values into Promise
// automatically, so we need to do so
result = yield Promise.resolve(handler(result, value));
}
return result;
});
}
function createLinks(links) {
return asyncReduce(
array,
async (resolvedLinks, link) => {
const newResolvedLink = await createLink(link);
return resolvedLinks.concat(newResolvedLink);
},
[]
);
}
const links = [url1, url2, url3, url4, url5];
createLinks(links);You can see that our interface remained the same, but the inside
changed to utilize co library –
while it is not that complicated, it might be pretty frustrating to
understand what do you need to do, if we ask all users of this function
to wrap their calls in co manually. You also will need to
import co or to write your own generator runner – which is
not very complicated, but one more layer of complexity.
Okay, but what about good old ES5? Maybe you don’t use babel, and need to support some old JS engines, or don’t want to use generators. Well, it is still good – all you need is available implementation of promises (which are hard to cancel) – either native or any polyfill, like Bluebird.
function asyncReduce(array, handler, startingValue) {
// we are using normal reduce, but instead of immediate execution
// of handlers, we postpone it until promise will be resolved
array.reduce(
function (promise, value) {
return promise.then((acc) => {
return Promise.resolve(handler(acc, value));
});
},
// we started with a resolved promise, so the first request
// will be executed immediately
// also, we use resolved value as our acc from async reducer
// we will resolve actual async result in promises
Promise.resolve(startingValue)
);
}While the amount of code is not bigger (it might be even smaller), it is less readable and has to wrap your head around it – however, it works exactly the same.