 ]
]Try them out!
]
As always, we’ll need three files:
As seen above, our clock has many different elements that make it well, a clock. No, we aren’t using any old image. Instead, we’ll be using CSS to handcraft this clock ourselves. If you count up all the different elements in the clock, you will notice that we need nine different divs for the following:
Let’s create those divs in our index.html file:
<!DOCTYPE html>
<html>
<head>
    <title>Clock</title>
    <meta name="viewport" content="width=device-width, initial-scale=1">
    <link rel="stylesheet" href="style.css" />
</head>
<body>
    <div class="clock">
        <div id="hours"></div>
        <div id="minutes"></div>
        <div id="seconds"></div>
        <div class="three"></div>
        <div class="six"></div>
        <div class="nine"></div>
        <div class="twelve"></div>
        <div class="center"></div>
    </div>

    <script type="text/javascript" src="app.js"></script>
</body>
</html>
Notice how we set ids for the arms so that when we actually want to make them move, it’ll be easier to communicate with them in JavaScript.
Here comes the hard part. We have to actually design the clock with nothing but CSS. First, we have to set our black background and make the circular shape of the clock. We can do that by starting with a height and width of the clock class to be 500px, and the border-radius to 100% so that we can make it circular. We also need a border with a greyish (#aaaaaa) color, and to make the clock centered on the page, we can use the margin and position attributes. Here’s what the CSS so far should look like:
* {
    margin : 0;
    padding : 0;
    border: 0;
}

body {
    background-color : #000;
}

.clock {
    height : 31.25em;
    width : 31.25em;
    background-color : #DDD;
    border-radius : 31.25em;
    border : 0.1875em solid #AAA;
    margin : auto;
    position : absolute;
    top : 0; left : 0; bottom : 0; right : 0;
}
Now that we’ve got this big circle on our screen, we need to make the small indicators for the third, sixth, ninth, and twelfth hours. We can do this by making all four of those divs have a width of 3px, a length of 15px, a color of #000 (black), and playing around with the position (top, bottom, left, right) attributes:
.twelve, .three, .six, .nine {
    position : absolute;
    height : .1875em;
    width : .9375em;
    background : #111;
}

.twelve, .six {
    left : 0; right : 0; margin : 0 auto;
    width : 0.1875em;
    height : .9375em;
}

.three, .nine {
    top : 0; bottom : 0; margin : auto 0;
}

.twelve { top : 0; }
.three { right : 0; }
.six { bottom : 0; }
.nine { left : 0; }
Alright, now we’ve got a better looking clock. However, it isn’t quite done yet! We still need to design the hour, minute, and second arms! This is where it gets a little more complex as all of these arms have different lengths and widths. Before that, however, we just need a small dot in the center. For the second hand, let’s set a height of 160px, a width of 2px, and a #ff4136 (red) color. For the minute hand, we can set a height of 200px, and a width of 2px, and a #000 (black) color. Lastly, for the hour hand, we can set a height of 80px, a width of 6px, and a #000 (black) color. For all of the hands we also need to set a -webkit-transform-origin so that the element can move it’s position once we link it with our JavaScript. And lastly, we need to play around with the positioning to make the hands sit on the center dot perfectly:
.center {
    width : 0.625em;
    height : 0.625em;
    position : absolute;
    left : 0; right : 0; top : 0; bottom : 0;
    margin : auto;
    background : #000;
    border-radius : 0.625em;
}

#seconds, #minutes, #hours {
    position : absolute;
    width : .125em;
    left : 0; right : 0; top : 0;
    margin : auto;
    transform-origin : bottom;
    background : #000;
}

#seconds {
    height : 10em;
    bottom : 10em;
    background : #FF4136;
}

#minutes {
    height : 12.5em;
    bottom : 12.5em;
}

#hours {
    height : 5em;
    width : 0.375em;
    bottom : 5em;
}
We now have a good-looking clock, but it doesn’t move it’s hands! Let’s change that with some JavaScript.
To make our hands actually move, we have to write a function in JavaScript. Since every circle is 360 degrees, and there are 12 hours, after each hour, the hour hand will move 30 degrees. Similarly, since there are 60 minutes in an hour, and 60 seconds in a minute, the minute and second hands will both move 6 degrees every minute or second. So, all we have to do, is make those element id’s rotate those degrees using the -webkit-transform:rotate attribute. Here’s what our JavaScript function should look like:
const secondHand = document.getElementById( "seconds" );
const minuteHand = document.getElementById( "minutes" );
const hourHand = document.getElementById( "hours" );

function getTime( date ){
    // getting the time and converting to degrees
    let timeObj = {};
    timeObj.hours = 30 * ( date.getHours() % 12 + date.getMinutes() / 60 );
    timeObj.minutes = 6 * date.getMinutes();
    timeObj.seconds = 6 * date.getSeconds();

    return timeObj;
}

function setRotation( timeObj, seconds, minutes, hours ){
    function rotateCssText( degrees ){
        return "transform : rotate(" + degrees + "deg);";
    }
    seconds.style.cssText = rotateCssText( timeObj.seconds );
    minutes.style.cssText = rotateCssText( timeObj.minutes );
    hours.style.cssText = rotateCssText( timeObj.hours );
}

function tickingClock(){
    setRotation(
        getTime( new Date() ),
        secondHand,
        minuteHand,
        hourHand
    );
    setTimeout( tickingClock, 1000 );
}

// init
tickingClock();
You did it! We now have a fully-functional, minimal, and beautiful clock. I hope you’ve learned a ton in terms of CSS design and JavaScript’s functionality in these types of projects.
Don’t stop! Maybe make the time display digitally underneath it, customize the look of the clock to your style, or even better - try and make the clock responsive with media queries!
This weather app tutorial will use HTML geolocation to auto-detect the user’s latitude and longitude and then will use those coordinates to determine the weather using the Dark Sky API. Before we start, you must sign up for your API key over at Dark Sky. Once you sign up and reach to your console, take note of your API key. Just for your information, this API is free for up to 1,000 requests/day.
Now that we have our API key, we can create our files:
As you probably saw in the preview above, we’re going to be displaying the current temperature, a short summary, and the coordinates based on the user’s location. That’s why we’ll need three divs in addition to adding the jQuery CDN (for the API request) and linking our style.css and app.js files.
<!DOCTYPE html>
<html lang="en">
    <head>
        <meta charset="utf-8">
        <meta name="viewport" content="width=device-width, initial-scale=1">
        <link rel="stylesheet" href="style.css" />
        <title>Weather</title>
    </head>

    <body>
        <h1><div id="temp"></div><div id="minutely"></div></h1>
        <h2><div id="location"></div></h2>
        <footer>
            <h4><a href="https://darksky.net/poweredby/">Powered by the wonderful folk at Dark Sky</a></h4>
        </footer>
    </body>
    <script src="app.js" type="text/javascript"></script>
</html>Our JS file will be centered around HTML’s geolocation.
This is what we need to incorporate:
function weather(){
    setElementText( "location", "Locating…" );
    navigator.geolocation.getCurrentPosition(
        geoLocationSuccess,
        geoLocationError );
}

function geoLocationSuccess( position ){
    requestWeather( {
        latitude : position.coords.latitude,
        longitude : position.coords.longitude
    });
}

function geoLocationError(){
    setElementText( "location", "Unable to retrieve your location" );
}

function requestWeather( position ){
    const apiKey = "535ff67f2907c354fb35b0a64bbd51d6";
    const url = "https://api.forecast.io/forecast/";

    serverReq( url + apiKey + "/" + position.latitude + "," + position.longitude + "?units=auto",
        data => {
            setElementText( "location", "Latitude is " + position.latitude + "° Longitude is " + position.longitude + "°" );
            setElementText( "temp",  data.currently.temperature + "° C" );
            setElementText( "minutely",  data.minutely.summary );
        });
}

function serverReq( url, callback ){
    const req = new XMLHttpRequest();

    req.open( "GET", url, true );
    req.onload = () => {
        if( req.status >= 200 && req.status < 400 )
            callback( JSON.parse( req.responseText ));
        else
            console.log( req );
    };
    req.onerror = function(){
        console.log( req );
    };
    req.send();
}

function setElementText( elem_id, text ){
    document.getElementById( elem_id ).innerText = text;
}

weather();
There you have it! We now have a functional weather app :)
Here’s my take on some basic centering and font changes in CSS. Feel free to style the page to your liking.
html {
    font-family : SF Mono, menlo, monaco, monospace;
    text-align : center;
}

body {
    margin : 0 auto;
    background-color : #1A1A1A;
}

h1 { color : #F4005F; }

h2 { color : #58D1EB; }

a { color : #C4C5B5; }
I encourage you to try to explore more with the world of APIs. You can build a Quote Generator that uses a quote API, or you could even further advance this project by adding more weather details from the Dark Sky API!.
Things to try out:

In this tutorial, we’ll make our very own color generator with just a couple lines of JavaScript. First off, you’ll need a folder with three files:
Before we begin, we have to link all our files all together. Open up your index.html file in your favorite text editor and add a title, a viewport, and link all our files together. Our index.html file should look something like this:
<!DOCTYPE html>
<html lang="en">
<head>
    <meta charset="utf-8">
    <title>Hex Color Generator</title>
    <meta name="viewport" content="width=device-width, initial-scale=1">
    <link rel="stylesheet" href="style.css" />
</head>

<body>
    <h1 class="heading">Press the <i>SPACE BAR</i> to change the background colour</h1>
    <div class="btn left cmd"><p class="bottom_btn_text">cmd ⌘</p></div>
    <div class="btn left spacebar"><p class="bottom_btn_text">space</p></div>
    <div class="btn right alt"><p class="top_btn_text">alt</p><p class="bottom_btn_text">⌥</p></div>
    <script src="app.js"></script>
</body>
</html>
Seems new? Don’t worry!
The !DOCTYPE html tag tells the web broswer what version of HTML the page is written in. Right below that, we have our head tag, where we can add our title, meta, and link up our CSS file. The viewport is used to make the page responsive so that any device can view the content clearly by based on the size of the screen so that browser can scale accordingly. Lastly, we have to link our JavaScript file which will contain our function of generating the random color.
If you are somewhat familiar with CSS, you know that colors are either specified in a rgb or hex code format. An example of this would be #ffffff (white) or #000000 (black). To generate our number, JavaScript has a math.random function that returns, random numbers that are between 0 and 1.
For example, let’s start by printing a simple math.random function:
function getColor() {
  return '#' + Math.random()
}

document.write(getColor());
If you take a look at the result by opening up our html file, we get a random number between 0 and 1 with a (#) added in front of it. However, since hex numbers include six letters (A, B, C, D, E, & F), we need to add those letters into our result as well. In addition, we also need to get rid of the (0) and (.) and limit the result to only 6 characters. Go ahead and try to solve this yourself. Here’s a hint: you’ll need to expand the math.random function by using Javascript’s toString() and slice() methods.
Seriously, don’t move on! Read up on those methods!
Alright, let’s see what you’ve come up with. Using the toString() method, we can convert our number to a string with a hexadecimal value. We can get a hexadecimal value by adding .toString(16) to the end of our math.random function. Let’s check out our result:
function getColor() {
   return '#' + Math.random().toString(16)
}

document.write(getColor());
Now we have a number in hexadecimal format, but it isn’t ready yet! We still have to get rid of the (0) and (.) and limit our result to 6 characters! We can to that with the JavaScript slice() method by adding .slice(2,8) at the end of our math.random function. The reason we have 2 and 8 in the parenthesis is because we want to slice the result starting with the first two characters and ending at the eighth character to get six characters in total. Check out the result!
function getColor() {
  return '#' + Math.random().toString(16).slice(2, 8);
}

document.write(getColor());
Finally, we have a number we can work with! All we need to do is set this hex value as our background. We can do that by writing another function, and that function will do two things:
Go ahead, you should be able to do this one!
Here’s what your app.js code should look like:
function getColor() {
  return '#' + Math.random().toString(16).slice(2, 8);
}

function setBck(){
    let colour = getColour();
    let textColour = getInverseColour( colour );
    document.body.style.background = colour;
    document.body.style.color = textColour;
}

setBck();
If we open our html file in the browser, you should see a random color every time you refresh the page!
Now, nobody wants to keep refreshing! We want to generate a new color every time someone clicks the space bar. We can do that by editing the setBackground() function at the end. Instead of just running it, we have to tell the browser when to run it.
We can do this by using an if statement that runs the setBackground() function only when the keyCode of 32 (code for spacebar) is pressed. This is what we have to write:
This is what our finished app.js file should look like:
function setBck(){
    let colour = getColour();
    let textColour = getInverseColour( colour );
    document.body.style.background = colour;
    document.body.style.color = textColour;
}

function getInverseColour( bckColour ){
    let red = 255 - parseInt( bckColour.slice( 1, 3 ), 16 );
    let green = 255 - parseInt( bckColour.slice( 3, 5 ), 16 );
    let blue = 255 - parseInt( bckColour.slice( 5, 7 ), 16 );

    return "#" + red.toString( 16 ) + green.toString( 16 ) + blue.toString( 16 );
}

function getColour(){
    return "#" + Math.random().toString( 16 ).slice( 2, 8 );
}

function addClass( elem, className, delay ){
    elem.classList.add( className );
    if( delay && ! isNaN( delay )){
        setTimeout( function(){
            elem.classList.remove( className );
        }, delay );
    }
}

document.body.onkeyup = function( e ){
    if( e.keyCode == 32 ){
        setBck();
        addClass( document.getElementsByClassName( "spacebar" )[ 0 ], "btn_transition", 200 );
    }
};
Open up your html file in the browser or click on the result tab. Then, press the spacebar. Pretty neat, right?
But wait! We haven’t even touched our style.css file! Open it up! We’ll add a transition just so it looks a little more fluid when switching between colors.
body{
    transition : all .5s ease;
    text-align: center;
    font-family : SF Mono, monospace;
}
.heading{
    margin-top : 1em;
}

.btn{
    display : inline-block;
    height : 10vh;
    width : 10vw;
    border : 1px solid #1D1D1D;
    background-color : #343434;
    color : #FEFEFA;
    font-weight : 200;
    border-radius : 5px;
    font-size : 0.9em;
    vertical-align : top;
    position : relative;
    box-shadow : 0 2px 1px rgba( 0,0,0,0.5 );
    transition : all 0.2s ease;
}
.spacebar{
    width : 50vw;
}

p{
    margin : 0;
    padding : 0;
}

.btn.right .bottom_btn_text, .btn.right .top_btn_text{
    right : 3px;
}

.btn.left .bottom_btn_text, .btn.left .top_btn_text{
    left : 3px;
}

.bottom_btn_text{
    position : absolute;
    bottom : 3px;
}

.top_btn_text{
    position : absolute;
    top : 3px;
}

.btn_transition{
    box-shadow : none;
}
Open up your html file and take a look at your latest creation!
I hope you’ve generated some pretty unique colors and learned a ton! However, don’t stop here! Think about what you can add next! Can you print the hex color code on screen? Can you look up some additional styles to add? Can you add a “press the spacebar” message that appears until the user presses the spacebar?
Improvements:
In this project, we’ll be building a live code editor similar to Codepen or JsFiddle.
Let’s get started by creating our usual three files:
To get started with our markup, we’ll be needing three textarea tags which will correspond with the id of the language we’ll be compiling. To actually show the compiled code, we will also need an iframe which will allow us to insert an html document into an existing html page. Make sure to set ids for each tag so we can communicate with these elements in JavaScript.
<!DOCTYPE html>
<head lang="en">
    <title>Code Editor</title>
    <meta name="viewport" content="width=device-width, initial-scale=1">
    <meta charset="utf-8">
    <link rel="stylesheet" href="style.css" />
</head>
<body>
    <textarea id="html" placeholder="HTML"></textarea>
    <textarea id="css" placeholder="CSS"></textarea>
    <textarea id="javascript" placeholder="JAVASCRIPT"></textarea>
    <iframe id="code"></iframe>
    <script type="text/javascript" src="app.js"></script>
</body>
</html>Before we head on to making our app, let’s style it up a bit. We should align the elements to the center, make the textarea elements go side by side, and put the iframe right below them.
body {
    text-align : center;
}

textarea {
    width : 32%;
    float : top;
    min-height : 250px;
    overflow : scroll;
    margin : auto;
    display : inline-block;
    background : #F4F4F9;
    outline : none;
    font-family : SF Mono, monotype;
    font-size : 14px;
}

iframe {
    bottom : 0;
    position : relative;
    width : 100%;
    height : 35em;
}
As always, feel free to customize this to your liking!
Now, here’s where we actually make our app functional. We can do so with just one function. Here’s what we’ll need to write in it:
function compile(){
    const html = document.getElementById( "html" );
    const css = document.getElementById( "css" );
    const javascript = document.getElementById( "javascript" );
    const code = document.getElementById( "code" ).contentWindow.document;

    document.body.onkeyup = () => {
        code.open();
        code.writeln( html.value + "<style>" + css.value + "</style>\n<script>" + javascript.value + "</script>" );
        code.close();
    };
};
That’s it! Pretty simple right? To take this a step further, try and make the textareas responsive with media queries. If you liked this tutorial, try building a Web Paint app!
This is amazing! I can’t believe something so simple could bring a silly grin to my face. Now that that has dissipated we can think about improving it.
Our web paint application is based off of HTML5’s canvas. We’ll be making a “whiteboard” that draws whenever you move your mouse while clicked. We’ll also implement an input box where we can specify what hex color we want. Since our app is basically a plain screen where we can draw, we don’t need to style anything (no CSS file needed). Therefore, we just need two files:
Our html will have all the usual tags (head, meta viewport, title, etc) but we do need to add an input tag to let the user specify a hex color, and a canvas tag for our canvas. We will also need to set ids for both.
<!DOCTYPE html>
<html lang="en">
    <head>
        <meta charset="utf-8">
        <meta name="viewport" content="width=device-width, initial-scale=1">
        <title>Web Paint App</title>
    </head>
    <body>
        <input id="hex" placeholder="enter hex colour"></input>
        <canvas id="draw"></canvas>
        <script src="app.js" type="text/javascript"></script>
    </body>
</html>In our app.js file, we need to assign our canvas id, draw, to a variable. Then, we’ll need to set another variable to the .getContext(’2d’) of that canvas variable so we can draw within it. In addition, we’ll need to write a small resize function so that we can set the canvas’s width and height to the window’s width and height. This way the canvas will take over the whole broswer window. We can do that like this:
let canvas = document.getElementById( "draw" );
let ctx = canvas.getContext( "2d" );
resize();

// Resize canvas with the window
function resize(){
    ctx.canvas.width = window.innerWidth;
    ctx.canvas.height = window.innerHeight;
}Our app needs four event listeners:
// Event Listeners
window.addEventListener( "resize", resize );
document.addEventListener( "mousemove", draw );
document.addEventListener( "mousedown", setPosition );
document.addEventListener( "mouseenter", setPosition );The drawing function of this project depends on the position of the mouse. Since we’ll be moving from one position to another one whenever the mouse is clicked or when the mouse is moved over the canvas, we’ll need to create a setPosition() function that sets variables to the user’s x & y position coordinates. We can then use those variables in our draw function.
// Set Position and Draw functions
let pos = { x : 0, y : 0 };

function setPosition( e ){
    pos.x = e.clientX;
    pos.y = e.clientY;
}
At last, we come to our draw() function. Our function will need a closure followed by the following:
This is all our JavaScript:
let canvas = document.getElementById( "draw" );
let ctx = canvas.getContext( "2d" );
resize();

// Resize canvas with the window
function resize(){
    ctx.canvas.width = window.innerWidth;
    ctx.canvas.height = window.innerHeight;
}

// Event Listeners
window.addEventListener( "resize", resize );
document.addEventListener( "mousemove", draw );
document.addEventListener( "mousedown", setPosition );
// document.addEventListener( "mouseenter", setPosition );

// Set Position and Draw functions
let pos = { x : 0, y : 0 };

function setPosition( e ){
    pos.x = e.clientX;
    pos.y = e.clientY;
}

function draw( e ){
//    if( e.button !== 1 ) return; // must be a left button mouse click
    let colour = document.getElementById( "hex" ).value; // get the user selected colour
    ctx.beginPath(); // begin drawing
    ctx.lineWidth = 20;
    ctx.lineCap = "round";
    ctx.strokeStyle = colour;
    ctx.moveTo( pos.x, pos.y ); // move to position of mouse before drawing
    setPosition( e );
    ctx.lineTo( pos.x, pos.y ); // draw line to end point

    ctx.stroke(); // fill in the line to visualise it
}
There you have it! We now have a drawing app that can use any hex color. Try inserting a hex code in the input box and click and drag to mouse to draw! After you’ve accomplished this, try to make another text box that changes the lineWidth of the line, or if you really want a challenge, try saving the canvas in a user’s localStorage so that the drawing will not be erased when the page is refreshed!
Today we’ll be creating a guessing number game in Python that you can run in your terminal. Open up your favorite text editor and let’s begin!
To start, we’ll need to import random as the random
module will let us generate a random number for the user to guess.
Then, we’ll set three variables:
numberofGuesses: set to 0 - contains how many guesses
the user takesnumber: to generate the random numbername: set to raw_input to get user’s
nameThe number variable will be set to
random.randint(1,50). This assigns the variable to a random
integer between 1 and 50. You may change the range if you wish.
Here’s what our code should look like so far:
import random

numberofGuesses = 0
number = random.randint(1,50)

name = raw_input("Hello! What is your name? ")Now, let’s print a message to the user asking to guess a number
between 1 and 50. After that, we can run more raw_inputs as
guesses and calculate whether the guess was too high or low in a while
loop with if
statements.
Our while loop will run the functions in it until a certain number of
guesses. In this case the while loop will be set to
while numberofGuesses < 8:. In the while loop, we can do
the following:
guess variable to raw_input for the
guess
guess input into an integer1) to the variable of
numberofGuessesguessesLeft variable to 8 -
numberofGuessesif statements to see if guess is larger or smaller
than number
guessesLeft to a string and print out if number
is to low/highguess===number, which breaks the loop if
true and prints out that you guessed the number in
numberofGuesses triesguess!=number (not equal), which prints
out the number that the computer generated as the user did
not guess it within 8 triesThat may seem like a lot - and it is!
import random

numberofGuesses = 0
number = random.randint(1,50)

name = raw_input("Hello! What is your name? ")

print(name + ", I am thinking of a whole number between 1 and 50. Can you guess what it is?")

while numberofGuesses < 8:
  guess = raw_input("Take a guess ")
  guess = int(guess)

  numberofGuesses = numberofGuesses + 1;
  guessesLeft = 8 - numberofGuesses;

  if guess < number:
    guessesLeft=str(guessesLeft)
    print("Your guess is too low! You have " + guessesLeft + " guesses left")

  if guess > number:
    guessesLeft=str(guessesLeft)
    print("Your guess is too high! You have " + guessesLeft + " guesses left")

  if guess==number:
    break

if guess==number:
  numberofGuesses=str(numberofGuesses)
  print("Good job! You guessed the number in " + numberofGuesses + " tries :)")

if guess!=number:
  number=str(number)
  print("Sorry. The number I was thinking of was " + number + " :)")
Take note that when we want to either use the number in code our
print it out, we need to convert it. First, we convert it to an integer
(int(guess)). In the same way, when we want to print out a
number, we make sure it is converted to a string
(str(number)).
Before we get started with the how of building a Neural Network, we need to understand the what first.
Neural networks can be intimidating, especially for people new to machine learning. However, this tutorial will break down how exactly a neural network works and you will have a working flexible neural network by the end. Let’s get started!
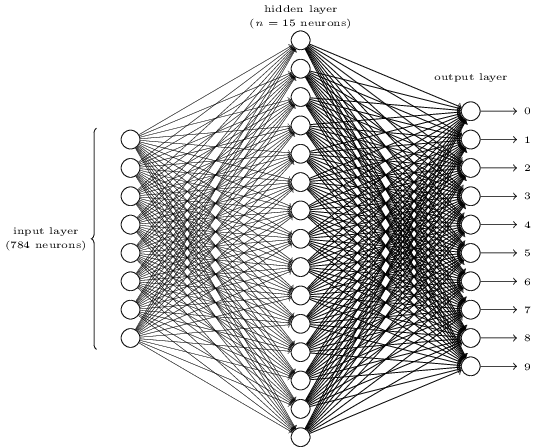
With approximately 100 billion neurons, the human brain processes data at speeds as fast as 268 mph! In essence, a neural network is a collection of neurons connected by synapses. This collection is organized into three main layers: the input layer, the hidden layer, and the output layer. You can have many hidden layers, which is where the term deep learning comes into play. In an artifical neural network, there are several inputs, which are called features, and produce a single output, which is called a label.

Image via Kabir Shah
The circles represent neurons while the lines represent synapses. The role of a synapse is to multiply the inputs and weights. You can think of weights as the “strength” of the connection between neurons. Weights primarily define the output of a neural network. However, they are highly flexible. After, an activation function is applied to return an output.
Here’s a brief overview of how a simple feedforward neural network works:
At its core, neural networks are simple. They just perform a dot product with the input and weights and apply an activation function. When weights are adjusted via the gradient of loss function, the network adapts to the changes to produce more accurate outputs.
Our neural network will model a single hidden layer with three inputs and one output. In the network, we will be predicting the score of our exam based on the inputs of how many hours we studied and how many hours we slept the day before. Our test score is the output. Here’s our sample data of what we’ll be training our Neural Network on:
| Hours Studied, Hours Slept (input) | Test Score (output) |
|---|---|
| 2, 9 | 92 |
| 1, 5 | 86 |
| 3, 6 | 89 |
| 4, 8 | ? |
Original example via Welch Labs
As you may have noticed, the ? in this case represents
what we want our neural network to predict. In this case, we are
predicting the test score of someone who studied for four hours and
slept for eight hours based on their prior performance.
Let’s start coding this bad boy! Open up a new python file. You’ll
want to import numpy as it will help us with certain
calculations.
First, let’s import our data as numpy arrays using
np.array. We’ll also want to normalize our units as our
inputs are in hours, but our output is a test score from 0-100.
Therefore, we need to scale our data by dividing by the maximum value
for each variable.
import numpy as np

# X = (hours sleeping, hours studying), y = score on test
X = np.array(([2, 9], [1, 5], [3, 6]), dtype=float)
y = np.array(([92], [86], [89]), dtype=float)

# scale units
X = X/np.amax(X, axis=0) # maximum of X array
y = y/100 # max test score is 100
Next, let’s define a python class and write an
init function where we’ll specify our parameters such as
the input, hidden, and output layers.
class Neural_Network(object):
  def __init__(self):
    #parameters
    self.inputSize = 2
    self.outputSize = 1
    self.hiddenSize = 3
It is time for our first calculation. Remember that our synapses perform a dot product, or matrix multiplication of the input and weight. Note that weights are generated randomly and between 0 and 1.
In the data set, our input data, X, is a 3x2 matrix. Our
output data, y, is a 3x1 matrix. Each element in matrix
X needs to be multiplied by a corresponding weight and then
added together with all the other results for each neuron in the hidden
layer. Here’s how the first input data element (2 hours studying and 9
hours sleeping) would calculate an output in the network:
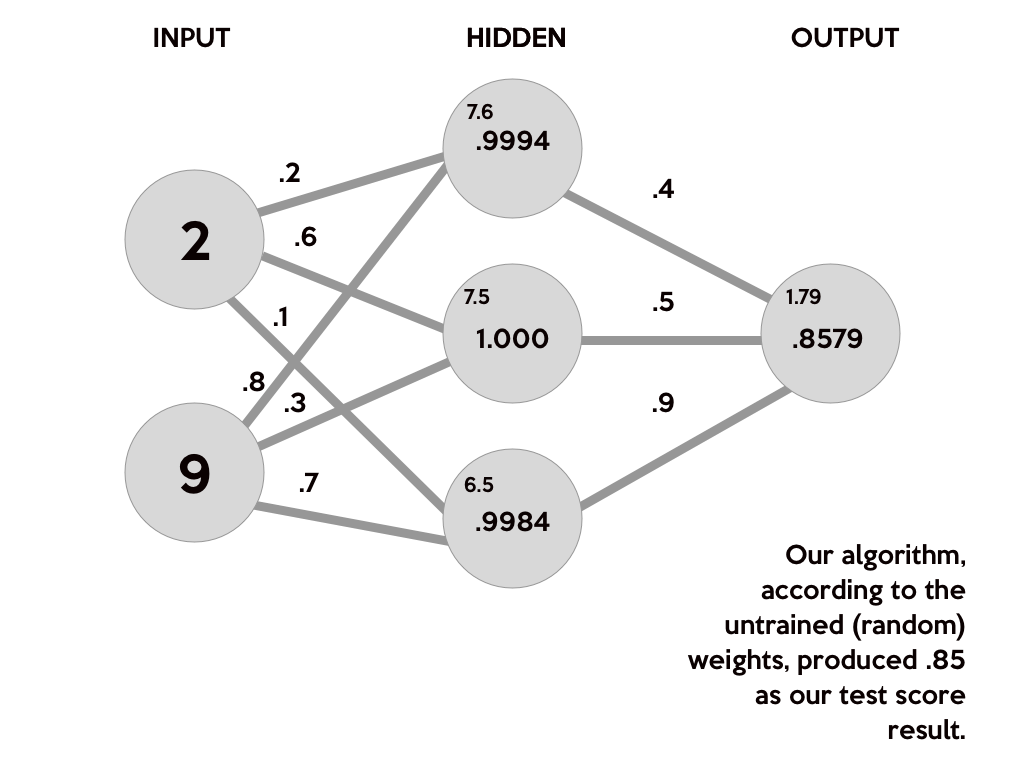
This image breaks down what our neural network actually does to produce an output. First, the products of the random generated weights (.2, .6, .1, .8, .3, .7) on each synapse and the corresponding inputs are summed to arrive as the first values of the hidden layer. These sums are in a smaller font as they are not the final values for the hidden layer.
(2 * .2) + (9 * .8) = 7.6
(2 * .6) + (9 * .3) = 7.5
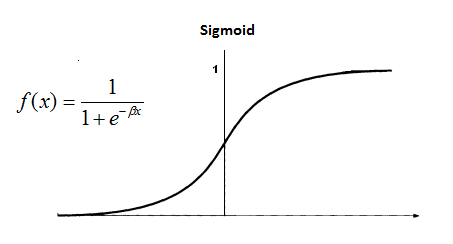
(2 * .1) + (9 * .7) = 6.5To get the final value for the hidden layer, we need to apply the activation function. The role of an activation function is to introduce nonlinearity. An advantage of this is that the output is mapped from a range of 0 and 1, making it easier to alter weights in the future.
There are many activation functions out there. In this case, we’ll stick to one of the more popular ones - the sigmoid function.
S(7.6) = 0.999499799
S(7.5) = 1.000553084
S(6.5) = 0.998498818
Now, we need to use matrix multiplication again, with another set of random weights, to calculate our output layer value.
(.9994 * .4) + (1.000 * .5) + (.9984 * .9) = 1.79832Lastly, to normalize the output, we just apply the activation function again.
S(1.79832) = .8579443067And, there you go! Theoretically, with those weights, out neural
network will calculate .85 as our test score! However, our
target was .92. Our result wasn’t poor, it just isn’t the
best it can be. We just got a little lucky when I chose the random
weights for this example.
How do we train our model to learn? Well, we’ll find out very soon. For now, let’s countinue coding our network.
If you are still confused, I highly reccomend you check out this informative video which explains the structure of a neural network with the same example.
Now, let’s generate our weights randomly using
np.random.randn(). Remember, we’ll need two sets of
weights. One to go from the input to the hidden layer, and the other to
go from the hidden to output layer.
#weights
self.W1 = np.random.randn(self.inputSize, self.hiddenSize) # (3x2) weight matrix from input to hidden layer
self.W2 = np.random.randn(self.hiddenSize, self.outputSize) # (3x1) weight matrix from hidden to output layer
Once we have all the variables set up, we are ready to write our
forward propagation function. Let’s pass in our input,
X, and in this example, we can use the variable
z to simulate the activity between the input and output
layers. As explained, we need to take a dot product of the inputs and
weights, apply an activation function, take another dot product of the
hidden layer and second set of weights, and lastly apply a final
activation function to recieve our output:
def forward(self, X):
    #forward propagation through our network
    self.z = np.dot(X, self.W1) # dot product of X (input) and first set of 3x2 weights
    self.z2 = self.sigmoid(self.z) # activation function
    self.z3 = np.dot(self.z2, self.W2) # dot product of hidden layer (z2) and second set of 3x1 weights
    o = self.sigmoid(self.z3) # final activation function
    return o
Lastly, we need to define our sigmoid function:
def sigmoid(self, s):
    # activation function
    return 1/(1+np.exp(-s))
And, there we have it! A (untrained) neural network capable of producing an output.
import numpy as np

# X = (hours sleeping, hours studying), y = score on test
X = np.array(([2, 9], [1, 5], [3, 6]), dtype=float)
y = np.array(([92], [86], [89]), dtype=float)

# scale units
X = X/np.amax(X, axis=0) # maximum of X array
y = y/100 # max test score is 100

class Neural_Network(object):
  def __init__(self):
    #parameters
    self.inputSize = 2
    self.outputSize = 1
    self.hiddenSize = 3

    #weights
    self.W1 = np.random.randn(self.inputSize, self.hiddenSize) # (3x2) weight matrix from input to hidden layer
    self.W2 = np.random.randn(self.hiddenSize, self.outputSize) # (3x1) weight matrix from hidden to output layer

  def forward(self, X):
    #forward propagation through our network
    self.z = np.dot(X, self.W1) # dot product of X (input) and first set of 3x2 weights
    self.z2 = self.sigmoid(self.z) # activation function
    self.z3 = np.dot(self.z2, self.W2) # dot product of hidden layer (z2) and second set of 3x1 weights
    o = self.sigmoid(self.z3) # final activation function
    return o

  def sigmoid(self, s):
    # activation function
    return 1/(1+np.exp(-s))

NN = Neural_Network()

#defining our output
o = NN.forward(X)

print "Predicted Output: \n" + str(o)
print "Actual Output: \n" + str(y)
As you may have noticed, we need to train our network to calculate more accurate results.
Since we have a random set of weights, we need to alter them to make our inputs equal to the corresponding outputs from our data set. This is done through a method called backpropagation.
Backpropagation works by using a loss function to calculate how far the network was from the target output.
One way of representing the loss function is by using the mean sum squared loss function:

In this function, o is our predicted output, and
y is our actual output. Now that we have the loss function,
our goal is to get it as close as we can to 0. That means we will need
to have close to no loss at all. As we are training our network, all we
are doing is minimizing the loss.
To figure out which direction to alter our weights, we need to find the rate of change of our loss with respect to our weights. In other words, we need to use the derivative of the loss function to understand how the weights affect the input.
In this case, we will be using a partial derivative to allow us to take into account another variable.

Image via Kabir Shah
This method is known as gradient descent. By knowing which way to alter our weights, our outputs can only get more accurate.
Here’s how we will calculate the incremental change to our weights:
Calculating the delta output sum and then applying the derivative of the sigmoid function are very important to backpropagation. The derivative of the sigmoid, also known as sigmoid prime, will give us the rate of change, or slope, of the activation function at output sum.
Let’s continue to code our Neural_Network class by
adding a sigmoidPrime (derivative of sigmoid) function:
def sigmoidPrime(self, s):
    #derivative of sigmoid
    return s * (1 - s)
Then, we’ll want to create our backward propagation
function that does everything specified in the four steps above:
def backward(self, X, y, o):
    # backward propgate through the network
    self.o_error = y - o # error in output
    self.o_delta = self.o_error*self.sigmoidPrime(o) # applying derivative of sigmoid to error

    self.z2_error = self.o_delta.dot(self.W2.T) # z2 error: how much our hidden layer weights contributed to output error
    self.z2_delta = self.z2_error*self.sigmoidPrime(self.z2) # applying derivative of sigmoid to z2 error

    self.W1 += X.T.dot(self.z2_delta) # adjusting first set (input --> hidden) weights
    self.W2 += self.z2.T.dot(self.o_delta) # adjusting second set (hidden --> output) weights
We can now define our output through initiating foward propagation
and intiate the backward function by calling it in the
train function:
def train (self, X, y):
    o = self.forward(X)
    self.backward(X, y, o)
To run the network, all we have to do is to run the
train function. Of course, we’ll want to do this multiple,
or maybe thousands, of times. So, we’ll use a for loop.
NN = Neural_Network()
for i in xrange(1000): # trains the NN 1,000 times
  print "Input: \n" + str(X)
  print "Actual Output: \n" + str(y)
  print "Predicted Output: \n" + str(NN.forward(X))
  print "Loss: \n" + str(np.mean(np.square(y - NN.forward(X)))) # mean sum squared loss
  print "\n"
  NN.train(X, y)
Great, we now have a Neural Network! What about using these trained weights to predict test scores that we don’t know?
To predict our test score for the input of [4, 8], we’ll
need to create a new array to store this data,
xPredicted.
xPredicted = np.array(([4,8]), dtype=float)We’ll also need to scale this as we did with our input and output variables:
xPredicted = xPredicted/np.amax(xPredicted, axis=0) # maximum of xPredicted (our input data for the prediction)Then, we’ll create a new function that prints our predicted output
for xPredicted. Believe it or not, all we have to run is
forward(xPredicted) to return an output!
def predict(self):
    print "Predicted data based on trained weights: ";
    print "Input (scaled): \n" + str(xPredicted);
    print "Output: \n" + str(self.forward(xPredicted));
To run this function simply call it under the for loop.
NN.predict()If you’d like to save your trained weights, you can do so with
np.savetxt:
def saveWeights(self):
    np.savetxt("w1.txt", self.W1, fmt="%s")
    np.savetxt("w2.txt", self.W2, fmt="%s")
Here’s the final result:
import numpy as np

# X = (hours studying, hours sleeping), y = score on test, xPredicted = 4 hours studying & 8 hours sleeping (input data for prediction)
X = np.array(([2, 9], [1, 5], [3, 6]), dtype=float)
y = np.array(([92], [86], [89]), dtype=float)
xPredicted = np.array(([4,8]), dtype=float)

# scale units
X = X/np.amax(X, axis=0) # maximum of X array
xPredicted = xPredicted/np.amax(xPredicted, axis=0) # maximum of xPredicted (our input data for the prediction)
y = y/100 # max test score is 100

class Neural_Network(object):
  def __init__(self):
    #parameters
    self.inputSize = 2
    self.outputSize = 1
    self.hiddenSize = 3

    #weights
    self.W1 = np.random.randn(self.inputSize, self.hiddenSize) # (3x2) weight matrix from input to hidden layer
    self.W2 = np.random.randn(self.hiddenSize, self.outputSize) # (3x1) weight matrix from hidden to output layer

  def forward(self, X):
    #forward propagation through our network
    self.z = np.dot(X, self.W1) # dot product of X (input) and first set of 3x2 weights
    self.z2 = self.sigmoid(self.z) # activation function
    self.z3 = np.dot(self.z2, self.W2) # dot product of hidden layer (z2) and second set of 3x1 weights
    o = self.sigmoid(self.z3) # final activation function
    return o

  def sigmoid(self, s):
    # activation function
    return 1/(1+np.exp(-s))

  def sigmoidPrime(self, s):
    #derivative of sigmoid
    return s * (1 - s)

  def backward(self, X, y, o):
    # backward propgate through the network
    self.o_error = y - o # error in output
    self.o_delta = self.o_error*self.sigmoidPrime(o) # applying derivative of sigmoid to error

    self.z2_error = self.o_delta.dot(self.W2.T) # z2 error: how much our hidden layer weights contributed to output error
    self.z2_delta = self.z2_error*self.sigmoidPrime(self.z2) # applying derivative of sigmoid to z2 error

    self.W1 += X.T.dot(self.z2_delta) # adjusting first set (input --> hidden) weights
    self.W2 += self.z2.T.dot(self.o_delta) # adjusting second set (hidden --> output) weights

  def train(self, X, y):
    o = self.forward(X)
    self.backward(X, y, o)

  def saveWeights(self):
    np.savetxt("w1.txt", self.W1, fmt="%s")
    np.savetxt("w2.txt", self.W2, fmt="%s")

  def predict(self):
    print "Predicted data based on trained weights: ";
    print "Input (scaled): \n" + str(xPredicted);
    print "Output: \n" + str(self.forward(xPredicted));

NN = Neural_Network()
for i in xrange(1000): # trains the NN 1,000 times
  print "# " + str(i) + "\n"
  print "Input (scaled): \n" + str(X)
  print "Actual Output: \n" + str(y)
  print "Predicted Output: \n" + str(NN.forward(X))
  print "Loss: \n" + str(np.mean(np.square(y - NN.forward(X)))) # mean sum squared loss
  print "\n"
  NN.train(X, y)

NN.saveWeights()
NN.predict()
To see how accurate the network actually is, I ran trained it 100,000 times to see if it would ever get exactly the right output. Here’s what I got:
# 99999
Input (scaled):
[[ 0.66666667  1.        ]
 [ 0.33333333  0.55555556]
 [ 1.          0.66666667]]
Actual Output:
[[ 0.92]
 [ 0.86]
 [ 0.89]]
Predicted Output:
[[ 0.92]
 [ 0.86]
 [ 0.89]]
Loss:
1.94136958194e-18

Predicted data based on trained weights:
Input (scaled):
[ 0.5  1. ]
Output:
[ 0.91882413]
There you have it! A full-fledged neural network that can learn and adapt to produce accurate outputs. While we thought of our inputs as hours studying and sleeping, and our outputs as test scores, feel free to change these to whatever you like and observe how the network adapts! After all, all the network sees are the numbers. The calculations we made, as complex as they seemed to be, all played a big role in our learning model. If you think about it, it’s super impressive that your computer, a physical object, managed to learn by itself!
Make sure to stick around for more machine learning tutorials on other models like Linear Regression and Classification coming soon!
In this tutorial, we’ll use some simple JQuery connected with a Quote API to make a website present a quote after the spacebar is pressed. We will be using AJAX to service requests between the API and handling the JSONP response.
As always, you’ll need a folder with three files:
To start with, our content will be displayed in the center of the screen. We also want to display our quote and source/author separately. Create a parent container div and two other divs for the quote and source. Last, create some instructions at the tails of the site so people know how to use it, import JQuery scripts using CDN, and link a custom font for us to use from Google Fonts. Our website isn’t functional and it’s pretty sketchy right now so let’s use some CSS to alleviate parts of those problems.
<!DOCTYPE html>
<html lang="en">
    <head>
        <meta charset="utf-8">
        <meta name="viewport" content="width=device-width, initial-scale=1">
        <title>Quote Generator</title>
        <link rel="stylesheet" href="style.css" />
    </head>
    <body>
        <div class="contain">
            <div class="executed" id="quote"></div>
            <div id="author"></div>
            <div class="bottom">
                <h2>press <span class="space">space</span> to inspire</h2>
            </div>
        </div>
    </body>
    <script src="app.js" type="text/javascript"></script>
</html>
The divs are empty, so you won’t see them. However, they still are there, but all you should see as a result is the instructions to press the space we typed earlier.
Here’s some basic things you should style:
This is my approach, feel free to tweak it to your preferences.
/* My Simple Versions */
html {
    margin : 0;
    padding : 0;
    background-color : #1A1A1A;
    color : #C4C5B5;
    font-family : SF Mono, monaco, menlo, monotype;
}
/* Tutorial Involved Version */
html,body {
  height: 100%;
  width: 100%;
  background: #202020;
  display:table;
  overflow: hidden;
}

/* font css */
p {
  font-size:2em;
}

/* main container css */
.contain{
  display:table-cell;
  vertical-align: middle;
  text-align: center;
  padding:3em;
}

/* quote css */
#quote{
  color:white;
  font-family : Inconsolata;
  position: relative;
}

/* source css */
#writer{
  opacity:1;
  font-size: 1em;
  padding-right:2em;
  text-align: right;
  color:white;
  font-family : Inconsolata;
  position: relative;
  -webkit-transition: all 1s ease-in-out;
    -moz-transition: all 1s ease-in-out;
    -o-transition: all 1s ease-in-out;
    transition: all 1s ease-in-out;
}

/* for the after stage of the source */
.fade {
  opacity:0 !important;
}

/* for the after stage of the quote.*/
.executed {
  opacity:1;
  right: 0;
  -webkit-transition: all 2s ease-in-out;
    -moz-transition: all 2s ease-in-out;
    -o-transition: all 2s ease-in-out;
    transition: all 2s ease-in-out;
}

/* for the before stage of the quote; should slide right when presented and left when removed.  */
.reset {
  opacity:0;
  right:600;
  -webkit-transition: all 1s ease-in-out;
    -moz-transition: all 1s ease-in-out;
    -o-transition: all 1s ease-in-out;
    transition: all 1s ease-in-out;
}

/* for the instructions at the bottom */
.bottom {
  bottom:10;
  position: absolute;
  color:#454545;
  font-family:Inconsolata;
}
Now that we’ve styled our app, we need to implement the true function of it. Let’s go ahead and do that.
To get the quotes, we need to call the Quotes API when the spacebar is pressed. Luckily, JQuery implements a window function just for that, known as keypress. To understand what to write, we have to go through what is happening in our site at that point. The current quote being displayed will be removed and we will request for a new one. When it returns from the API, we will display it.
http://quotesondesign.com/wp-json/posts?filter[orderby]=rand&filter[posts_per_page]=1&_jsonp=mycallback
and we can use some pretty simple AJAX (a way to send post/get requests)
to retrieve the quote from the API. more on AJAXVoila! May this be useful when you are lacking inspiration:
// Note. The ajax request doesn't work from file://
const url = "https://quotesondesign.com/wp-json/posts?filter[orderby]=rand&filter[posts_per_page]=1×tamp=";
function serverRequest( url, callback ){
const req = new XMLHttpRequest();
req.open( "GET", url, true );
req.onload = () => {
if( req.status >= 200 && req.status < 400 )
callback( JSON.parse( req.responseText ));
else
console.log( req );
};
req.onerror = () => {
console.log( req );
};
req.send();
}
document.body.onkeyup = e => {
if( e.keyCode == 32 )
// the date is required to stop the request being cached
serverRequest( url + new Date(), newQuote );
};
function newQuote( json ){
const quote = json[ 0 ];
document.getElementById( "quote" ).innerHTML = quote.content;
document.getElementById( "author" ).innerText = quote.title;
}Your API is super powerful! Try making the site responsive and changing up the style.
Building a chat app is pretty complex. However, with a framework like Node.js, and libraries like Socket.io and Express, a basic chat app is achievable with just a couple lines of code. Using Node.js, we can write JavaScript for the server, and with Socket.io and Express, we can make use of websockets to push messages to users from the server in real-time.
We’re going to be creating a Node.js app, so make sure you have it installed.
To start:
npm init . The will create a new
package.json file. (it will ask you name/version,
etc.)npm install --save express // a web framework for
nodenpm install --save socket.io // real-time module for
our appNow that our dependencies are installed, let’s create our file structure:
server.js filepublic with the following files:
index.htmlstyle.cssclient.jsOpen up the server.js file. Here’s where we need to
require express and socket.io, and create a new server. We also
need to use app.get to
deliver an HTML file easily. In addition, we have to let express know
that all our static (html,css,js) files are in the public folder.
Lastly, we need to open up a port on our localhost
hostname.
var express = require('express');
var app = express();
var server = require('http').createServer(app);
var io = require('socket.io')(server);

app.get('/', function(req, res, next) {
  res.sendFile(__dirname + '/public/index.html')
});

app.use(express.static('public'));

server.listen(7777);
Now, open your index.html file in the public folder. In
there, we will need to create a normal HTML document with the
following:
form with two inputs
ul with an id for the messages to go in/socket.io/socket.io.jsclient.js<!DOCTYPE html>
<head>
<title> Real Time Chat </title>
<meta name="viewport" content="width=device-width, initial-scale=1" />
<link rel="stylesheet" href="style.css" />
</head>
<body>
<h1> Chat! </h1>
<form>
<input id="message" type="text" placeholder="message">
<input type="submit" value="Send">
</form>
<ul id="thread"></ul>
<script src="/socket.io/socket.io.js"></script>
<script src="client.js"></script>
</body>
</html> Now, if you cd into the file on your terminal, run
node server.js, and headover to localhost:7777
in your browser, you should see your HTML file being served.
Open up your client.js file. At this point, we need to
connect to our server using io.connect. On connect, let us emit a
message to confirm our connection with an event of
join.
var socket = io.connect('http://localhost:7777');
socket.on('connect', function(data) {
    socket.emit('join', 'Hello server from client');
});
Then, we can open back up our server.js file and log a
message that the client is connected. Also, we can listen for the
join event we wrote earlier to log the data from the
client. Here’s how it’ll work:
var express = require('express');
var app = express();
var server = require('http').createServer(app);
var io = require('socket.io')(server);

app.get('/', function(req, res, next) {
  res.sendFile(__dirname + '/public/index.html')
});

app.use(express.static('public'));

io.on('connection', function(client) {
  console.log('Client connected...');

  client.on('join', function(data) {
      console.log(data);
  });
});

server.listen(7777);
Now, if you re-run the server.js file in your terminal (CTRL+C to
exit) and refresh localhost:7777 in your browser, you
should see the messages client connected... &
Hello server from client in your terminal which confirms
our connection!
Finally! Now that we have a connection, we can use it to emit and
send messages. Here is what we need to do in our client.js
file:
thread) that will recieve any
messages emitted by ther servermessage id (in our
input)return false; to prevent the from from it’s default
action (refreshing page)// initializing socket, connection to server
var socket = io.connect('http://localhost:7777');
socket.on('connect', function(data) {
socket.emit('join', 'Hello server from client');
});
// listener for 'thread' event, which updates messages
socket.on('thread', function(data) {
$('#thread').append('<li>' + data + '</li>');
});
// sends message to server, resets & prevents default form action
$('form').submit(function() {
var message = $('#message').val();
socket.emit('messages', message);
this.reset();
return false;
});However, before we have a functional application, we have to add our
messages event to our server and emit it to our thread
event!
var express = require('express');
var app = express();
var server = require('http').createServer(app);
var io = require('socket.io')(server);

app.get('/', function(req, res, next) {
  res.sendFile(__dirname + '/public/index.html')
});

app.use(express.static('public'));

io.on('connection', function(client) {
  console.log('Client connected...');

  client.on('join', function(data) {
      console.log(data);
  });

  client.on('messages', function(data){
      client.emit('thread', data);
      client.broadcast.emit('thread', data);
  });
});

server.listen(7777);
There you go! Our messages event is listened for and
once to server recieves it it is broadcasted to all the other clients
using client.broadcast.emit.
Before we finish, let’s style the app a bit. Open up the
style.css file and customize it to your liking!
html, body {
  text-align: center;
  font-family: 'Avenir Next', 'Helvetica', 'Arial', sans-serif;
}

html,body,li,form,ul {
  padding: 0;
  margin: 0;
}

form {
  padding-bottom: 2%;
}

li {
  list-style: none;
  width: 100vw;
}

li:nth-child(odd) {
  background: #eee;
}
Well, now you have a basic form of communication! If you open up multiple tabs, you’ll see the messages are being sent in real-time!
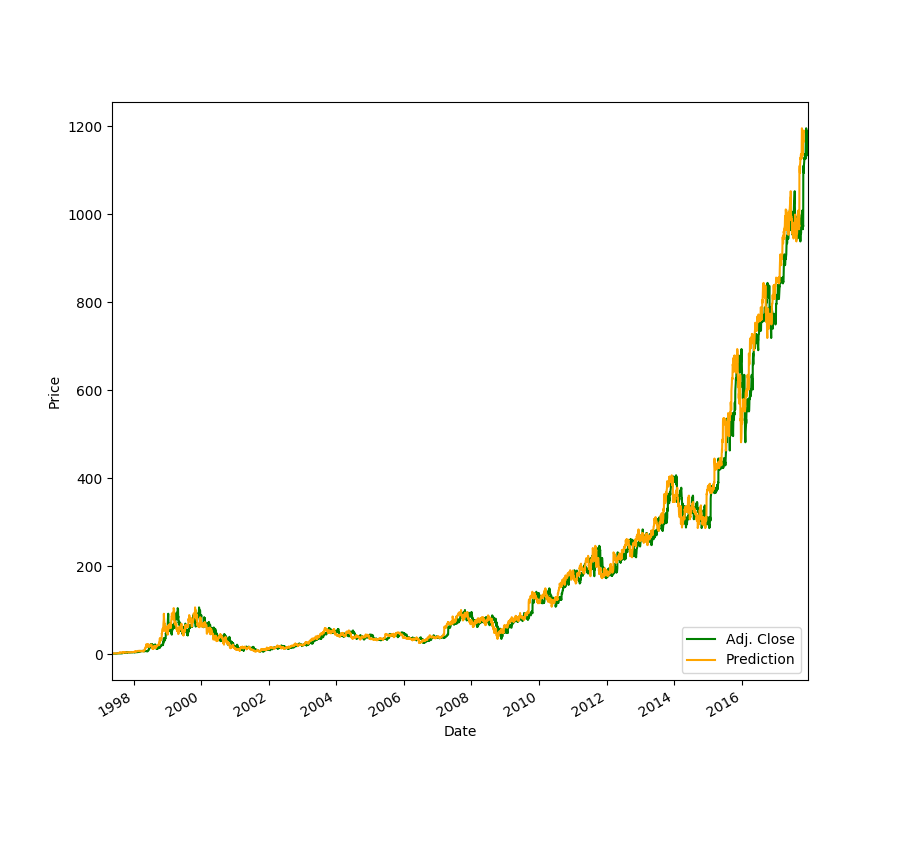
In this tutorial, we’ll be exploring how we can use Linear Regression to predict stock prices thirty days into the future. You probably won’t get rich with this algorithm, but I still think it is super cool to watch your computer predict the price of your favorite stocks.
Create a new stock.py file. In our project, we’ll need
to import a few dependencies. If you don’t have them installed, you will
have to run pip install [dependency] on the command
line.
import quandl
import pandas as pd
import numpy as np
import datetime

from sklearn.linear_model import LinearRegression
from sklearn import preprocessing, cross_validation, svm
We are using Quandl for our stock data, pandas for our dataframe, numpy for array and math fucntions, and sklearn for the regression algorithm.
To get our stock data, we can set our dataframe to
quandl.get("WIKI/[NAME OF STOCK]"). In this tutorial, I
will use Amazon, but you can choose any stock you wish.
df = quandl.get("WIKI/AMZN")If we print(df.tail()) and run our python program, we
see that we get a lot of data for each stock:
Open     High      Low    Close     Volume  Ex-Dividend  \
Date
2017-12-13  1170.00  1170.87  1160.27  1164.13  2555053.0          0.0
2017-12-14  1163.71  1177.93  1162.45  1174.26  3069993.0          0.0
2017-12-15  1179.03  1182.75  1169.33  1179.14  4539895.0          0.0
2017-12-18  1187.37  1194.78  1180.91  1190.58  2767271.0          0.0
2017-12-19  1189.15  1192.97  1179.14  1187.38  2555235.0          0.0

Split Ratio  Adj. Open  Adj. High  Adj. Low  Adj. Close  \
Date
2017-12-13          1.0    1170.00    1170.87   1160.27     1164.13
2017-12-14          1.0    1163.71    1177.93   1162.45     1174.26
2017-12-15          1.0    1179.03    1182.75   1169.33     1179.14
2017-12-18          1.0    1187.37    1194.78   1180.91     1190.58
2017-12-19          1.0    1189.15    1192.97   1179.14     1187.38

Adj. Volume
Date
2017-12-13    2555053.0
2017-12-14    3069993.0
2017-12-15    4539895.0
2017-12-18    2767271.0
2017-12-19    2555235.0
However, in our case, we only need the Adj. Close column
for our predictions.
df = df[['Adj. Close']]Now, let’s set up our forecasting. We want to predict 30 days into
the future, so we’ll set a variable forecast_out equal to
that. Then, we need to create a new column in our dataframe which serves
as our label, which, in machine learning, is known as our
output. To fill our output data with data to be trained upon, we will
set our prediction column equal to our
Adj. Close column, but shifted 30 units up.
forecast_out = int(30) # predicting 30 days into future
df['Prediction'] = df[['Adj. Close']].shift(-forecast_out) #  label column with data shifted 30 units up
You can see the new dataframe by printing it:
print(df.tail())
Our X will be an array consisting of our
Adj. Close values, and so we want to drop
the Prediction column. We also want to scale our input
values. Scaling our features allow us to normalize the data.
X = np.array(df.drop(['Prediction'], 1))
X = preprocessing.scale(X)
Now, if you printed the dataframe after we created the
Prediction column, you saw that for the last 30 days, there
were NaNs, or no label data. We’ll set a new input variable
to these days and remove them from the X array.
X_forecast = X[-forecast_out:] # set X_forecast equal to last 30
X = X[:-forecast_out] # remove last 30 from X
To define our y, or output, we will set it equal to our array of the
Prediction values and remove the last 30 days where we
don’t have any pricing data.
y = np.array(df['Prediction'])
y = y[:-forecast_out]Finally, prediciton time! First, we’ll want to split our testing and
training data sets, and set our test_size equal to 20% of
the data. The training set contains our known outputs, or prices, that
our model learns on, and our test dataset is to test our model’s
predictions based on what it learned from the training set.
X_train, X_test, y_train, y_test = cross_validation.train_test_split(X, y, test_size = 0.2)Now, we can initiate our Linear Regression model and fit it with training data. After training, to test the accuracy of the model, we “score” it using the testing data. We can get an r^2 (coefficient of determination) reading based on how far the predicted price was compared to the actual price in the test data set. When I ran the algorithm, I usually got a value of over 90%.
# Training
clf = LinearRegression()
clf.fit(X_train,y_train)
# Testing
confidence = clf.score(X_test, y_test)
print("confidence: ", confidence)
Lastly, we can to predict our X_forecast values:
forecast_prediction = clf.predict(X_forecast)
print(forecast_prediction)
Here’s what I got for AMZN stock (12/19/17):
('confidence: ', 0.989032635604704)
[ 1163.89768621  1166.50500319  1172.69608254  1168.7695255   1172.7376334
  1180.70501237  1170.16147958  1181.17245963  1173.47516131  1169.76674633
  1183.45775738  1200.77408167  1231.77102929  1241.98215513  1239.66569423
  1206.08220507  1222.16239103  1207.20407851  1177.70296214  1185.61840252
  1196.81636148  1204.54482295  1206.84050841  1214.0288086   1210.03992526
1209.05309214 1219.57584949 1224.6450554 1236.52860369 1233.20453424]Try and plot your data using matplotlib. Make your predictions more advanced by including more features. When completed, feel free to share your projects in the comments! I’d love to check them out :)

In this tutorial, we’ll make a text editor in the broswer. Using JavaScript, we can save the text automatically in a user’s localStorage so that whenever the text editor is pulled up, it remembers the text that was written. localStorage is a JavaScript object that let’s you save data in user’s browser.
As always, you’ll need a folder with three files:
Since we’re making a text-editor, our content has to be editable! Thankfully, HTML has an attribute for that. Go ahead: link the files, and create two divs with the contenteditable attributeand with a heading and a content id.
<!DOCTYPE html>
<head>
    <title>Text Editor</title>
    <meta name="viewport" content="width=device-width, initial-scale=1">
    <link rel="stylesheet" href="style.css" />
</head>
<body>
    <div id="heading" contenteditable="true"><i class="placeholder header">Enter me</i></div>
    <div id="content" contenteditable="true"><b class="placeholder body">Miss me, don't dismiss me</b></div>

    <script src="app.js"></script>
</body>
</html>
Open the html file in your bowser. You’ll see that you have two editable text boxes. However, they’re pretty ugly. Let’s style them!
Here’s some basic things you should do in your the style.css file:
This is my attempt. Feel free to customize your editor however you wish to!
body, html{
    margin : 0;
    padding : 0;
    font-family : SF Mono, monaco, monospace;
    background-color : #1A1A1A;
    color : #C4C5B5;
}

#heading{
    font-size : 1.5em;
    font-weight : 600;
    margin : 1em 0 0.5em 0;
    padding : 0.3125em;
}
#content{
    font-size : 1em;
    font-weight : 400;
    padding : 0.3125em;
}

.placeholder.header{
    color : #F4005F;
}

.placeholder.body{
    color : #98E024;
}

div:focus{ outline : none; }
How does your editor look now? Play around with it! However, you may have noticed that if you refresh the page, the text doesn’t save. Let’s fix that.
To save the text in our two divs, we need to store it in the brower’s localStorage. To do that, we first have to get the div ids from the HTML document and set it to a localStorage instance with some default text. Then, we can write a function that checks the innerHTML of both the divs and saves it every second. Here’s what we have to write:
This is what the finished app.js should look like:
let h = document.getElementById( "heading" );
let c = document.getElementById( "content" );
h.innerHTML = localStorage[ "title" ] || "Enter me";
c.innerHTML = localStorage[ "text" ] || "Miss me, don't dismiss me";

setInterval( function(){
    localStorage[ "title" ] = heading.innerHTML;
    localStorage[ "text" ] = content.innerHTML;
}, 1000 );Things to consider:
In this project, we’ll make our very own to-do list! This project will incorporate several JavaScript functions to add and remove tasks from our list.
Let’s start by creating three files:
Our basic markup will consist of:
Here’s what our HTML file should look like:
<!DOCTYPE html>
<html lang="en">
    <head>
        <meta charset="utf-8">
        <meta name="viewport" content="width=device-width, initial-scale=1">
        <title>To-Do List</title>
        <link rel="stylesheet" href="style.css" />
    </head>
    <body>
        <input id="input" placeholder="What needs to be done?">
        <ul id="list"></ul>
    </body>
    <script src="app.js" type="text/javascript"></script>
</html>To make our to-do list work, we need it to do three things at the minimum:
How can we implement this? Well, we need to create a function that runs whenever the enter key is pressed. Then, that function will add that input text to the ul as a li. At that moment, the input text box will also be erased so that one can type in the next task. Also, on click of a task, it must be passed on to another function which will remove it from the parent element (ul).
Here’s how we should go about this:
I know this may seem confusing, but try to set up your own variable names and make an attempt! If you’re successful, you should be able to add a task to the list by clicking the enter key! Here’s our first two functions:
function addNewItem( input, parent ){
    parent.appendChild( createElement( "li", {
        textNode : getInputTextAsNode( input )
    }));
    input.value = "";
}

const taskInput = document.getElementById( "input" );
const taskList = document.getElementById( "list" );
document.body.onkeyup = e => {
    if( e.keyCode == 13 )
        addNewItem( taskInput, taskList );
};
Now, we can add tasks, but what about removing them? In our first function, we specified that li.onclick would equal our removeItem() function. Let’s write that.
Looking back, we see that the ul is our parent element, while the li is the child element. To remove the li, all we would really need to do is well, remove the child of the parent element. We can do that easily with the target event. This is how we would write it:
function addNewItem( input, parent ){
    parent.appendChild( createElement( "li", {
        textNode : getInputTextAsNode( input )
    }));
    input.value = "";
}

// basic element creation
function createElement( type, options ){
    const elem = document.createElement( type );
    if( options ){
        for( let prop in options ){
            if( prop == "textNode" )
                elem.appendChild( options[ prop ] );
            else
                elem[ prop ] = options[ prop ];
        }
    }
    return elem;
}

function getInputTextAsNode( input ){
    return document.createTextNode( "- " + input.value );
}

const taskInput = document.getElementById( "input" );
const taskList = document.getElementById( "list" );
document.body.onkeyup = e => {
    if( e.keyCode == 13 )
        addNewItem( taskInput, taskList );
};

taskList.addEventListener( "click", e => {
    if( e.target.nodeName == "LI" )
        e.target.parentElement.removeChild( e.target );
});
That’s it! We can now click on any li to remove it from the list.
Right now, all we have is an ugly bulleted list. Here’s my attempt at making it look prettier. However, feel free to experiment with the styling yourself.
html {
    font-family : SF Mono, monaco, menlo, monotype;
    text-align : center;
    color : #C4C5B5;
}

body {
    max-width : 31.25em;
    margin : 0 auto;
    background-color : #1A1A1A;
}

input {
    margin-top : 1.875em;
    width : 100%;
    height : 3.75em;
    font-size : 2em;
    border : 1px solid #98E024;
    border-radius : 0.1875em;
    padding : 0.1875em;
    background-color : #1A1A1A;
    color : #98E024;
}

input:focus {
    outline : none;
}

ul {
    margin : 0;
    margin-top : 1em;
    padding : 0;
}

ul li:nth-child( even ) {
    background-color : #1C1C2C;
}

li {
    text-align : left;
    font-size : 2em;
    list-style : none;
    margin : 0;
    padding : 1em 0;
    border-top : 1px dotted #F4005F;
}

li::after {
    content : "👍";
    width : 1.3em;
    text-align : center;
    border-radius : 2em;
    border : 1px solid #98E024;
    margin-left : 0.5em;
    display : inline-block;
}


li:hover {
    text-decoration : line-through;
}
Take a look at the result. What do you think?
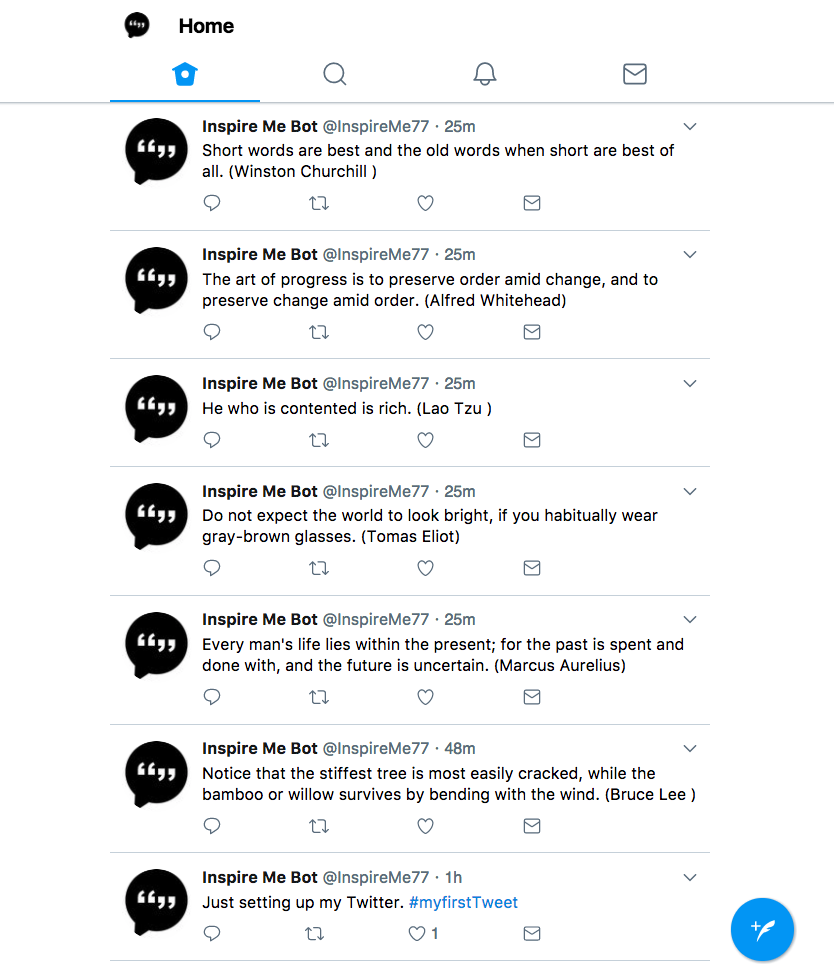
Today, we’ll be building our very own Twitter Bot with Node.js. Our bot will fetch a random quote using the Forismatic API and then, of course, tweet it in an attempt to look smart!
First off, make sure you have Node.js and npm installed. Then,
create a new folder for your application and cd into it
from the command line. Then, run npm init and go through
the process to initialize a new node application.
Now, the twitter API module we’ll be using is twit. The module we’ll be
using to make requests is request Run
npm install --save twit request to install it.
Once we have everything ready to go, create a index.js
file where we’ll be coding our application.
Let’s get started by requiring our modules in our
index.js file.
var Twit = require('twit');
var request = require('request');
Oh, wait. There’s one more step before we actually start writing more code. Since we’re building a twitter bot, we need to register a twitter application!
You’ll need to either create a new Twitter account or use your own to
create a new Twitter application.
Create your app and then navigate to the “Keys & Access Tokens”
Page. From there, copy your “top secret” keys and tokens into your
index.js file using the following template:
var Twit = require('twit');
var request = require('request');

var T = new Twit({
  consumer_key:         'TOP SECRET CODE',
  consumer_secret:      'TOP SECRET CODE',
  access_token:         'TOP SECRET CODE',
  access_token_secret:  'TOP SECRET CODE'
})
Here, we’re defining the variable T and setting it to
initialize the Twit library with our application that we registered so
we can post, search, favorite, retweet, and basically do whatever we
want on Twitter.
To build what we want, we need to fetch a random quote. Luckily, Forismatic’s API is very easy
to use as we just need a url. You can set the url below as a
const as unlike variables, it will not be changed.
https://api.forismatic.com/api/1.0/?method=getQuote&key=123456&format=text&lang=enOne problem that we may run to when building these kind of applications is that since we have to make a request, we want to:
This may look simple - except for the sending data to another function part. To do this in JavaScript, we use something called callbacks. Callbacks allow us to write asynchronous code. This means that to make this program as efficient as it can be, we have to use callbacks.
Let’s start by creating a getQuote function with a
paramenter that’s named callback. Then, using request, we
can make a request to the url and set the data of the request to the
callback.
function getQuote (callback) {
    request(url, function (error, response, body) {
      console.log('error:', error); // Print the error if one occurred
      console.log('statusCode:', response && response.statusCode); // Print the response status code if a response was received
      console.log('body:', body);
      callback(body);
    });
}
Now, we have our data, in this case body ready to be
used in another function. The next function we’ll be creating is a
postTweet function with the tweet parameter.
Using T.post, we are
able to post with the status (data of tweet) to be
tweet.
function postTweet(tweet) {
    console.log(tweet);
    T.post('statuses/update', { status: tweet }, function(err, data, response) {
      console.log(data);
    })
}
We’ve written the two functions. What next? Well, now we need to
connect them together! We want getQuote to run first, so
we’ll need to run it first with the parameter of postTweet
which is our callback.
getQuote(postTweet)If you take a look at your code, it’s actually just calling the
getQuote function, setting the callback to the data that
was requested, and then it calls the postTweet function
which has the tweet parameter. However, the
tweet parameter is equal to the body of the request all
because of the callback.
You did it! Save your file and then run node index.js in
your terminal. You should see everything being logged and the tweet
posted! I encourage you to continue making the bot more advanced using
the twit library! If you
have any questions, feel free to leave them below :)