by Bytearcher
Hoisting in javascript refers to the way in which variables are processed by javascript. Variables are moved, or hoisted, to the top of there execution scope and defined. The scope may be a function or the global scope. An example :
function fn(){
    var a;
    console.log('hello world!');
    var b;
}
When run is interpreted by the javascript as :
function fn(){
    var a;
    var b;  // hoisted
    console.log('hello world!');
}When variables are moved to the top of their scope they are defined which is to say they are given a name that can referred to. These variables are not, however, given a value. The variables are initialized at the same point in the code as written. Let’s take a ganders :
function fruity(){
    var a = "Los";
    console.log(a, b);
    var b = " plátanos";
}

> fruity()
> Los undefined
When we run the function we do not get any errors but we do not get
the correct output. The console.log(a,b); statement is
aware of the ‘b’ variable but not it’s value.
The simple solution is to hoist the variables yourself; put the variables at the top and initialize any that make sense.
ES6 introduces new variable declaration terms that are familiar to programmers who have worked in other languages particularly strongly typed languages. These terms are let and const. let is a variable scoped to blocks be they function, closure, for loop, if loop and so on. On the other hand const is used to define a variable once and for all; indeed a const variable must be initialized and declared in the same instance.
Going back to our previous example, while let gets hoisted like a var declaration an error is return if one tries to access the data before initialization. The main to take away from this, whether you use ES5 or ES6, is that you should always be mindful of code structure.
Dmitri Pavutin | 04 Jan 2016
===1 === "1" // false, IES rule 1 The two operands are of
different type so they do not equate to each other.
0 === 0 // true, IEA rule 6 Operands are the same type
(number) and have the same value.
undefined === undefined // true, IEA rule 3 Both
operands are undefined and thus strictly
equal.
undefined === null // false, IEA rule 1 Operands are of
different type so not equal.
NaN === NaN // false, IEA rule 4 Nothing is equal to
NaN. Nothing.
var firstObject = {}, secondObject = firstObject; secondObject['name'] = 'Nathan'; secondObject === firstObject; // true, IEA rule 8
Both variables firstObject &
secondObject are references to the same object and
based on IEA rule 8 evaluates to true.
[] === [] // false, IES rule 9 The []
literal creates a new array reference. Both operands are the same type
(object) but reference different objects contravening IEA rule
9.
valueOf() exists it is called. If
valueOf() returns a primitive, the object os converted to
this value.toString() exists then
that function is called. If toString() returns a primitive
then the object is converted to this value.TypeError: Cannot convert object to primitive value).Most native objects return the object itself after calling
valueOf(). toString() is used more often. The
Date object does not call valueOf() rather
toString() skipping rule 1. Plain objects
in Javascript usually convert to “[object Object]”. An array is
usually converted to its contents with a comma as a separator. E.g. [1,
3, “four”] converts to “1, 3, four”.
==1 == true // true 1. 1 == true Transform
true to 1 using EEA rule 2.3 2. 1 == 1
Operands have the same type so strict equality is tested. 3.
1 === 1 Same type and same value equals equality. 4.
true
'' == 0 // true 1. '' == 0 One operand is a
string and the other is a number.
Based on EEA rule 2.2 the empty string is converted
into a number. 2. 0 == 0 Operands are of the same type so
they are evaluated based on identity using EEA rule 1. 3.
0 == 0 Operands are the same type and the same value so are
strictly equal based on IEA rule 6 4.
true
null == 0 // false 1. null == 0 Both
operands are of different types. Refer to EEA rule 3. 2.
false
null == undefined // true 1.
null == undefined Based on EEA rule 2.1 the operands are
equal. 2. true
NaN == NaN // false 1. NaN == NaN Both
operands are numbers so are evaluated using identity
using EEA rule 1. 2. NaN === NaN IEA rule 4 states
NaN does not equal each other. Never. 3.
false
[''] == '' // true 1. [''] == '' The
array is converted to a string to test against the
other operand which is a string using OPCA rule 2. 2.
'' == '' Both are of the same type so they are tested with
identity. 3. '' === '' The two string
operands are tested by value and found to be equal according to IEA rule
7. 4. true
{} == true //false 1. {} == true Using EEA
rule 2.3 transform the true operand to 1. 2.
{} == 1 Transform the object operand to a
primitive. 3. "[object Object]" == 1 Transform the
string operand to a number according
to EEA rule 2.2. 4. NaN == 1 Both operands are
numbers so test the operands strictly. 5.
NaN === 1 NaN is not equal to anything,
not even itself. 6. false
[0] == 0 // true 1. [0] == 0 The
array must be converted to a primitive in the form of a
string with commas to separate the entries. 2.
"0" == 0 The string must be converted to a
number to compare to the other operand. 3.
0 == 0 Both operands are numbers so must
be evaluated by identity. 4. 0 === 0 Both values are equal
so they are strictly equal. 5. true
Factorial functions using both recursion and iteration. Factorials
are the multiplication of all the proceeding numbers of the given number
(5 * 4 * 3 * 2 * 1).
function rFactorial( num ){
    if( num < 2 ) return num;
    return num * rFactorial( num - 1 );
};

function factorial( num ){
    let result = 1;
    while( num > 1 ){
        result *= num;
        num -= 1;
    }

    return result;
}

console.log( rFactorial( 5 ));
console.log( factorial( 5 ));
Which do you prefer? Iterative or recursive?
const reverseStr = str => str.split( "" ).reverse().join( "" );

const reverseStrR = str => {
    const length = str.length;
    if( length === 1 ) return str[ 0 ];
    return str[ length - 1 ] +
        reverseStrR( str.slice( 0, length - 1 ));
};function rFibonacciNumbers( n ){
if( n < 3 ) return 1;
return rFibonacciNumbers( n - 1 ) + rFibonacciNumbers( n - 2 );
}const reoccurringNinNumR = n => {
let total = 0;
const nStr = n.toString();
const $reoccurringNinNumR = num => {
const numStr = num.toString();
if( numStr[ 0 ] === nStr ) total += 1;
if( numStr.length === 1 ) return total;
return $reoccurringNinNumR( numStr.slice( 1, ));
};
return $reoccurringNinNumR;
};
const reoccurringNinNum = curry(( n, num ) =>
num.toString().split( "" ).filter( i => i === n.toString()).length
);const reoccurringCharsinStrR = str => {
const strDict = {};
let returnStrArr = [];
const $reoccurringCharsinStrR = s => {
if( s.length < 1 ) return returnStrArr;
if( !strDict[ s[ 0 ]]){
strDict[ s[ 0 ]] = 1;
returnStrArr.push( s[ 0 ]);
}
return $reoccurringCharsinStrR( s.slice( 1, ));
};
return $reoccurringCharsinStrR( str ).join( "" );
};
const reoccurringCharsinStr = str => {
const strDict = {};
return str.split( "" ).reduce(( s, c ) => {
if( !strDict[ c ] ){
strDict[ c ] = 1;
s.push( c );
}
return s;
}, []).join( "" );
};// Binary method - constantly dividing by two
// Slowest method
const isEven = num => num % 2 === 0;
const gcdBinary = ( a, b, d = 0 ) => {
if( a === 0 || b === 0 ) return 0;
if( isEven( a ) && isEven( b ))
return gcdBinary( a >> 1, b >> 1, d += 1 );
if( a !== b ){
if( isEven( a ))
return gcdBinary( a >> 1, b, d );
if( isEven( b ))
return gcdBinary( a, b >> 1, d );
if( a > b )
return gcdBinary(( a - b ) >> 1, b, d );
return gcdBinary( a, ( b - a ) >> 1, d );
}
return Math.pow( 2 * a, d );
};
// Euclid method - uses modulus until the remainder is 0, fastest
const gcdEuclid = ( a, b ) => {
if( a === 0 || b === 0 ) return 0;
let remainder, retVal;
if( a > b ){
remainder = a % b;
retVal = b;
} else {
remainder = b % a;
retVal = a;
}
if( remainder === 0 ) return retVal;
return gcdEuclid( retVal, remainder );
};
// Reference solution - similar to Euclid but is slower
function getGcd(num1, num2) {
// added this line otherwise the function either fails
// or produces the wrong answer
if( num1 === 0 || num2 === 0 ) return 0;
if (num1 % num2 === 0) {
return num2;
}
return getGcd(num2, num1 % num2);
}
const unitTestArr = [
[ 42, 56 ],
[ 461952, 116298 ],
[ 7966496, 314080416 ],
[ 24826148, 45296490 ],
[ 56, 42 ],
[ 116298, 461952],
[ 314080416, 7966496 ],
[ 45296490, 24826148 ],
[ 12, 0 ],
[ 0, 0 ],
[ 0, 9 ]
];
const unitTestAns = [ 14, 18, 32, 526, 14, 18, 32, 256, 12, 0, 0 ];
const runTests = ( fn, testXs ) => {
const resultXs = [];
const start = new Date();
for( let i = 0; i < 2000; i += 1 ){
let row = testXs[ i % 11 ];
let a = row[ 0 ];
let b = row[ 1 ];
resultXs.concat( fn( a, b ));
}
const end = new Date();
const correctAns = resultXs.every(( ans, i ) => ans === unitTestAns[ i % 11 ]);
return correctAns
? `${ fn.name } ran in ${ end - start }ms`
: "The function didn't produce the correct results";
};
[ gcdBinary, gcdEuclid, getGcd ].forEach(
fn => console.log( runTests( fn, unitTestArr ))
);const lcm = ( a, b ) => a / gcdEuclid( a, b ) * b;Preethi Kasireddy | Apr 29, 2016
Closures are a fundamental JavaScript concept that every serious programmer should know inside-out.
The Internet is packed with great explanations of “what” closures are, but few deep-dives into the “why” side of things.
I find that understanding the internals ultimately gives developers a stronger grasp of their tools, so this post will be dedicated to the nuts and bolts of how and why closures work the way they do.
Hopefully you’ll walk away better equipped to take advantage of closures in your day-to-day work. Let’s get started!
Closures are an extremely powerful property of JavaScript (and most programming languages). As defined on MDN:
Closures are functions that refer to independent (free) variables. In other words, the function defined in the closure ‘remembers’ the environment in which it was created.
Note: Free variables are variables that are neither locally declared nor passed as parameter.
Let’s look at some examples:
function numberGenerator() {
  // Local “free” variable that ends up within the closure
  var num = 1;
  function checkNumber() {
    console.log(num);
  }
  num++;
  return checkNumber;
}

var number = numberGenerator();
number(); // 2
In the example above, the function numberGenerator creates a local “free” variable num (a number) and checkNumber (a function which prints num to the console). The function checkNumber doesn’t have any local variables of its own — however, it does have access to the variables within the outer function, numberGenerator, because of a closure. Therefore, it can use the variable num declared in numberGenerator to successfully log it to the console even after numberGenerator has returned.
In this example we’ll demonstrate that a closure contains any and all local variables that were declared inside the outer enclosing function.
function sayHello() {
  var say = function() { console.log(hello); }
  // Local variable that ends up within the closure
  var hello = 'Hello, world!';
  return say;
}
var sayHelloClosure = sayHello();
sayHelloClosure(); // ‘Hello, world!’
Notice how the variable hello is defined after the anonymous function — but can still access the hello variable. This is because the hello variable has already been defined in the function “scope” at the time of creation, making it available when the anonymous function is finally executed. (Don’t worry, I’ll explain what “scope” means later in the post. For now, just roll with it!)
These examples illustrated “what” closures are on a high level. The general theme is this: we have access to variables defined in enclosing function(s) even after the enclosing function which defines these variables has returned. Clearly, something is happening in the background that allows those variables to still be accessible long after the enclosing function that defined them has returned.
To understand how this is possible, we’ll need to touch on a few related concepts — starting 3000 feet up and slowly climbing our way back down to the land of closures. Let’s start with the overarching context within which a function is run, known as “Execution context”.
Execution context is an abstract concept used by the ECMAScript specification to ** track the runtime evaluation of code. This can be the global context in which your code is first executed or when the flow of execution enters a function body.
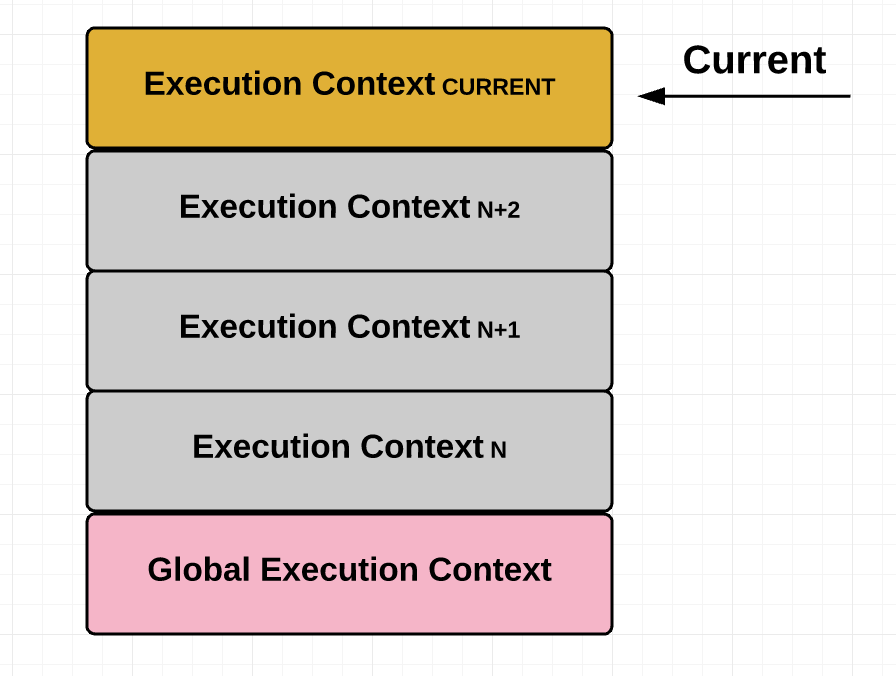
At any point in time, there can only be one execution context running. That’s why JavaScript is “single threaded,” meaning only one command can be processed at a time. Typically, browsers maintain this execution context using a “stack.” A stack is a Last In First Out (LIFO) data structure, meaning the last thing that you pushed onto the stack is the first thing that gets popped off it. (This is because we can only insert or delete elements at the top of the stack.) The current or “running” execution context is always the top item in the stack. It gets popped off the top when the code in the running execution context has been completely evaluated, allowing the next top item to take over as running execution context.
Moreover, just because an execution context is running doesn’t mean that it has to finish running before a different execution context can run. There are times when the running execution context is suspended and a different execution context becomes the running execution context. The suspended execution context might then at a later point pick back up where it left off. Anytime one execution context is replaced by another like this, a new execution context is created and pushed onto the stack, becoming the current execution context.
For a practical example of this concept in action in the browser, see the example below:
var x = 10;
function foo(a) {
  var b = 20;

  function bar(c) {
    var d = 30;
    return boop(x + a + b + c + d);
  }

  function boop(e) {
    return e * -1;
  }

  return bar;
}

var moar = foo(5); // Closure
/*
  The function below executes the function bar which was returned
  when we executed the function foo in the line above. The function bar
  invokes boop, at which point bar gets suspended and boop gets push
  onto the top of the call stack (see the screenshot below)
*/
moar(15); 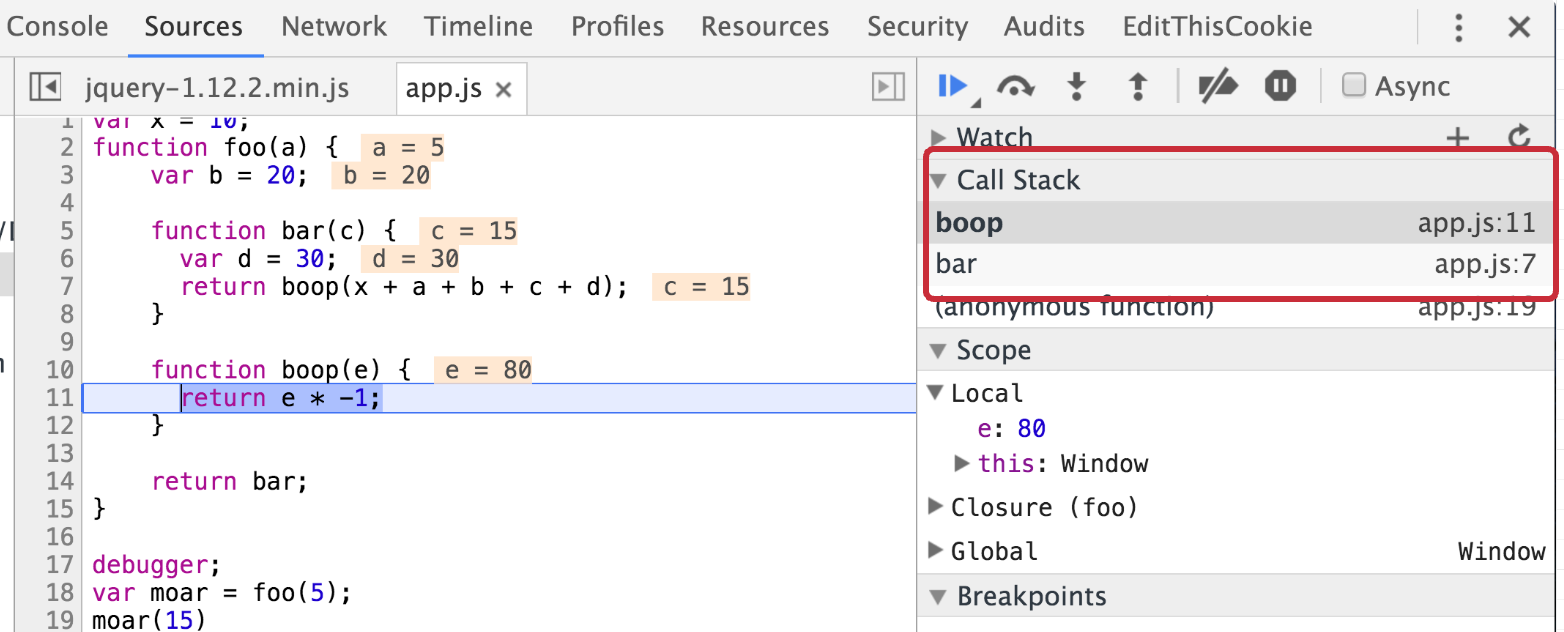
Then when boop returns, it gets popped off the stack and bar is resumed:
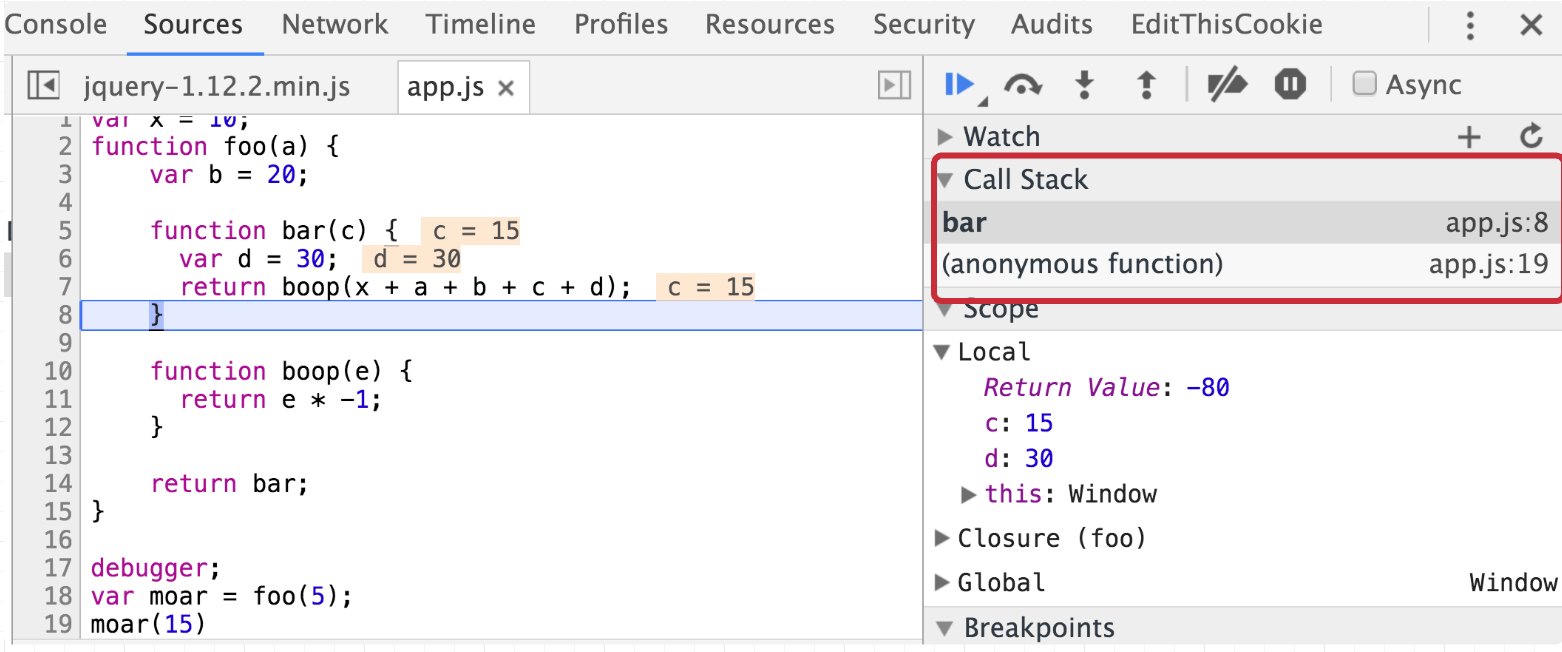
When we have a bunch of execution contexts running one after another — often being paused in the middle and then later resumed — we need some way to keep track of state so we can manage the order and execution of these contexts. And that is in fact the case; as per the ECMAScript spec, each execution context has various state components that are used to keep track of the progress the code in each context has made. These include:
If this sounds too confusing to you, don’t worry. Of all these variables, the Lexical Environment variable is the one that’s most interesting to us because it explicitly states that it resolves “identifier references” made by code within this execution context. You can think of “identifiers” as variables. Since our original goal was to figure out how it’s possible for us to magically access variables even after a function (or “context”) has returned, Lexical Environment looks like something we should dig into!
Note: Technically, both Variable Environment and Lexical Environment are used to implement closures. But for simplicity’s sake, we’ll generalize it to an “Environment”. For a detailed explanation on the difference between Lexical and Variable Environment, see Dr. Alex Rauschmayer’s excellent article.
By definition: A Lexical Environment is a specification type used to define the association of Identifiers to specific variables and functions based upon the lexical nesting structure of ECMAScript code. A Lexical Environment consists of an Environment Record and a possibly null reference to an outer Lexical Environment. Usually a Lexical Environment is associated with some specific syntactic structure of ECMAScript code such as a FunctionDeclaration, a BlockStatement, or a Catch clause of a TryStatement and a new Lexical Environment is created each time such code is evaluated. — ECMAScript-262/6.0
Let’s break this down.
Abstractly, the environment looks like this in pseudocode:
LexicalEnvironment = {
  EnvironmentRecord: {
  // Identifier bindings go here
  },

  // Reference to the outer environment
  outer: < >
};In short, every execution context has a Lexical Environment. This Lexical environments holds variables and their associated values, and also has a reference to its outer environment. The Lexical Environment can be the global environment, a module environment (which contains the bindings for the top level declarations of a Module), or a function environment (environment created due to the invocation of a function).
Based on the above definition, we know that an environment has access to its parent’s environment, and its parent environment has access to its parent environment, and so on. This set of identifiers that each environment has access to is called “scope.” We can nest scopes into a hierarchical chain of environments known as the “scope chain”.
Let’s look at an example of this nesting structure:
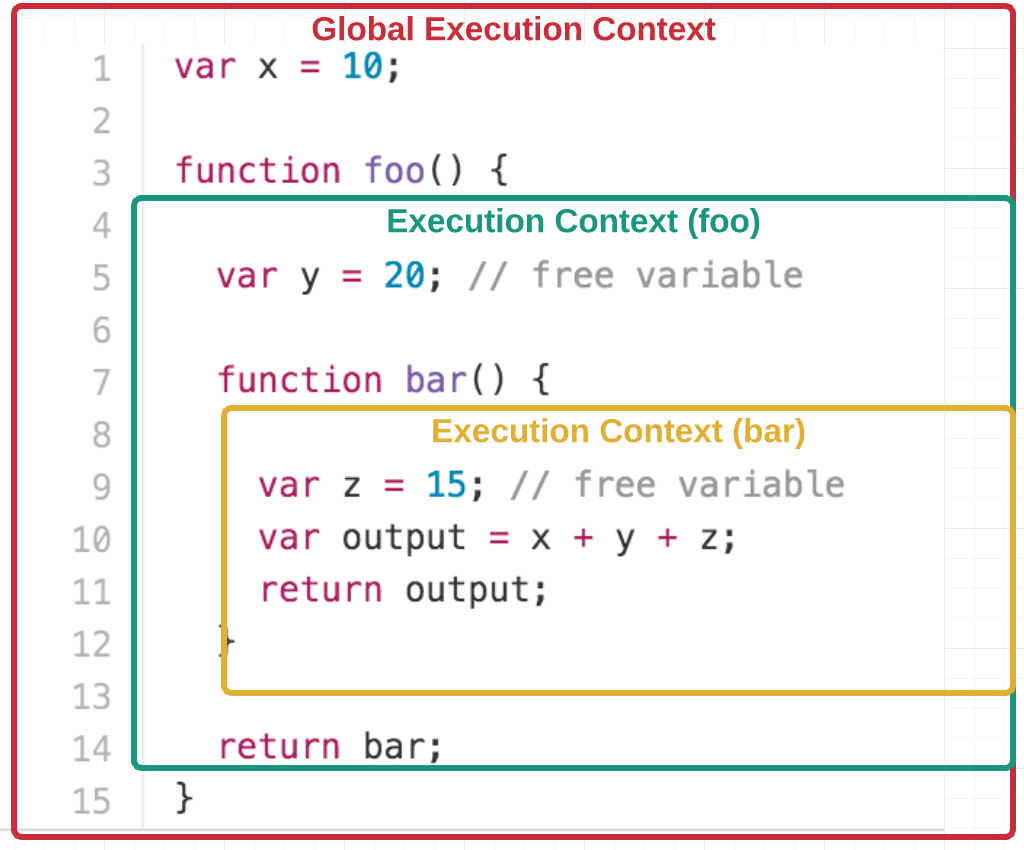
var x = 10;

function foo() {
  var y = 20; // free variable
  function bar() {
    var z = 15; // free variable
    return x + y + z;
  }
  return bar;
}
As you can see, bar is nested within foo. To help you visualize the nesting, see the diagram below:
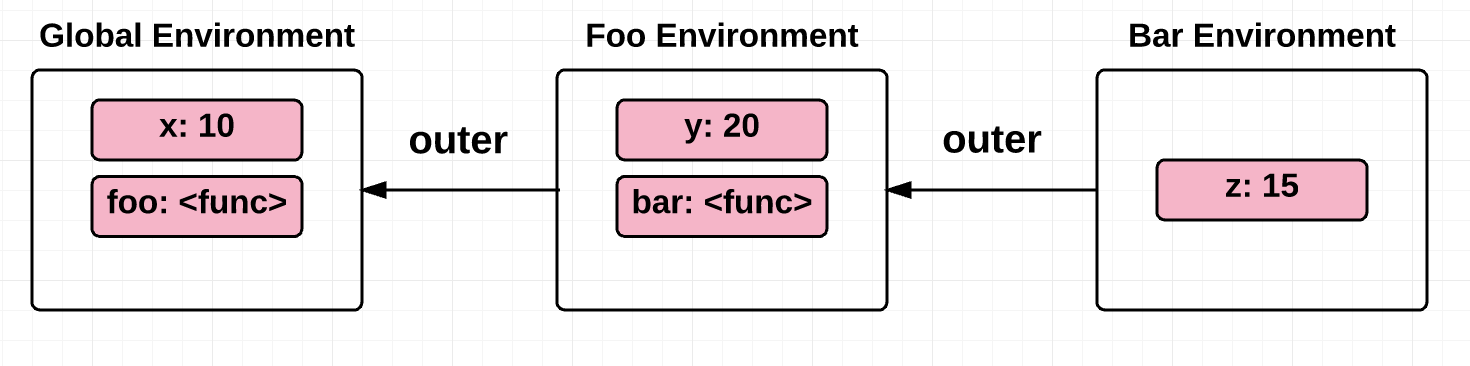
We’ll revisit this example later in the post.
This scope chain, or chain of environments associated with a function, is saved to the function object at the time of its creation. In other words, it’s defined statically by location within the source code. (This is also known as “lexical scoping”.)
Let’s take a quick detour to understand the difference between “dynamic scope” and “static scope”, which will help clarify why static scope (or lexical scope) is necessary in order to have closures.
Dynamic scoped languages have “stack-based implementations”, meaning that the local variables and arguments of functions are stored on a stack. Therefore, the runtime state of the program stack determines what variable you are referring to.
On the other hand, static scope is when the variables referenced in a context are recorded at the time of creation. In other words, the structure of the program source code determines what variables you are referring to.
At this point, you might be wondering how dynamic scope and static scope are different. Here’s two examples to help illustrate:
var x = 10;

function foo() {
  var y = x + 5;
  return y;
}

function bar() {
  var x = 2;
  return foo();
}

function main() {
  foo(); // Static scope: 15; Dynamic scope: 15
  bar(); // Static scope: 15; Dynamic scope: 7
  return 0;
}
We see above that the static scope and dynamic scope return different values when the function bar is invoked.
With static scope, the return value of bar is based on the value of x at the time of foo’s creation. This is because of the static and lexical structure of the source code, which results in x being 10 and the result being 15.
Dynamic scope, on the other hand, gives us a stack of variable definitions tracked at runtime — such that which x we use depends on what exactly is in scope and has been defined dynamically at runtime. Running the function bar pushes x = 2 onto the top of the stack, making foo return 7.
var myVar = 100;

function foo() {
  console.log(myVar);
}

foo(); // Static scope: 100; Dynamic scope: 100

(function () {
  var myVar = 50;
  foo(); // Static scope: 100; Dynamic scope: 50
})();

// Higher-order function
(function (arg) {
  var myVar = 1500;
  arg();  // Static scope: 100; Dynamic scope: 1500
})(foo);
Similarly, in the dynamic scope example above the variable myVar is resolved using the value of myVar at the place where the function is called. Static scope, on the other hand, resolves myVar to the variable that was saved in the scope of the two IIFE functions at creation.
As you can see, dynamic scope often leads to some ambiguity. It’s not exactly made clear which scope the free variable will be resolved from.
Some of that may strike you as off-topic, but we’ve actually covered everything we need to know to understand closures:
Every function has an execution context, which comprises of an environment that gives meaning to the variables within that function and a reference to its parent’s environment. A reference to the parent’s environment makes all variables in the parent scope available for all inner functions, regardless of whether the inner function(s) are invoked outside or inside the scope in which they were created.
So, it appears as if the function “remembers” this environment (or scope) because the function literally has a reference to the environment (and the variables defined in that environment)!
Coming back to the nested structure example:
var x = 10;

function foo() {
  var y = 20; // free variable
  function bar() {
    var z = 15; // free variable
    return x + y + z;
  }
  return bar;
}

var test = foo();

test(); // 45
Based on our understanding of how environments work, we can say that the environment definitions for the above example look something like this (note, this is purely pseudocode):
GlobalEnvironment = {
  EnvironmentRecord: {
    // built-in identifiers
    Array: '<func>',
    Object: '<func>',
    // etc..

    // custom identifiers
    x: 10
  },
  outer: null
};

fooEnvironment = {
  EnvironmentRecord: {
    y: 20,
    bar: '<func>'
  }
  outer: GlobalEnvironment
};

barEnvironment = {
  EnvironmentRecord: {
    z: 15
  }
  outer: fooEnvironment
};
When we invoke the function test, we get 45, which is the return value from invoking the function bar (because foo returned bar). bar has access to the free variable y even after the function foo has returned because bar has a reference to y through its outer environment, which is foo’s environment! bar also has access to the global variable x because foo’s environment has access to the global environment. This is called “scope-chain lookup.”
Returning to our discussion of dynamic scope vs static scope: for closures to be implemented, we can’t use dynamic scoping via a dynamic stack to store our variables. The reason is because it would mean that when a function returns, the variables would be popped off the stack and no longer available — which contradicts our initial definition of a closure. What happens instead is that the closure data of the parent context is saved in what’s known as the “heap,” which allows for the data to persist after the function call that made them returns (i.e. even after the execution context is popped off the execution call stack).
Make sense? Good! Now that we understand the internals on an abstract level, let’s look at a couple more examples:
One canonical example/mistake is when there’s a for-loop and we try to associate the counter variable in the for-loop with some function in the for-loop:
var result = [];

for (var i = 0; i < 5; i++) {
  result[i] = function () {
    console.log(i);
  };
}

result[0](); // 5, expected 0
result[1](); // 5, expected 1
result[2](); // 5, expected 2
result[3](); // 5, expected 3
result[4](); // 5, expected 4
Going back to what we just learned, it becomes super easy to spot the mistake here! Abstractly, here’s what the environment looks like this by the time the for-loop exits:
environment: {
  EnvironmentRecord: {
    result: [...],
    i: 5
  },
  outer: null,
}
The incorrect assumption here was that the scope is different for all five functions within the result array. Instead, what’s actually happening is that the environment (or context/scope) is the same for all five functions within the result array. Therefore, every time the variable i is incremented, it updates scope — which is shared by all the functions. That’s why any of the 5 functions trying to access i returns 5 (i is equal to 5 when the for-loop exits).
One way to fix this is to create an additional enclosing context for each function so that they each get their own execution context/scope:
var result = [];

for (var i = 0; i < 5; i++) {
  result[i] = (function inner(x) {
    // additional enclosing context
    return function() {
      console.log(x);
    }
  })(i);
}

result[0](); // 0, expected 0
result[1](); // 1, expected 1
result[2](); // 2, expected 2
result[3](); // 3, expected 3
result[4](); // 4, expected 4
Yay! That fixed it 😀
Another, rather clever approach is to use let instead of var, since let is block-scoped and so a new identifier binding is created for each iteration in the for-loop:
var result = [];

for (let i = 0; i < 5; i++) {
  result[i] = function () {
    console.log(i);
  };
}

result[0](); // 0, expected 0
result[1](); // 1, expected 1
result[2](); // 2, expected 2
result[3](); // 3, expected 3
result[4](); // 4, expected 4
Tada! 😃
In this example, we’ll show how each call to a function creates a new separate closure:
function iCantThinkOfAName(num, obj) {
  // This array variable, along with the 2 parameters passed in,
  // are 'captured' by the nested function 'doSomething'
  var array = [1, 2, 3];
  function doSomething(i) {
    num += i;
    array.push(num);
    console.log('num: ' + num);
    console.log('array: ' + array);
    console.log('obj.value: ' + obj.value);
  }

  return doSomething;
}

var referenceObject = { value: 10 };
var foo = iCantThinkOfAName(2, referenceObject); // closure ##1
var bar = iCantThinkOfAName(6, referenceObject); // closure ##2

foo(2);
/*
  num: 4
  array: 1,2,3,4
  obj.value: 10
*/

bar(2);
/*
  num: 8
  array: 1,2,3,8
  obj.value: 10
*/

referenceObject.value++;

foo(4);
/*
  num: 8
  array: 1,2,3,4,8
  obj.value: 11
*/

bar(4);
/*
  num: 12
  array: 1,2,3,8,12
  obj.value: 11
*/
In this example, we can see that each call to the function iCantThinkOfAName creates a new closure, namely foo and bar. Subsequent invocations to either closure functions updates the closure variables within that closure itself, demonstrating that the variables in each closure continue to be usable by iCantThinkOfAName’s doSomething function long after iCantThinkOfAName returns.
function mysteriousCalculator(a, b) {
  var mysteriousVariable = 3;
  return {
    add: function() {
      var result = a + b + mysteriousVariable;
      return toFixedTwoPlaces(result);
    },

    subtract: function() {
      var result = a - b - mysteriousVariable;
      return toFixedTwoPlaces(result);
    }
  }
}

function toFixedTwoPlaces(value) {
  return value.toFixed(2);
}

var myCalculator = mysteriousCalculator(10.01, 2.01);
myCalculator.add() // 15.02
myCalculator.subtract() // 5.00
What we can observe is that mysteriousCalculator is in the global scope, and it returns two functions. Abstractly, the environments for the example above look like this:
GlobalEnvironment = {
  EnvironmentRecord: {
    // built-in identifiers
    Array: '<func>',
    Object: '<func>',
    // etc...

    // custom identifiers
    mysteriousCalculator: '<func>',
    toFixedTwoPlaces: '<func>',
  },
  outer: null,
};

mysteriousCalculatorEnvironment = {
  EnvironmentRecord: {
    a: 10.01,
    b: 2.01,
    mysteriousVariable: 3,
  }
  outer: GlobalEnvironment,
};

addEnvironment = {
  EnvironmentRecord: {
    result: 15.02
  }
  outer: mysteriousCalculatorEnvironment,
};

subtractEnvironment = {
  EnvironmentRecord: {
    result: 5.00
  }
  outer: mysteriousCalculatorEnvironment,
};
Because our add and subtract functions have a reference to the mysteriousCalculator function environment, they’re able to make use of the variables in that environment to calculate the result.
One final example to demonstrate an important use of closures: to maintain a private reference to a variable in the outer scope.
function secretPassword() {
  var password = 'xh38sk';
  return {
    guessPassword: function(guess) {
      if (guess === password) {
        return true;
      } else {
        return false;
      }
    }
  }
}

var passwordGame = secretPassword();
passwordGame.guessPassword('heyisthisit?'); // false
passwordGame.guessPassword('xh38sk'); // true
This is a very powerful technique — it gives the closure function guessPassword exclusive access to the password variable, while making it impossible to access the password from the outside.
I hope this post was helpful and gave you a mental model for how closures are implemented in JavaScript. As you can see, understanding the nuts and bolts of how they work makes it much easier to spot closures — not to mention saving a lot of headache when it’s time to debug.
PS: I’m human and make mistakes — so if you find any mistakes I’d love for you to let me know!
For the sake of brevity I left out a few topics that might be interesting to some readers. Here are some links that I wanted to share:
Jul 29, 2017
In this article I’m trying to explain to myself recursive data structures and how they work together with lazy evaluation. I happen to use them everyday, but never really thought about underlying implementation and the idea in general.
First we define a problem and describe recursive solution to it. After that we are going to implement a simple data structure, recursively. And once we get the idea, I’ll cover lazy evaluation and present lazy variant of that data structure.
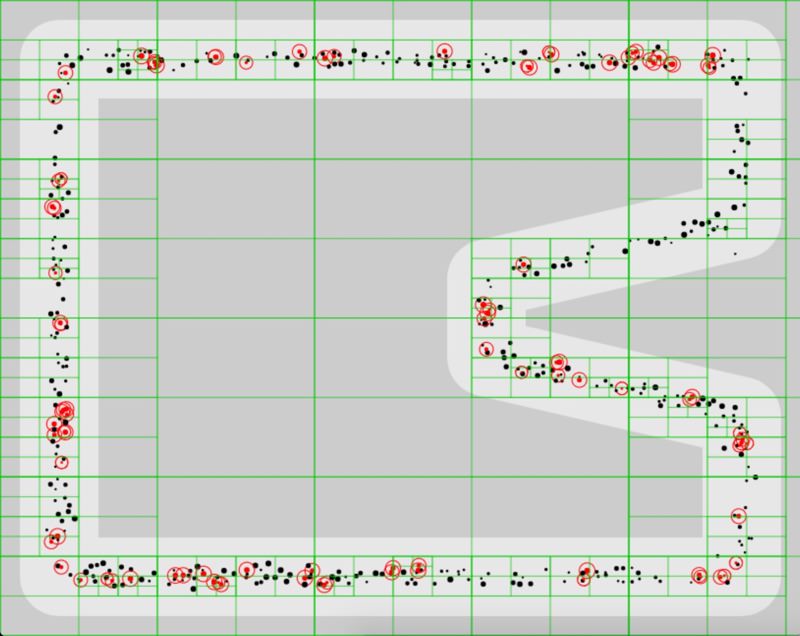
A typical problem in game development is collision detection. This technique is used to detect intersection between entities in coordinate space, such as enemies and bullets in shooter games for example.

Let’s imagine we are building 2D space shooter game. The game involves interaction between enemy entities and player’s missiles. In order to say if enemy entity is destroyed the game should be able to detect when the missile intersects an entity in two-dimensional coordinate space. In the context of our game collision detection algorithm could be described as the following:
As you can see the algorithm is straightforward and can be easily implemented via iteration.
for (let i = 0; i < missiles.length; i++) {
  const missile = missiles[i];
  for (let j = 0; j < enemies.length; j++) {
    const enemy = enemies[j];
    if (missile.intersects(enemy)) {
      // collision is detected
    }
  }
}
The problem however is that this naive approach takes
O(n*(n-1)) or simply O(n^2) time to execute,
meaning that every time the number of entities doubles the number of
iterations required to detect collision between all entities is going to
be four times larger. That is for 3 entities it takes roughly 9
iterations, 900 iterations for 30 entities, 90000 for 300 entities and
so on. It’s totally fine to use this approach if a single check is
relatively cheap operation and there are not much entities on a screen,
but sometimes that’s not the case.
An obvious improvement would be to perform collision check for a given entity only against entities that are close to it, discarding all distant entities. Screen area can be divided into separate areas to form a grid and now for every entity we can perform collision check only against other entities currently in the same area. This technique is called space partitioning.

More sophisticated algorithm would be to use an adaptive grid, where cells can subdivide itself based on how much entities there are currently in a given cell.
One of the algorithms implementing adaptive grid approach is called quadtree space partitioning. A quadtree is a data structure where every node has exactly four child nodes, hence the name. A quadtree is recursive because it is defined in terms of itself (every node, except leaf nodes, has another quadtree as its subtree).
Game canvas can be divided between those nodes where each node would represent an area on the screen defined by its bounds. A node may hold entities that are currently in the area which corresponds to that node. Quadtree nodes should be set a maximum number of entities they can hold (maximum number of entities in a given area). Once capacity of the node is full, the node subdivides itself into four child nodes and spreads its entities across child nodes with respect to their position on the screen. Subdivision can be infinitely deep, but usually the maximum number of levels is set.
The benefit of this approach is that in the best case, when all entities are spread evenly across the screen, the time required to perform all collision checks is reduced by 4x with every level of subdivision. That is, for 100 entities we get 2500 checks instead of 10000 with one level of subdivision, with two levels it is 625 checks and so on. This can reduce CPU load when applied correctly, but don’t forget that maintaining a quadtree also consumes CPU cycles and memory.
What we’ve just learned is that game development is fun and algorithms are not that hard, but most importantly in this section we’ve seen how recursive data structures could be a natural fit as a solution to a certain type of problems. Now let’s see the code.
In this section we are going to build List data
structure, singly linked list to be precise. A list is fundamental data
structure in functional programming known from early days of Lisp
programming language. Take a look at type declaration of List data type
in Haskell
data List a = Nil | Cons a (List a)You can see that a list is either Nil (empty list) or
Cons (construction) of a value and another list. Having
another list as the next value in a list is what makes this data
structure recursive or defined in terms of itself. The last value in a
list is always Nil, it is used to signal that the end of
list is reached. Nil is also treated as empty list, which
means that this type inherits properties of a list. To get better
understanding here’s how a list of three items could be written in
pseudo code:
[1 [2 [3 nil]]]A tuple of two items here is called a cons (construction) cell. A
cons cell consists of a value at the first position (head) and a pointer
to another value (tail). Thus a list of three items is essentially a
chain of three cons cells with Nil in the last cell to
indicate the end of list. This can be also visualized as the
following:

A list built on cons cells has interesting properties such as access to the head of list and its tail in constant time. On the other hand lists doesn’t provide efficient random access such as in indexed collections (arrays).
Now that we know underlying representation of a list, lets create our
own implementation. First we define data types — building blocks of a
list. They are: List, Cons and
Nil. List type is not really necessary to
build a list, because a list is just a chain of cons cells with
Nil in the end. It is rather a useful abstraction which
could provide us with an API for creating and manipulating lists.
First we implement type Nil as JavaScript class and
create an instance of the class, a variable named nil, to
be used as a marker of the end of a list.
class Nil {
  toString() {
    return 'Nil';
  }
}

const nil = new Nil();
The next type is Cons. It is a class that accepts
head value and tail — a reference to the next
value. We also create a helper static method .of to avoid
using new keyword.
class Cons {
  constructor(head, tail = nil) {
    this.head = head;
    this.tail = tail;
  }
  toString() {
    return `Cons(${this.head}, ${this.tail})`;
  }
}

Cons.of = (head, tail) => new Cons(head, tail);
Using just cons cells we can already create lists of values and access those values:
class Nil {
  toString() {
    return 'Nil';
  }
}

const nil = new Nil();

class Cons {
  constructor(head, tail = nil) {
    this.head = head;
    this.tail = tail;
  }
  toString() {
    return `Cons(${this.head}, ${this.tail})`;
  }
}

Cons.of = (head, tail) => new Cons(head, tail);


const list = Cons.of(1, Cons.of(2, Cons.of(3, nil)));

console.log(list.head);
console.log(list.tail.toString());
console.log(list.tail.head);
console.log(list.tail.tail.tail.toString());
As I mentioned before cons cells are enough for creating lists, but
list abstraction built on top of Cons could save us a
little time and code by providing an API to create and manipulate lists.
So lets built List type on top of Cons:
class List extends Cons {
  constructor(head, tail) {
    super(head, tail);
  }
  toString() {
    return `List(${this.first()}, ${this.rest()})`;
  }
  first() {
    return this.head;
  }
  rest() {
    return this.tail;
  }
}

List.of = (head, tail) => new List(head, tail);

List.fromValues = (head, ...tail) => {
  if (tail.length > 0) {
    return List.of(head, List.fromValues(...tail));
  } else {
    return List.of(head, nil);
  }
};
We also implement .fromValues helper for creating lists
from arbitrary number of arguments. Note how it builds a list
recursively.
class Nil {
  toString() {
    return 'Nil';
  }
}

const nil = new Nil();

class Cons {
  constructor(head, tail = nil) {
    this.head = head;
    this.tail = tail;
  }
  toString() {
    return `Cons(${this.head}, ${this.tail})`;
  }
}

Cons.of = (head, tail) => new Cons(head, tail);

class List extends Cons {
  constructor(head, tail) {
    super(head, tail);
  }
  toString() {
    return `List(${this.first()}, ${this.rest()})`;
  }
  first() {
    return this.head;
  }
  rest() {
    return this.tail;
  }
}

List.of = (head, tail) => new List(head, tail);

List.fromValues = (head, ...tail) => {
  if (tail.length > 0) {
    return List.of(head, List.fromValues(...tail));
  } else {
    return List.of(head, nil);
  }
};

const list = List.fromValues(1, 2, 3);

console.log(list.toString());
Another useful operation would be generating a range of values. Add a
new static method to List class definition:
List.range = (start, end) => {
  if (start < end) {
    return List.of(start, List.range(start + 1, end));
  } else {
    return nil;
  }
};
take method is used to take an arbitrary number
of values from a list.
take(n) {
  if (n > 0) {
    return List.of(this.first(), this.rest().take(n - 1));
  } else {
    return List.of(this.first(), nil);
  }
}
Quick test with range and take
class Nil {
  toString() {
    return 'Nil';
  }
}

const nil = new Nil();

class Cons {
  constructor(head, tail = nil) {
    this.head = head;
    this.tail = tail;
  }
  toString() {
    return `Cons(${this.head}, ${this.tail})`;
  }
}

Cons.of = (head, tail) => new Cons(head, tail);

class List extends Cons {
  constructor(head, tail) {
    super(head, tail);
  }
  toString() {
    return `List(${this.first()}, ${this.rest()})`;
  }
  first() {
    return this.head;
  }
  rest() {
    return this.tail;
  }
  take(n) {
    if (n > 0) {
      return List.of(this.first(), this.rest().take(n - 1));
    } else {
      return List.of(this.first(), nil);
    }
  }
}

List.of = (head, tail) => new List(head, tail);

List.fromValues = (head, ...tail) => {
  if (tail.length > 0) {
    return List.of(head, List.fromValues(...tail));
  } else {
    return List.of(head, nil);
  }
};

List.range = (start, end) => {
  if (start < end) {
    return List.of(start, List.range(start + 1, end));
  } else {
    return nil;
  }
};


const list = List.range(0, 10);

console.log(list.take(3).toString());
So far we’ve implemented only retrieval and list creation operations.
Lets also create operations for adding values to list and mapping over
its values: add and map methods.
add operation is super cheap, because list supports
efficient addition to the head, just create a new list with value in
head position and target list in tail position, it is as simple as
that:
add(value) {
  return List.of(value, this);
}
map operation also returns a new list where a value in
head position is applied recursively to mapper function:
map(fn) {
  const first = this.first();
  const rest = this.rest();

  if (rest === nil) {
    return List.of(fn(first), nil);
  } else {
    return List.of(fn(first), rest.map(fn));
  }
}
class Nil {
toString() {
return 'Nil';
}
}
const nil = new Nil();
class Cons {
constructor(head, tail = nil) {
this.head = head;
this.tail = tail;
}
toString() {
return `Cons(${this.head}, ${this.tail})`;
}
}
Cons.of = (head, tail) => new Cons(head, tail);
class List extends Cons {
constructor(head, tail) {
super(head, tail);
}
toString() {
return `List(${this.first()}, ${this.rest()})`;
}
first() {
return this.head;
}
rest() {
return this.tail;
}
take(n) {
if (n > 0) {
return List.of(this.first(), this.rest().take(n - 1));
} else {
return List.of(this.first(), nil);
}
}
add(value) {
return List.of(value, this);
}
map(fn) {
const first = this.first();
const rest = this.rest();
if (rest === nil) {
return List.of(fn(first), nil);
} else {
return List.of(fn(first), rest.map(fn));
}
}
}
List.of = (head, tail) => new List(head, tail);
List.fromValues = (head, ...tail) => {
if (tail.length > 0) {
return List.of(head, List.fromValues(...tail));
} else {
return List.of(head, nil);
}
};
List.range = (start, end) => {
if (start < end) {
return List.of(start, List.range(start + 1, end));
} else {
return nil;
}
};
const list = List.range(1, 4).add(0).map(n => n * n);
console.log(list.toString());Operations such as filter and reduce could
be implemented similarly to map.
In this section we’ve learnt about List data structure
and its recursive implementation. Similar reasoning could be applied to
build quadtree mentioned earlier and any other data structure as well.
Later here we will create lazy version of List.
Before we dive into implementing lazy variant of List
lets quickly remind ourselves what is lazy evaluation.
There are two evaluation strategies: eager and lazy. In short eager means now or to execute immediately and lazy — later or to delay execution until result is needed. Lazy evaluation is essentially an optimization technique. A real world analogy would be lazy loading images on a web page. When you open a website with a bunch of images the browser will start downloading them all immediately. On the other hand we could save bandwidth by loading only those images that are currently visible in browser window. Non of the images below the fold should load until the page scrolled to a position where they become visible. The same applies to code: a set of operations are executed on demand, when the result is actually needed.
Eager evaluation is more straightforward in a sense that it’s easier to reason about. It’s a standard evaluation strategy in languages like JavaScript and Ruby. Consider the following example (evaluation process is described in comments):
range(0, 10) // [0..9]
  .map(n => n + 1) // [1..10]
  .filter(n => n % 2 === 0) // [2 4 6 8 10]
  .take(3) // [2 4 6]
You can see that the code is executed in-place and result returned immediately.
Lazy evaluation strategy is different.
range(0, 10) // nothing happened
  .map(n => n + 1) // nothing happened
  .filter(n => n % 2 === 0) // nothing happened
  .take(3) // nothing happened
  .run() // [2 4 6]
Here none of the operations in the chain are executed until the call
to .run method. nothing happened is of course
not entirely true. When called each operation is being saved for later
execution and when the result is requested the whole chain is executed
and the final value is returned. Languages like Haskell and Clojure
relies heavily on delayed execution. In Haskell for example everything
is stored in thunks. You can think of a thunk as a container for
arbitrary code that prevents its evaluation. It could be a closure that
contains an expression. Eager version of 1 + 1 can be
represented as lazy () => 1 + 1 in JavaScript. As an
example let’s create lazy functions to add and subtract numbers:
const add = (a, b) => {
  return () => {
    a = typeof a === "function" ? a() : a;
    b = typeof b === "function" ? b() : b;
    return a + b;
  };
};

const sub = (a, b) => {
  return () => {
    a = typeof a === "function" ? a() : a;
    b = typeof b === "function" ? b() : b;
    return a - b;
  };
};
Both add and sub returns a function that is
closed over the arguments, thus the actual operation is not executed
yet, until we force it by calling returned thunk.
const thunk = fn => {
  fn.toString = () => '[Thunk]';
  return fn;
};


const add = (a, b) => {
  return thunk(() => {
    a = typeof a === "function" ? a() : a;
    b = typeof b === "function" ? b() : b;
    return a + b;
  });
};

const sub = (a, b) => {
  return thunk(() => {
    a = typeof a === "function" ? a() : a;
    b = typeof b === "function" ? b() : b;
    return a - b;
  });
};


const result1 = sub(20, add(10, 5));
const result2 = add(3, sub(5, 7));
const result3 = add(result1, result2);

console.log(result1);
console.log(result2);
console.log(result3);

console.log(result3());
Lazy evaluation always comes with memoization which is yet another optimization. Once a thunk was evaluated it can cache the result in closure and return cached value on subsequent calls instead of evaluating the whole thing again and again. Here’s modified version of previous example:
// memoization function
const memoize = (fn) => {
  let cache;
  return () => {
    if (cache) {
      return cache;
    } else {
      cache = fn();
      return cache;
    }
  };
};

const add = (a, b) => {
  return memoize(() => {
    a = typeof a === "function" ? a() : a;
    b = typeof b === "function" ? b() : b;
    return a + b;
  });
};

const sub = (a, b) => {
  return memoize(() => {
    a = typeof a === "function" ? a() : a;
    b = typeof b === "function" ? b() : b;
    return a - b;
  });
};
const memoize = (fn) => {
let cache;
return () => {
if (cache) {
console.log('Return cached');
return cache;
} else {
console.log('Evaluate');
cache = fn();
return cache;
}
};
};Below is the initial implementation of LazyList
abstraction which we are going to build on top of Cons
type.
class LazyList {
  constructor(fn) {
    this._fn = fn;
  }
  toString() {
    return `LazyList(${this.next()})`;
  }
  next() {
    return this._fn();
  }
  first() {
    return this.next().head;
  }
  rest() {
    return this.next().tail;
  }
}

LazyList.of = fn => new LazyList(fn);
fn here is a thunk which should return a cons cell and
next method evaluates the thunk.
See how .fromValues helper builds a list lazily and
recursively. It returns an instance of LazyList which
contains a thunk of Cons with head as value
from arguments and tail as another lazy list.
LazyList.fromValues = (head, ...tail) => {
  return LazyList.of(() => {
    if (tail.length > 0) {
      return Cons.of(head, LazyList.fromValues(...tail));
    } else {
      return Cons.of(head, nil);
    }
  });
};
class Nil {
toString() {
return 'Nil';
}
}
const nil = new Nil();
class Cons {
constructor(head, tail = nil) {
this.head = head;
this.tail = tail;
}
toString() {
return `Cons(${this.head}, ${this.tail})`;
}
}
Cons.of = (head, tail) => new Cons(head, tail);
class LazyList {
constructor(fn) {
this._fn = fn;
}
toString() {
return `LazyList(${this.next()})`;
}
next() {
return this._fn();
}
first() {
return this.next().head;
}
rest() {
return this.next().tail;
}
}
LazyList.of = fn => new LazyList(fn);
LazyList.fromValues = (head, ...tail) => {
return LazyList.of(() => {
if (tail.length > 0) {
return Cons.of(head, LazyList.fromValues(...tail));
} else {
return Cons.of(head, nil);
}
});
};
const list = LazyList.fromValues(1, 2, 3);
console.log(list.toString());take also returns a lazy list. But in order to take
actual values it evaluates thunks one by one, taking from the tail of
the target list, and constructs a new one.
take(n) {
  if (n > 0) {
    return LazyList.of(() => {
      const head = this.first();
      const tail = this.rest();

      if (tail === nil) {
        return Cons.of(head, nil);
      } else {
        return Cons.of(head, tail.take(n - 1));
      }
    });
  }
}
range returns a range of values, except that now with
laziness it is possible to create infinite lists.
LazyList.range = (start = 0, end = Infinity) => {
  if (start < end) {
    return LazyList.of(() => Cons.of(start, LazyList.range(start + 1, end)));
  }
};
class Nil {
toString() {
return 'Nil';
}
}
const nil = new Nil();
class Cons {
constructor(head, tail = nil) {
this.head = head;
this.tail = tail;
}
toString() {
return `Cons(${this.head}, ${this.tail})`;
}
}
Cons.of = (head, tail) => new Cons(head, tail);
class LazyList {
constructor(fn) {
this._fn = fn;
}
toString() {
return `LazyList(${this.next()})`;
}
next() {
return this._fn();
}
first() {
return this.next().head;
}
rest() {
return this.next().tail;
}
take(n) {
if (n > 0) {
return LazyList.of(() => {
const head = this.first();
const tail = this.rest();
return Cons.of(head, tail.take(n - 1));
});
}
}
}
LazyList.of = fn => new LazyList(fn);
LazyList.fromValues = (head, ...tail) => {
return LazyList.of(() => {
if (tail.length > 0) {
return Cons.of(head, LazyList.fromValues(...tail));
} else {
return Cons.of(head, nil);
}
});
};
LazyList.range = (start = 0, end = Infinity) => {
if (start < end) {
return LazyList.of(() => Cons.of(start, LazyList.range(start + 1, end)));
}
};
const list = LazyList.range();
console.log(list.take(2).toString());
console.log(list.take(5).toString());Adding a value to a lazy list is very similar to List
implementation
add(value) {
  return LazyList.of(() => Cons.of(value, this));
}
map operation is also similar to its eager variant
map(fn) {
  return LazyList.of(() => {
    const first = this.first();
    const rest = this.rest();

    return Cons.of(fn(first), rest.map(fn));
  });
}
Now we can create an infinite list of values with a set of operations defined on it.
class Nil {
  toString() {
    return 'Nil';
  }
}

const nil = new Nil();

class Cons {
  constructor(head, tail = nil) {
    this.head = head;
    this.tail = tail;
  }
  toString() {
    return `Cons(${this.head}, ${this.tail})`;
  }
}

Cons.of = (head, tail) => new Cons(head, tail);

class LazyList {
  constructor(fn) {
    this._fn = fn;
  }
  toString() {
    return `LazyList(${this.next()})`;
  }
  next() {
    return this._fn();
  }
  first() {
    return this.next().head;
  }
  rest() {
    return this.next().tail;
  }
  take(n) {
    if (n > 0) {
      return LazyList.of(() => {
        const head = this.first();
        const tail = this.rest();
          return Cons.of(head, tail.take(n - 1));
      });
    }
  }
  add(value) {
    return LazyList.of(() => Cons.of(value, this));
  }
  map(fn) {
    return LazyList.of(() => {
      const first = this.first();
      const rest = this.rest();

      return Cons.of(fn(first), rest.map(fn));
    });
  }
}

LazyList.of = fn => new LazyList(fn);

LazyList.fromValues = (head, ...tail) => {
  return LazyList.of(() => {
    if (tail.length > 0) {
      return Cons.of(head, LazyList.fromValues(...tail));
    } else {
      return Cons.of(head, nil);
    }
  });
};

LazyList.range = (start = 0, end = Infinity) => {
  if (start < end) {
    return LazyList.of(() => Cons.of(start, LazyList.range(start + 1, end)));
  }
};


const list = LazyList.range().map(n => n * n);

console.log(list.take(2).toString());
console.log(list.take(5).toString());
So far we had only one method for evaluating entire list:
.toString. In order to be able to consume a list using
common JavaScript facilities it should be converted to something
meaningful, for example array. .toArray method does exactly
this.
toArray() {
  const first = this.first();
  const rest = this.rest();

  if (rest === nil) {
    return [first];
  } else {
    return [first, ...rest.toArray()];
  }
}
class Nil {
toString() {
return 'Nil';
}
}
const nil = new Nil();
class Cons {
constructor(head, tail = nil) {
this.head = head;
this.tail = tail;
}
toString() {
return `Cons(${this.head}, ${this.tail})`;
}
}
Cons.of = (head, tail) => new Cons(head, tail);
class LazyList {
constructor(fn) {
this._fn = fn;
}
toString() {
return `LazyList(${this.next()})`;
}
next() {
return this._fn();
}
first() {
return this.next().head;
}
rest() {
return this.next().tail;
}
take(n) {
if (n > 0) {
return LazyList.of(() => {
const head = this.first();
const tail = this.rest();
return Cons.of(head, tail.take(n - 1));
});
}
}
add(value) {
return LazyList.of(() => Cons.of(value, this));
}
map(fn) {
return LazyList.of(() => {
const first = this.first();
const rest = this.rest();
return Cons.of(fn(first), rest.map(fn));
});
}
toArray() {
const first = this.first();
const rest = this.rest();
if (rest === nil) {
return [first];
} else {
return [first, ...rest.toArray()];
}
}
}
LazyList.of = fn => new LazyList(fn);
LazyList.fromValues = (head, ...tail) => {
return LazyList.of(() => {
if (tail.length > 0) {
return Cons.of(head, LazyList.fromValues(...tail));
} else {
return Cons.of(head, nil);
}
});
};
LazyList.range = (start = 0, end = Infinity) => {
if (start < end) {
return LazyList.of(() => Cons.of(start, LazyList.range(start + 1, end)));
}
};
const list = LazyList.range().map(n => n * n);
console.log(list.take(2).toArray());
console.log(list.take(5).toArray());Let’s add memoization now. Every time someone calls
.next method to retrieve a value from a list we either
evaluate a thunk and memoize the result or just return the result if it
was already cached. Here’s what modifications need to be done to
LazyList class:
constructor(fn) {
  this._fn = fn;
  this._next = null; // cache
}

next() {
  // if there's a thunk
  if (typeof this._fn === 'function') {
    this._next = this._fn(); // evaluate it and cache the result
    this._fn = null; // we don't need thunk anymore
    return this._next; // return cached  value
  } else {
    // other just return cached value
    return this._next;
  }
}
See this example of pulling user records lazily from database.
getUsers function produces a list of user records lazily by
pulling them out of database on demand, when the thunk is evaluated.
const getUsers = (db, [id, ...ids]) => {
  return LazyList.of(() => {
    if (ids.length > 0) {
      return Cons.of(db.getUserByID(id), getUsers(db, ids));
    } else {
      return Cons.of(db.getUserByID(id), nil);
    }
  });
};

// usage
const ids = db.getUsersIDs();
const users = getUsers(db, ids); // nothing happened
const firstThreeUsers = users.take(3).map(({ id }) => id); // nothing happened

firstThreeUsers.toArray(); // [1, 2, 3]
Let’s test this. In the code below you can see that the first run
takes ~1s but the next one takes less than 1ms, even though we execute
different operations. This happens because users list was
evaluated on the first run and result was memoized for subsequent
calls.
class Nil {
  toString() {
    return 'Nil';
  }
}

const nil = new Nil();

class Cons {
  constructor(head, tail = nil) {
    this.head = head;
    this.tail = tail;
  }
  toString() {
    return `Cons(${this.head}, ${this.tail})`;
  }
}

Cons.of = (head, tail) => new Cons(head, tail);

class LazyList {
  constructor(fn) {
    this._fn = fn;
    this._next = null;
  }
  toString() {
    return `LazyList(${this.next()})`;
  }
  next() {
    if (typeof this._fn === 'function') {
      this._next = this._fn();
      this._fn = null;
      return this._next;
    } else {
      return this._next;
    }
  }
  first() {
    return this.next().head;
  }
  rest() {
    return this.next().tail;
  }
  take(n) {
    if (n > 0) {
      return LazyList.of(() => {
        const head = this.first();
        const tail = this.rest();

        if (tail === nil) {
          return Cons.of(head, nil);
        } else {
          return Cons.of(head, tail.take(n - 1));
        }
      });
    }
  }
  add(value) {
    return LazyList.of(() => Cons.of(value, this));
  }
  map(fn) {
    return LazyList.of(() => {
      const first = this.first();
      const rest = this.rest();

      return Cons.of(fn(first), rest.map(fn));
    });
  }
  toArray() {
    const first = this.first();
    const rest = this.rest();

    if (rest === nil) {
      return [first];
    } else {
      return [first, ...rest.toArray()];
    }
  }
}

LazyList.of = fn => new LazyList(fn);

LazyList.fromValues = (head, ...tail) => {
  return LazyList.of(() => {
    if (tail.length > 0) {
      return Cons.of(head, LazyList.fromValues(...tail));
    } else {
      return Cons.of(head, nil);
    }
  });
};

LazyList.range = (start = 0, end = Infinity) => {
  if (start < end) {
    return LazyList.of(() => Cons.of(start, LazyList.range(start + 1, end)));
  }
};


// benchmark helper
const time = (fn) => {
  const start = performance.now();
  const result = fn();
  const delta = performance.now() - start;
  console.log(Math.round(delta * 100) / 100);
  return result;
};

// db mock
const db = {
  getUsersIDs() {
    return [1, 2, 3, 4, 5, 6];
  },
  getUserByID(id) {
    for (let i = 0; i < 1e8; i++) {}
    return { id };
  }
};

const getUsers = (db, [id, ...ids]) => {
  return LazyList.of(() => {
    if (ids.length > 0) {
      return Cons.of(db.getUserByID(id), getUsers(db, ids));
    } else {
      return Cons.of(db.getUserByID(id), nil);
    }
  });
};

const users = getUsers(db, [1, 2, 3, 4, 5, 6]);

time(() =>
   users
     .take(6)
     .toArray());

time(() =>
  users
    .map(id => 'user id ' + id)
    .take(3)
    .toArray());
Thats pretty much it 🎬
P.S.
All of the interactive code examples in this article are rendered lazily, checkout the source here.
If you are interested in learning functional data structures, I highly recommend to read Okasaki’s book “Purely Functional Data Structures”.
If you come from classical object-oriented languages like Java or C##, it might be a littler tricky to do encapsulation in JavaScript (hiding variables from the external scopes).
In this post we going to see tree ways to do encapsulation with JavaScript:
First lets cover what an IIFE is:
In JavaScript we declare functions like this:
function myFunc(){
   console.log(myVar); // "Hello World"
}
And we call the function like this:
myFunc();
An IIFE is a combination of both in one, now, the more common and most used method to create an IIFE is with the parenthesis like this:
(function myFunc(){
   console.log("Hello World"); // "Hello World"
})();
There are other ways to create IIFE, you can accomplish this by using any of the following operators: !, +, -, ~.
!function myFunc(){
   console.log("Hello World"); // "Hello World"
}();

+function myFunc(){
   console.log("Hello World"); // "Hello World"
}();

-function myFunc(){
   console.log("Hello World"); // "Hello World"
}();

~function myFunc(){
   console.log("Hello World"); // "Hello World"
}();In JavaScript a variable scope is defined by the curly braces { } of an expression, for example a function:
function myFunc(){
   var myVar = "Hello World";
}
console.log(myVar) //undefined
myVar is not defined outside of the { } of the function, now notice that you can access a variable defined in the outter scope, like this:
var myVar = "Hello World";
function myFunc(){
   console.log(myVar) // "Hello World"
}
With those two concepts you can encapsulate variables and remove it from the global scope and protect your data. This helps prevent variables and function declarations from living longer than expected in the global scope, which also helps avoid variable collisions. Also When your code is minified and bundled into a single file for deployment to a production, you could have collisions of global variables. If you adopt to use IFFE in every JavaScript file, it will protects you against both of these by providing variable scope for each file.
Why getters and setters can be used for encapsulation?
A: To limit access to an internal state of an object.
One of the advantages of properties is that you can have behavior in your fields, also limitate the field to be read only and/or write only.
var myObj = {
   get myVar() {
      return 'Using get';
   },
   set myVar(value) {
      console.log('Using set, value: '+value);
   }
};
Note: Up to IE 8, it doesn’t support get and set operators, instead you’ll have to use the __defineGetter__ and __defineSetter__ methods that can be found in Object.prototype.
var myObj = {
    myVar1: 'Hello',
    myVar2: 'World'
};

myObj.__defineGetter__('sayHello', function(){
    return this.myVar1 + ' ' + this.myVar2;
});

myObj.__defineSetter__('sayHello', function(value){
    console.log(value);
});With this pattern we encapsulate and hide or reveal variable and functions in an object:
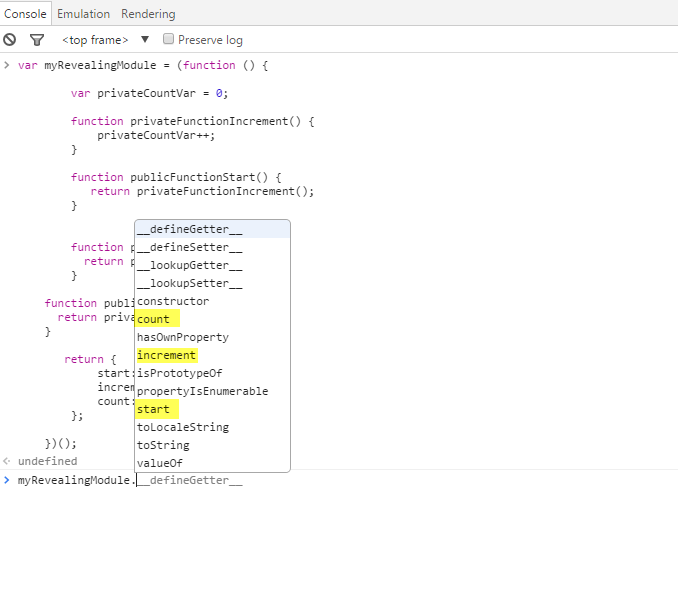
var myRevealingModule = (function () {
  var privateCountVar = 0;

  function privateFunctionIncrement() {
      privateCountVar++;
  }

  function publicFunctionStart() {
     return privateFunctionIncrement();
  }


  function publicGetCount(){
    return privateCountVar;
  }

  function publicIncrement(){
    return privateFunctionIncrement()
  }

  return {
    start: publicFunctionStart,
    increment: publicIncrement,
    count: publicGetCount
  };
})();
If you run the code above you’ll see that only the methods revealed in the return {…} are public see image below:
return {
  start: publicFunctionStart,
  increment: publicIncrement,
  count: publicGetCount
};
JavaScript is not an object oriented language, it is a functional language, but we can work around to have some of the goodies of the Object Oriented languages in JavaScript.
Those are some references for what in my opinion are two of the best
JavaScript books I ever read (they are free):
http://speakingjs.com/es5/
http://addyosmani.com/resources/essentialjsdesignpatterns/book/

const sum = (a, b) => a + b
const subtract = (a, b) => a - b

module.exports = {sum, subtract}
I’ve made a repo on GitHub you can reference as well 🐙😸
Here’s the most basic form of a test I can think of:
   // basic-test.js
   const actual = true
   const expected = false
   if (actual !== expected) {
     throw new Error('${actual} is not ${expected}')
   }
You could run this test code by running
node basic-test.js! That’s a test! 🎉
A test is code that throws an error when the actual result of
something does not match the expected output. It can get more
complicated when you’re dealing with code that depends on some state to
be set up first (like a component needs to be rendered to the document
before you can fire browser events, or there needs to be users in the
database). However, it is relatively easy to test “pure functions” like
those in our math.js module (functions which will always
return the same output for a given input and not change the state of the
world around them).
The part that says actual !== expected is called
an “assertion.” It’s a way to say in code that one thing should
be a certain value or pass a certain… eh… test :) It could be an
assertion that the actual matches a regex, is an array with
a certain length, or any number of things. The key is that if our
assertion fails, then we throw an error.
So here’s what the most basic test would be for our
math.js function:
   // 1.js
   const {sum, subtract} = require('./math')

   let result, expected

   result = sum(3, 7)
   expected = 10
   if (result !== expected) {
     throw new Error(`${result} is not equal to ${expected}`)
   }

   result = subtract(7, 3)
   expected = 4
   if (result !== expected) {
     throw new Error(`${result} is not equal to ${expected}`)
   }
There you go! Run that with node and the command will
exit without error. Now, let’s break the sum function by
changing the + to a - and run it again and
we’ll see:
   $ node 1.js
   /Users/kdodds/Desktop/js-test-example/1.js:8
     throw new Error(`${result} is not equal to ${expected}`)
     ^

   Error: -4 is not equal to 10
       at Object.<anonymous> (/Users/kdodds/Desktop/js-test-example/1.js:8:9)
       at Module._compile (module.js:635:30)
       at Object.Module._extensions..js (module.js:646:10)
       at Module.load (module.js:554:32)
       at tryModuleLoad (module.js:497:12)
       at Function.Module._load (module.js:489:3)
       at Function.Module.runMain (module.js:676:10)
       at startup (bootstrap_node.js:187:16)
       at bootstrap_node.js:608:3
Cool! We’re benefitting from our basic tests already! We can’t break
the sum function without breaking our automated test!
Neato!
One of the most important parts of testing frameworks (or assertion libraries) is how helpful their error messages are. Often when a test fails, the first thing you’ll see is the error message. If you can’t figure out what the underlying problem is from the error message, then you have to spend a few minutes looking at the code to understand what went wrong. A lot of the quality of the error message depends on how well you understand and use the assertions provided by the framework you’re using.
Did you know that Node actually has an
assert module for making assertions like the one we
have above 🤔? Let’s refactor our test to use that module!
   // 2.js
   const assert = require('assert')
   const {sum, subtract} = require('./math')

   let result, expected

   result = sum(3, 7)
   expected = 10
   assert.strictEqual(result, expected)

   result = subtract(7, 3)
   expected = 4
   assert.strictEqual(result, expected)
Nice! This is still a test module. This is functionally equivalent to what we had before. The only difference is the error message:
   $ node 2.js
   assert.js:42
     throw new errors.AssertionError({
     ^

   AssertionError [ERR_ASSERTION]: -4 === 10
       at Object.<anonymous> (/Users/kdodds/Desktop/js-test-example/2.js:8:8)
       at Module._compile (module.js:635:30)
       at Object.Module._extensions..js (module.js:646:10)
       at Module.load (module.js:554:32)
       at tryModuleLoad (module.js:497:12)
       at Function.Module._load (module.js:489:3)
       at Function.Module.runMain (module.js:676:10)
       at startup (bootstrap_node.js:187:16)
       at bootstrap_node.js:608:3
You’ll notice that the error thrown no longer includes any of our own code in it which is a shame… 😦 But let’s keep going.
Let’s go ahead and write our own simple testing “framework” and
assertion library. We’ll start with the assertion library. So instead of
Node’s built-in assert module we’ll create a library we’ll
call expect. Here’s our refactored test with that
change:
   // 3.js
   const {sum, subtract} = require('./math')

   let result, expected

   result = sum(3, 7)
   expected = 10
   expect(result).toBe(expected)

   result = subtract(7, 3)
   expected = 4
   expect(result).toBe(expected)

   function expect(actual) {
     return {
       toBe(expected) {
         if (actual !== expected) {
           throw new Error(`${actual} is not equal to ${expected}`)
         }
       },
     }
   }
Cool, so now we can add a bunch of assertions on that object we
return (like toMatchRegex or toHaveLength).
Oh, and here’s the error message now:
   $ node 3.js
   /Users/kdodds/Desktop/js-test-example/3.js:17
           throw new Error(`${actual} is not equal to ${expected}`)
           ^

   Error: -4 is not equal to 10
       at Object.toBe (/Users/kdodds/Desktop/js-test-example/3.js:17:15)
       at Object.<anonymous> (/Users/kdodds/Desktop/js-test-example/3.js:7:16)
       at Module._compile (module.js:635:30)
       at Object.Module._extensions..js (module.js:646:10)
       at Module.load (module.js:554:32)
       at tryModuleLoad (module.js:497:12)
       at Function.Module._load (module.js:489:3)
       at Function.Module.runMain (module.js:676:10)
       at startup (bootstrap_node.js:187:16)
at bootstrap_node.js:608:3But now here’s the problem 😖… If I see that error message, how do I
know that the sum function is the one that’s broken? It
could be the subtract module. Also, the source of the test
doesn’t do a good job of keeping tests isolated (visually or
otherwise).
So let’s write a helper function to make that work:
   // 4.js
   const {sum, subtract} = require('./math')

   test('sum adds numbers', () => {
     const result = sum(3, 7)
     const expected = 10
     expect(result).toBe(expected)
   })

   test('subtract subtracts numbers', () => {
     const result = subtract(7, 3)
     const expected = 4
     expect(result).toBe(expected)
   })

   function test(title, callback) {
     try {
       callback()
       console.log(`✓ ${title}`)
     } catch (error) {
       console.error(`✕ ${title}`)
       console.error(error)
     }
   }

   function expect(actual) {
     return {
       toBe(expected) {
         if (actual !== expected) {
           throw new Error(`${actual} is not equal to ${expected}`)
         }
       },
     }
   }
Now we can put everything relevant to a given test within our “test”
callback function and we can give that test a name. Then we use that
test function to not only give a more helpful error message
but also run all the tests in the file (without bailing on the first
error)! Here’s the output now:
   $ node 4.js
   ✕ sum adds numbers
   Error: -4 is not equal to 10
       at Object.toBe (/Users/kdodds/Desktop/js-test-example/4.js:29:15)
       at test (/Users/kdodds/Desktop/js-test-example/4.js:6:18)
       at test (/Users/kdodds/Desktop/js-test-example/4.js:17:5)
       at Object.<anonymous> (/Users/kdodds/Desktop/js-test-example/4.js:3:1)
       at Module._compile (module.js:635:30)
       at Object.Module._extensions..js (module.js:646:10)
       at Module.load (module.js:554:32)
       at tryModuleLoad (module.js:497:12)
       at Function.Module._load (module.js:489:3)
       at Function.Module.runMain (module.js:676:10)
   ✓ subtract subtracts numbers
Sweet! Now we see the error itself and we see the title of the test so we know which one to go about fixing.
So all we need to do now is write a CLI tool that will search for all our test files and run them! That bit is pretty simple at first, but there are a LOT of things we can add on top of it. 😅
At this point, we’re building a testing framework and test runner. Luckily for us, there are a bunch of these built already! I’ve tried a ton of them and they’re all great. That said, nothing comes close to serving my use cases better than Jest 🃏. It’s an amazing tool (learn more about Jest here).
So, instead of building our own framework, let’s just go ahead and
switch our test file to work with Jest. As it so happens, it already
does! All we have to do is remove our own implementation of
test and expect because Jest includes those in
our tests as global objects! So here’s what it looks like now:
   // 5.js
   const {sum, subtract} = require('./math')

   test('sum adds numbers', () => {
     const result = sum(3, 7)
     const expected = 10
     expect(result).toBe(expected)
   })

test('subtract subtracts numbers', () => {
  const result = subtract(7, 3)
  const expected = 4
  expect(result).toBe(expected)
})
When we run this file with Jest, here’s what the output looks like:
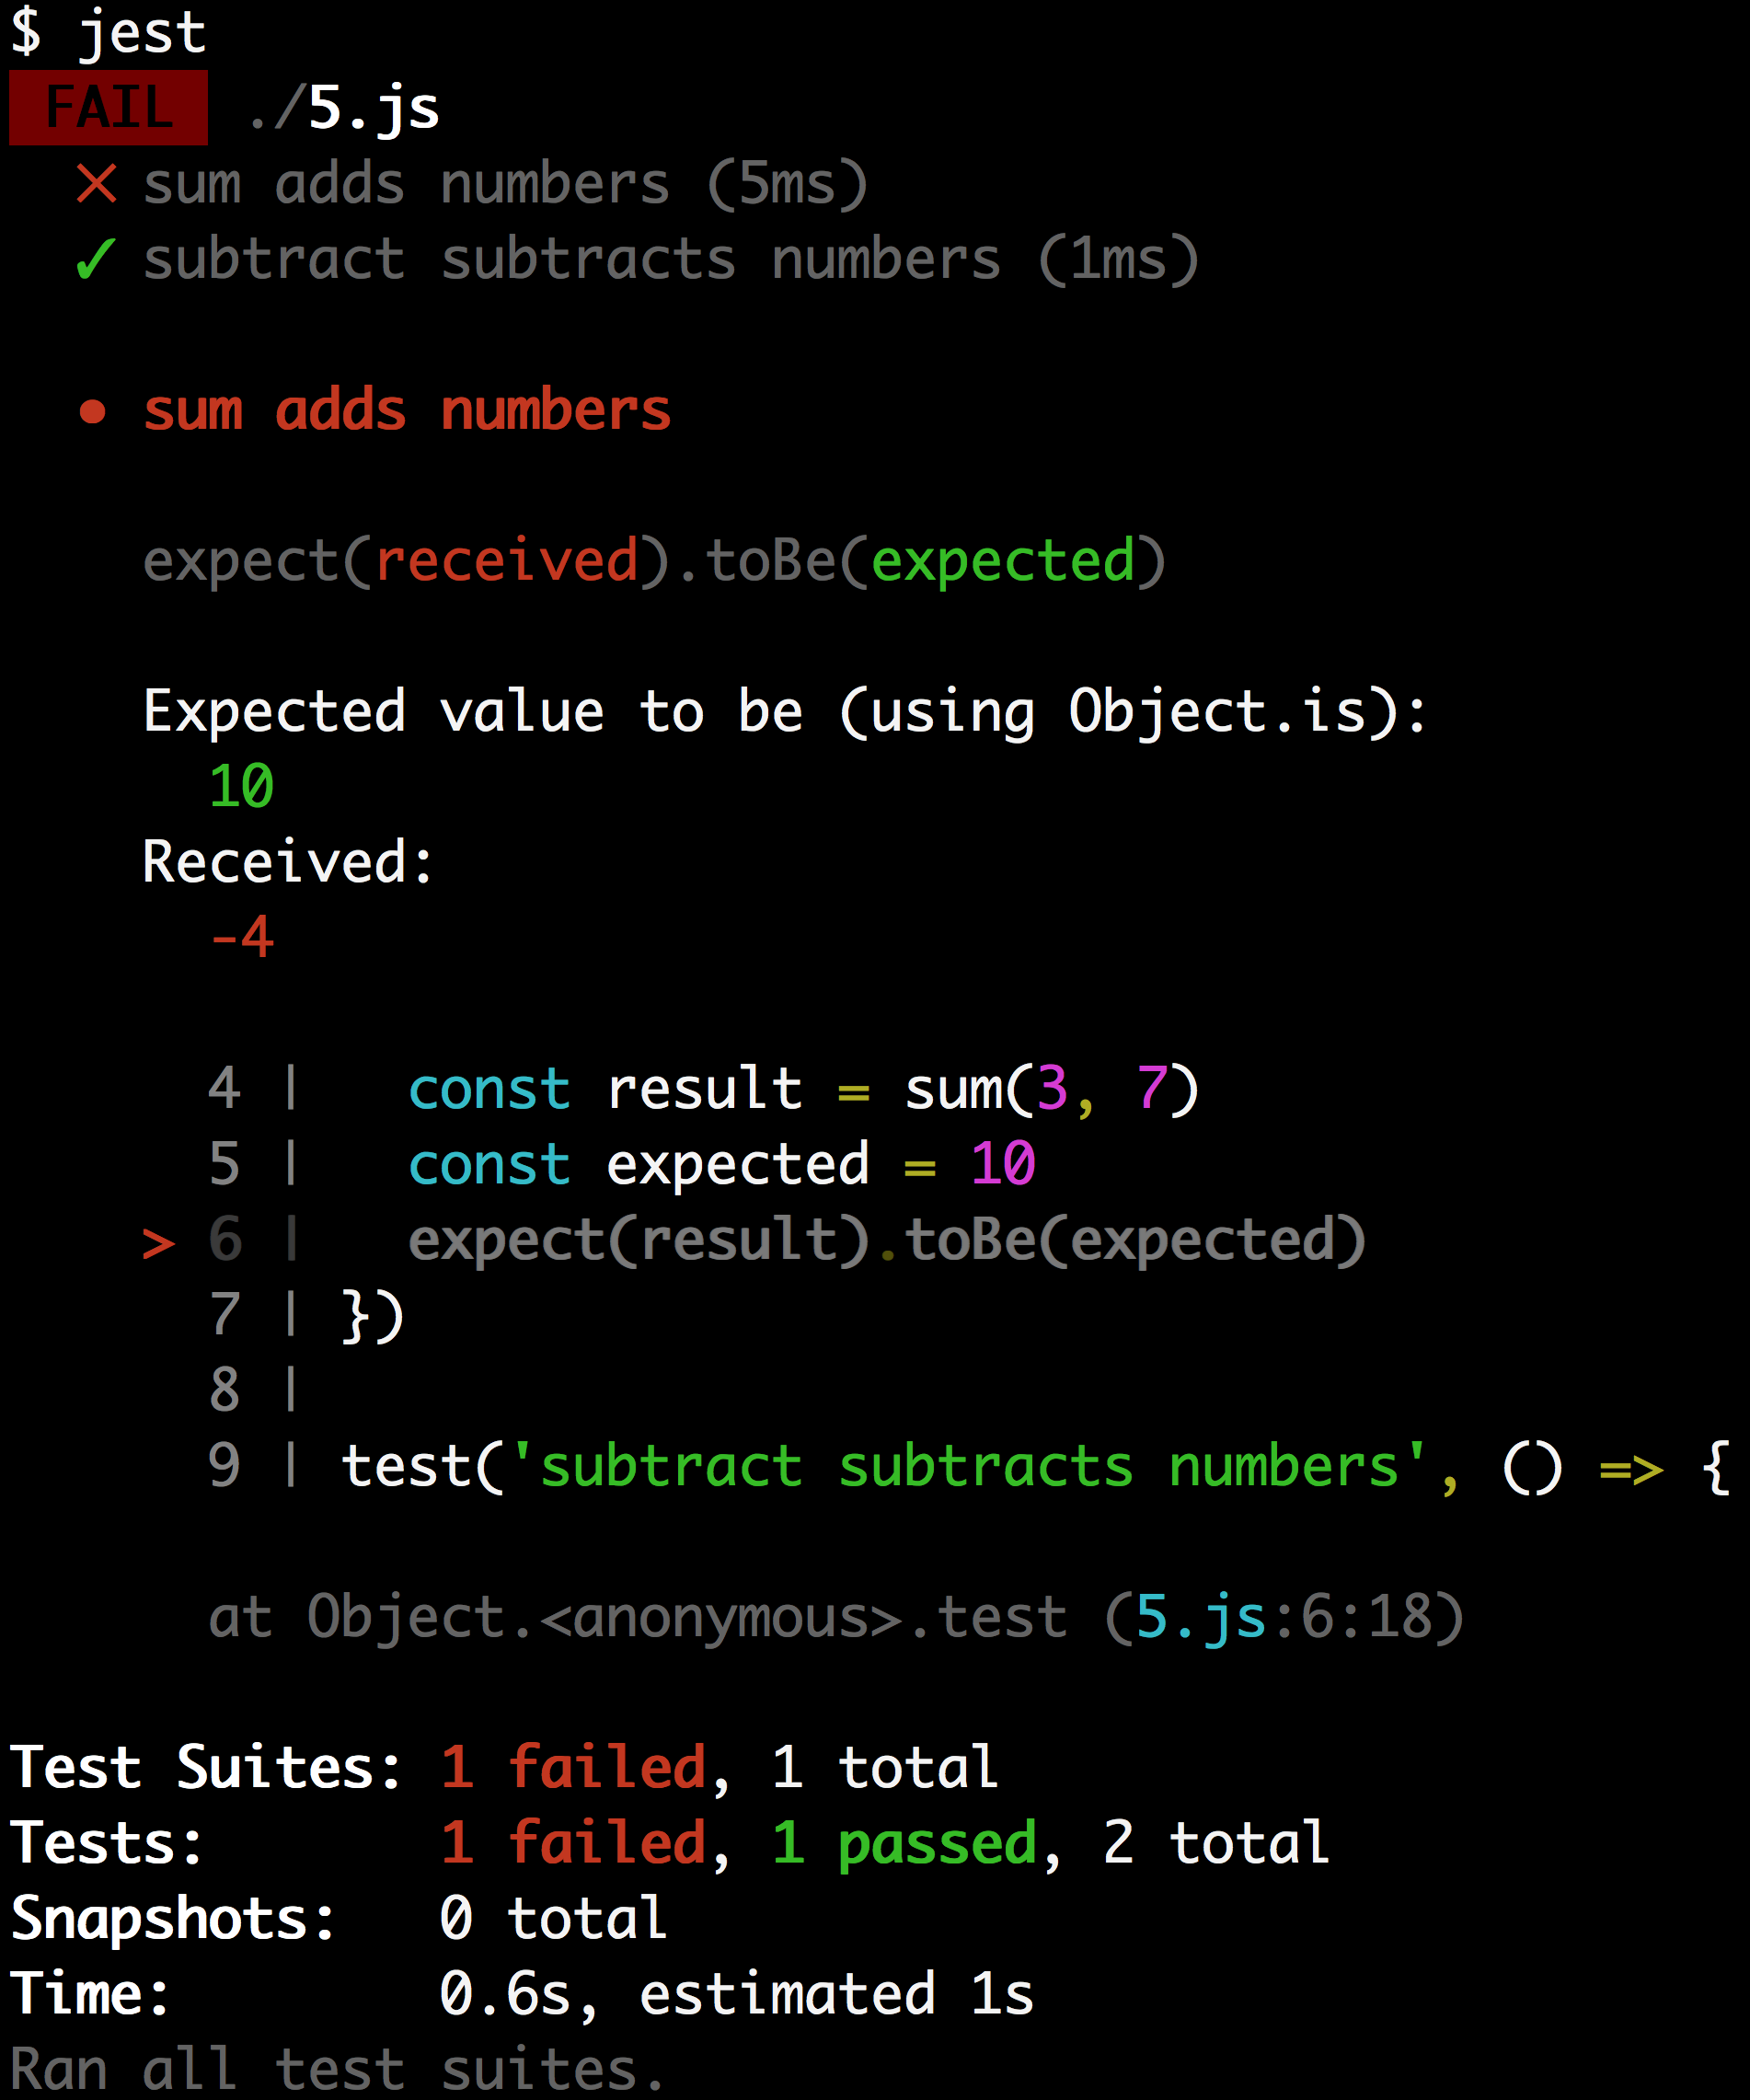
   $ jest
    FAIL  ./5.js
     ✕ sum adds numbers (5ms)
     ✓ subtract subtracts numbers (1ms)

     ● sum adds numbers

       expect(received).toBe(expected)

       Expected value to be (using Object.is):
         10
       Received:
         -4

          4 |   const result = sum(3, 7)
          5 |   const expected = 10
        > 6 |   expect(result).toBe(expected)
          7 | })
          8 |
          9 | test('subtract subtracts numbers', () => {

        at Object.<anonymous>.test (5.js:6:18)

   Test Suites: 1 failed, 1 total
   Tests:       1 failed, 1 passed, 2 total
   Snapshots:   0 total
   Time:        0.6s, estimated 1s
   Ran all test suites.
You can’t tell from the text, but here’s an image of the output:
It has color coding which is really helpful in identifying the parts that are relevant 😀 It also shows the code where the error was thrown! Now that’s a helpful error message!
So, what’s a JavaScript test? It’s simply some code which sets up
some state, performs some action, and makes an assertion on the new
state. We didn’t talk about common framework
helper functions like beforeEach
or describe,
and there are a lot more assertions
we could add like toMatchObject
or toContain.
But hopefully this gives you an idea of the fundamental concepts of
testing with JavaScript.
I hope this is helpful to you! Good luck! 👍
Zell Liew

To mutate means to change in form or nature. Something that’s mutable can be changed, while something that’s immutable cannot be changed. To understand mutation, think of the X-Men. In X-Men, people can suddenly gain powers. The problem is, you don’t know when these powers will emerge. Imagine your friend turns blue and grows fur all of a sudden; that’d be scary, wouldn’t it?
In JavaScript, the same problem with mutation applies. If your code is mutable, you might change (and break) something without knowing.
In JavaScript, you can add properties to an object. When you do so after instantiating it, the object is changed permanently. It mutates, like how an X-Men member mutates when they gain powers.
In the example below, the variable egg mutates once you
add the isBroken property to it. We say that objects (like
egg) are mutable (have the ability to mutate).
const egg = { name: "Humpty Dumpty" };
egg.isBroken = false;

console.log(egg);
// {
//   name: "Humpty Dumpty",
//   isBroken: false
// }
Mutation is pretty normal in JavaScript. You use it all the time.
Here’s when mutation becomes scary.
Let’s say you create a constant variable called newEgg
and assign egg to it. Then you want to change the name of
newEgg to something else.
const egg = { name: "Humpty Dumpty" };

const newEgg = egg;
newEgg.name = "Errr ... Not Humpty Dumpty";
When you change (mutate) newEgg, did you know
egg gets mutated automatically?
console.log(egg);
// {
//   name: "Errr ... Not Humpty Dumpty"
// }
The example above illustrates why mutation can be scary—when you change one piece of your code, another piece can change somewhere else without your knowing. As a result, you’ll get bugs that are hard to track and fix.
This weird behavior happens because objects are passed by reference in JavaScript.
To understand what “passed by reference” means, first you have to
understand that each object has a unique identity in JavaScript. When
you assign an object to a variable, you link the variable to the
identity of the object (that is, you pass it by reference) rather than
assigning the variable the object’s value directly. This is why when you
compare two different objects, you get false even if the
objects have the same value.
console.log({} === {}); // false

When you assign `egg` to `newEgg`, `newEgg` points to the same object as `egg`. Since `egg` and `newEgg` are the same thing, when you change `newEgg`, `egg` gets changed automatically.

console.log(egg === newEgg); // true
Unfortunately, you don’t want egg to change along with
newEgg most of the time, since it causes your code to break
when you least expect it. So how do you prevent objects from mutating?
Before you understand how to prevent objects from mutating, you need to
know what’s immutable in JavaScript.
In JavaScript, primitives (String, Number, Boolean, Null, Undefined, and Symbol) are immutable; you cannot change the structure (add properties or methods) of a primitive. Nothing will happen even if you try to add properties to a primitive.
const egg = "Humpty Dumpty";
egg.isBroken = false;

console.log(egg); // Humpty Dumpty
console.log(egg.isBroken); // undefined
const doesn’t
grant immutabilityMany people think that variables declared with const are
immutable. That’s an incorrect assumption.
Declaring a variable with const doesn’t make it
immutable, it prevents you from assigning another value to it.
const myName = "Zell";
myName = "Triceratops";
// ERROR
When you declare an object with const, you’re still
allowed to mutate the object. In the egg example above,
even though egg is created with const,
const doesn’t prevent egg from mutating.
const egg = { name: "Humpty Dumpty" };
egg.isBroken = false;

console.log(egg);
// {
//   name: "Humpty Dumpty",
//   isBroken: false
// }You can use Object.assign and assignment to prevent
objects from mutating.
Object.assignObject.assign lets you combine two (or more) objects
together into a single one. It has the following syntax:
const newObject = Object.assign(object1, object2, object3, object4);newObject will contain properties from all of the
objects you’ve passed into Object.assign.
const papayaBlender = { canBlendPapaya: true };
const mangoBlender = { canBlendMango: true };

const fruitBlender = Object.assign(papayaBlender, mangoBlender);

console.log(fruitBlender);
// {
//   canBlendPapaya: true,
//   canBlendMango: true
// }
If two conflicting properties are found, the property in a later
object overwrites the property in an earlier object (in the
Object.assign parameters).
const smallCupWithEar = {
  volume: 300,
  hasEar: true
};

const largeCup = { volume: 500 };

// In this case, volume gets overwritten from 300 to 500
const myIdealCup = Object.assign(smallCupWithEar, largeCup);

console.log(myIdealCup);
// {
//   volume: 500,
//   hasEar: true
// }
But beware! When you combine two objects with
Object.assign, the first object gets mutated. Other objects
don’t get mutated.
console.log(smallCupWithEar);
// {
//   volume: 500,
//   hasEar: true
// }

console.log(largeCup);
// {
//   volume: 500
// }Object.assign mutation problemYou can pass a new object as your first object to prevent existing objects from mutating. You’ll still mutate the first object though (the empty object), but that’s OK since this mutation doesn’t affect anything else.
const smallCupWithEar = {
  volume: 300,
  hasEar: true
};

const largeCup = {
  volume: 500
};

// Using a new object as the first argument
const myIdealCup = Object.assign({}, smallCupWithEar, largeCup);
You can mutate your new object however you want from this point. It doesn’t affect any of your previous objects.
myIdealCup.picture = "Mickey Mouse";
console.log(myIdealCup);
// {
//   volume: 500,
//   hasEar: true,
//   picture: "Mickey Mouse"
// }

// smallCupWithEar doesn't get mutated
console.log(smallCupWithEar); // { volume: 300, hasEar: true }

// largeCup doesn't get mutated
console.log(largeCup); // { volume: 500 }Object.assign copies references to objectsThe problem with Object.assign is that it performs a
shallow merge—it copies properties directly from one object to
another. When it does so, it also copies references to any objects.
Let’s explain this statement with an example.
Suppose you buy a new sound system. The system allows you to declare whether the power is turned on. It also lets you set the volume, the amount of bass, and other options.
const defaultSettings = {
  power: true,
  soundSettings: {
    volume: 50,
    bass: 20,
    // other options
  }
};
Some of your friends love loud music, so you decide to create a preset that’s guaranteed to wake your neighbors when they’re asleep.
const loudPreset = {
  soundSettings: {
    volume: 100
  }
};
Then you invite your friends over for a party. To preserve your existing presets, you attempt to combine your loud preset with the default one.
const partyPreset = Object.assign({}, defaultSettings, loudPreset);But partyPreset sounds weird. The volume is loud enough,
but the bass is non-existent. When you inspect partyPreset,
you’re surprised to find that there’s no bass in it!
console.log(partyPreset);
// {
//   power: true,
//   soundSettings: {
//     volume: 100
//   }
// }
This happens because JavaScript copies over the reference to the
soundSettings object. Since both
defaultSettings and loudPreset have a
soundSettings object, the one that comes later gets copied
into the new object.
If you change partyPreset, loudPreset will
mutate accordingly—evidence that the reference to
soundSettings gets copied over.
partyPreset.soundSettings.bass = 50;

console.log(loudPreset);
// {
//   soundSettings: {
//     volume: 100,
//     bass: 50
//   }
// }
Since Object.assign performs a shallow merge, you need
to use another method to merge objects that contain nested properties
(that is, objects within objects).
Enter assignment.
assignment
is a small library made by Nicolás
Bevacqua from Pony Foo, which is
a great source for JavaScript knowledge. It helps you perform a deep
merge without having to worry about mutation. Aside from the method
name, the syntax is the same as Object.assign.
// Perform a deep merge with assignment
const partyPreset = assignment({}, defaultSettings, loudPreset);

console.log(partyPreset);
// {
//   power: true,
//   soundSettings: {
//     volume: 100,
//     bass: 20
//   }
// }
assignment copies over values of all nested objects, which prevents your existing objects from getting mutated.
If you try to change any property in
partyPreset.soundSettings now, you’ll see that
loudPreset remains as it was.
partyPreset.soundSettings.bass = 50;

// loudPreset doesn't get mutated
console.log(loudPreset);
// {
//   soundSettings {
//     volume: 100
//   }
// }
assignment is just one of many libraries that help you perform a deep merge. Other libraries, including lodash.assign and merge-options, can help you do it, too. Feel free to choose from any of these libraries.
Object.assign?As long as you know how to prevent your objects from mutating, you
can use Object.assign. There’s no harm in using it as long
as you know how to use it properly.
However, if you need to assign objects with nested properties, always
prefer a deep merge over Object.assign.
Although the methods I mentioned can help you prevent objects from
mutating, they don’t guarantee that objects don’t mutate. If you made a
mistake and used Object.assign for a nested object, you’ll
be in for deep trouble later on.
To safeguard yourself, you might want to guarantee that objects don’t mutate at all. To do so, you can use libraries like ImmutableJS. This library throws an error whenever you attempt to mutate an object.
Alternatively, you can use Object.freeze and
deep-freeze. These two methods fail silently (they don’t throw errors,
but they also don’t mutate the objects).
Object.freeze and
deep-freezeObject.freeze prevents direct properties of an object
from changing.
const egg = {
  name: "Humpty Dumpty",
  isBroken: false
};

// Freezes the egg
Object.freeze(egg);

// Attempting to change properties will silently fail
egg.isBroken = true;

console.log(egg); // { name: "Humpty Dumpty", isBroken: false }
But it doesn’t help when you mutate a deeper property like
defaultSettings.soundSettings.base.
const defaultSettings = {
  power: true,
  soundSettings: {
    volume: 50,
    bass: 20
  }
};
Object.freeze(defaultSettings);
defaultSettings.soundSettings.bass = 100;

// soundSettings gets mutated nevertheless
console.log(defaultSettings);
// {
//   power: true,
//   soundSettings: {
//     volume: 50,
//     bass: 100
//   }
// }
To prevent a deep mutation, you can use a library called deep-freeze, which
recursively calls Object.freeze on all objects.
const defaultSettings = {
  power: true,
  soundSettings: {
    volume: 50,
    bass: 20
  }
};

// Performing a deep freeze (after including deep-freeze in your code per instructions on npm)
deepFreeze(defaultSettings);

// Attempting to change deep properties will fail silently
defaultSettings.soundSettings.bass = 100;

// soundSettings doesn't get mutated anymore
console.log(defaultSettings);
// {
//   power: true,
//   soundSettings: {
//     volume: 50,
//     bass: 20
//   }
// }When you reassign a variable, you change what it points to. In the
following example, a is changed from 11 to
100.
let a = 11;
a = 100;
When you mutate an object, it gets changed. The reference to the object stays the same.
const egg = { name: "Humpty Dumpty" };
egg.isBroken = false;Mutation is scary because it can cause your code to break without your knowing about it. Even if you suspect the cause of breakage is a mutation, it can be hard for you to pinpoint the code that created the mutation. So the best way to prevent code from breaking unknowingly is to make sure your objects don’t mutate from the get-go.
To prevent objects from mutating, you can use libraries like ImmutableJS and Mori.js, or use
Object.assign and Object.freeze.
Take note that Object.assign and
Object.freeze can only prevent direct properties from
mutating. If you need to prevent multiple layers of objects from
mutating, you’ll need libraries like assignment
and deep-freeze.
Surma, 2018-01-25
How do I copy an object in JavaScript? It’s a simple question, without a simple answer.
JavaScript passes everything by reference. In case you don’t know what that means, here’s an example:
function mutate(obj) {
  obj.a = true;
}

const obj = {a: false};
mutate(obj)
console.log(obj.a); // prints true
The function mutate changes the object it gets passed as
a parameter. In a “call by value” environment, the function would get
passed the value — so a copy — that the function could work with. Any
changes the function makes to the object would not be visible outside of
that function. But in a “call by reference” environment like JavaScript,
the function gets a — you guessed it — reference, and will
mutate the actual object itself. The console.log at the end
will therefore print true.
Sometimes, however, you might want to keep your original object and create a copy for other functions to work with.
One way to copy an object is to use
Object.assign(target, sources...). It takes an arbitrary
number of source objects, enumerating all of their own properties and
assigning them to target. If we use a fresh, empty object
as target, we are basically copying.
const obj = /* ... */;
const copy = Object.assign({}, obj);
This, however, is merely a shallow copy. If our object contains objects, they will remain shared references, which is not what we want:
function mutateDeepObject(obj) {
  obj.a.thing = true;
}

const obj = {a: {thing: false}};
const copy = Object.assign({}, obj);
mutateDeepObject(copy)
console.log(obj.a.thing); // prints true
Another thing to potentially trip over is that
Object.assign() turns getters into simple properties.
So what now? Turns out, there is a couple of ways to create a deep copy of an object.
One of the oldest way to create copies of an object is to turn the object into its JSON string representation and then parse it back to an object. It feels a bit heavy-handed, but it does work:
const obj = /* ... */;
const copy = JSON.parse(JSON.stringify(obj));
The downside here is that you create a temporary, potentially big string just to pipe it back into a parser. Another downside is that this approach cannot deal with cyclic objects. And despite what you might think, those can happen quite easily. For example when you are building tree-like data structures where a node references its parent, and the parent in turn references its own children.
const x = {};
const y = {x};
x.y = y; // Cycle: x.y.x.y.x.y.x.y.x...
const copy = JSON.parse(JSON.stringify(x)); // throws!
Additionally, things like Maps, Sets, RegExps, Dates, ArrayBuffers and other built-in types just get lost at serialization.
Structured
cloning is an existing algorithm that is used to transfer values
from one realm into another. For example, this is used whenever you call
postMessage to send a message to another window or a WebWorker.
The nice thing about structured cloning is that it handles cyclic
objects and supports
a wide set of built-in types. The problem is that at the time of
writing the algorithm is not exposed directly, only as a part of other
APIs. I guess we’ll have to look at those then, won’t we…
As I said, whenever you call postMessage the structured
clone algorithm is used. We can create a MessageChannel
and send ourselves a message. On the receiving end the message contains
a structural clone of our original data object.
function structuralClone(obj) {
  return new Promise(resolve => {
    const {port1, port2} = new MessageChannel();
    port2.onmessage = ev => resolve(ev.data);
    port1.postMessage(obj);
  });
}

const obj = /* ... */;
const clone = await structuralClone(obj);
The downside of this approach is that it is asynchronous. That is not a big deal, but sometimes you need a synchronous way of deep-copying an object.
If you’ve ever used history.pushState() to build an SPA
you know that you can provide a state object to save alongside the URL.
It turns out that this state object is structurally cloned —
synchronously. We have to be careful not to mess with any program logic
that might use the state object, so we need to restore the original
state after we’re done cloning. To prevent any events from firing, use
history.replaceState() instead of
history.pushState().
function structuralClone(obj) {
  const oldState = history.state;
  history.replaceState(obj);
  const copy = history.state;
  history.replaceState(oldState);
  return copy;
}

const obj = /* ... */;
const clone = await structuralClone(obj);
Once again, it feels a bit heavy-handed to tap into the browser’s
engine just to copy an object, but you gotta do what’cha gotta do. Also,
Safari limits the amount of calls to replaceState to 100
within a 30 second window.
After tweet-storming about this whole journey on Twitter, Jeremy Banks showed me that there’s a 3rd way to tap into structural cloning: The Notification API. Notifications have a data object associated with them that gets cloned.
function structuralClone(obj) {
  return new Notification('', {data: obj, silent: true}).data;
}

const obj = /* ... */;
const clone = await structuralClone(obj);
Short, concise. I liked it! However, it basically kicks of the
permission machinery within the browser, so I suspected it to be quite
slow. Safari, for some reason, always returns undefined for
the data object.
I wanted to measure which of these ways is the most performant. In my first (naïve) attempt, I took a small JSON object and piped it through these different ways of cloning an object a thousand times. Luckily, Mathias Bynens told me that V8 has a cache for when you add properties to an object. I was benchmarking the cache more than anything else. To ensure I never hit the cache, I wrote a function that generates objects of given depth and width using random key names and re-ran the test.
Here’s how the different techniques perform in Chrome, Firefox and Edge. Lower is better.

So what do we take away from this?
JSON.parse(JSON.stringify()), which I found quite
surprising.MessageChannel
is your only reliable cross-browser choice.Wouldn’t it be better if we just had structuredClone()
as a function on the platform? I certainly think so and revived an old
issue on the HTML
spec to reconsider this approach.
Jan 17, 2018
A bit vector (also known as bit set or bit array) is a set data structure which uses only 1 bit per element. It answers the question is X in the set?.
The main advantage is memory efficiency and speed, as the memory is allocated in a single continuous block, making it very cache friendly (unlike some tree based data structures), and requiring only a few bitwise operations to access/modify elements in the set. The disadvantage is that we need to know the size of the bit vector beforehand, and that we might be wasting some of the memory if we only store a few elements in a large vector. Let’s look at this more closely.
For simplicity, we can think of the bit vector as an array of bits. Not boolean true/false values, or bytes, but bits. Our goal is to map the set of all possible values we might want to store (also called the domain) to a unique index in the bit vector. A good example would be if we wanted a set of small integers (say for an algorithm like the prime sieve of Eratosthenes). We would then need as many bits as is the highest integer we might want to store. If the highest number is 1024, our vector would need 1024 bits, or 128 bytes to store all our membership values (flags).
As a small sidenote, you can use the Chrome developer console to run the example code. It was written in a way that you can copy paste each snippet as you go along and everything will work.
Array and Number typesLet’s do a simple implementation first, using bare JavaScript arrays
of Number. We can do this because the JavaScript
bitwise operators treat their operands as 32 bit integers.
Afterwards, we’ll do the same using the new Uint32Array
type. But first, let’s use a regular Array to make
things simpler.
To create a bit vector, we first need to specify the number of bits
we need (which is also the number of possible values we can store
membership of). The question becomes, how many 32-bit integers do we
need to store N bits? The answer is unsurprisingly
N / 32.
// A function which takes a number of bits and returns an initialized
// bit vector of given length.
function buildVector(bitCount) {
    // The number of bits each `Number` can store.
    var BITS_PER_ELEMENT = 32;

    // Total number of `Number` values in the vector.
    // We round up, because even if we need less than 32 bits, we need at least 1 `Number`.
    var elementCount = Math.ceil(bitCount / BITS_PER_ELEMENT);

    var vector = new Array(elementCount);

    // We initialize our bit vector to all zeros
    for (var i = 0; i < elementCount; i++) {
        vector[i] = 0;
    }

    return vector;
}
Now that we have our bit vector, all that is left to do is write the
get and set methods for manipulating bit
values by their respective bit index. We’ll first consider only having a
single Number representing 32 bits.
Binary numbers are represented as a sum of powers of two, for example:
If you don’t have much experience with binary, you might be tempted to think that (4 = 1 + 3 = 2^0 + (2^0 + 2^1)), but that wouldn’t work, as we only want one of each power of two. A simple rule to achieve this is that we do a greedy approach, starting from the biggest power of two we can.
A binary number is then simply a sequence of 0 or 1, stating 1 for each power of 2 we have (going from the lowest from the right), and 0 for each one we don’t have, thus:
Note that we can add any number of zeros to the left, so 111 is equivalent to 0111 and 000000111.
A small sidestep here, we can also use hexadecimal numbers to represent binary, as the conversion is rather simple. A hexadecimal digit represents a value from 0 to 15, which is exactly what 4 bits represent. We can thus take any binary number, such as 100000101011111010 and convert it to hex (or back):
10 0000 1010 1111 10100010 0000 1010 1111 10102 0 10 15 10 to
decimal2 0 A F A0x to get
0x20AFAConverting hexadecimal back to binary is simple, just take these
steps backwards. The reason we use hexadecimal numbers instead of binary
often is because they are much easier to visually parse, understand and
remember. Looking at a number like 0xA1 is much clearer
than looking at 10100001, because you don’t have to count
how long is each run of zeros/ones.
To manipulate individual bits, we’ll make use of a few simple bitwise operators. They are called bitwise, because they manipulate individual bits. Specifically, we’ll need:
~ (tilde) operator, which
simply flips all the bits& operator, which
returns 1 when both bits are 1, otherwise 0| operator, which returns 0
when both bits are 0, otherwise 1<< operator, which is
shifting all the bits to the left, or semantically multiplying by a
given power of 2.Because these operators are bitwise, they will operate on all the
bits in parallel. This is different from the more common logical
operators && and || (note that they’re
doubled), which operate on the whole numbers. Here are a few examples
(the b suffix signifies a binary string, this is not proper
JavaScript syntax and only used for demonstration purposes):
1 | 2 = 01b | 10b = 11b = 31 || 2 = 1, because both are converted to booleans, and
both are true1 & 3 = 01b & 11b = 01b = 21 && 3 = 1, because both are converted to
booleans, and both are true1 << 1 = 1b << 1 = 10b = 2, or (1 ·
2^1)1 << 3 = 1b << 3 = 1000b = 8, or (1 ·
2^3)To understand the NOT operator, we first need to understand that
while mathematically, binary numbers are infinite (or can be), we are
only working with 32-bit integers. This means if we start with
0 and do a negation ~0, we get a 32 bit number
with all bits set to 1.
Because JavaScript uses two’s complement, ~0 will
actually be -1 (or
11111111111111111111111111111111 in binary). This is
because the Number type behaves as a signed 32-bit
number, which means it also has to represent negative values. The
important thing here is that two’s complement doesn’t say anything about
the actual bits, it only specifies what value those bits represent when
doing other mathematical operations (+, -,
*, etc.). It also affects how the browser will display each
number. If you want to learn more about two’s complement, check out the wikipedia
article or the following
online calculator (there are many others) to get an idea for how it
works.
But since our bit vector doesn’t need to do arithmetic, we don’t
really need to worry about this. We might occasionally want to print out
a given number in hex or binary, which can be done using the
.toString function, for example
(14).toString(2) outputs binary 1110 and
(14).toString(16) outputs hex e.
Knowing how binary and bitwise operators work, we can finally figure
out how to set a specific bit in a given 32-bit integer. The
OR operator | is perfect for this, as it won’t
change a 1 to 0 (and thus leaving the existing
values alone), but will be able to set a 0 to
1. Counting from 0, if we want to set the 1st bit (at index
0) to 1, we simply do num | 1, as this can
also be read as num | 00000000000000000000000000000001b. If
we wanted to set the 2nd bit (at index 1), we’d want
num | 10b, or num | 2 in decimal/hex. The 3rd
bit (at index 2) would be num | 100b or
num | 4, the 4th bit (at index 3) would be
num | 1000b or num | 8, and so on. We’ll call
the number on the right side of the operator a bit mask.
If you look closely, you can probably figure out the pattern. To set
the i-th bit, we need to OR the number with (2^i), which
can be easily created with a left shift as 1 << i.
The whole operation then becomes num | (1 << i).
Before moving on, let’s do a more visual example. We’ll start with
num = 0xDA (or 11011010, or 218
dec), and toggle the 3rd bit (index 2).
num  11011010
mask 00000100
OR | --------
     11011110
We can also use the same operation to check if a given bit is set. As
all the bits except for the i-th are zero, we can use the
& operator, which will return a non-zero number if and
only if the i-th bit in num is 1. The
get operation is then
num & (1 << i).
Lastly, we might want to remove elements from the bit vector, which
means we need the ability to clear a specific bit. A small recap of the
& operator.
| & | 0 | 1 |
|---|---|---|
| 0 | 0 | 0 |
| 1 | 0 | 1 |
We can see that if we set the mask to all 1, doing
num & 1111...1111b doesn’t change the num
value. We also see that no matter what value is in num, if
any of the bits in the mask is 0, the resulting bit will
also be 0. Thus num & 11101b will set the
2nd bit from the right (index 1) to 0 and leave all of the
other bits intact.
Constructing such mask is simple, since we only need to take our
set mask from before and flip all the bits using the NOT
operator ~. Resulting in
num & (~(1 << i)). I’ve added extra parentheses
to make the order of operations clear. Beware that &
and | have a very low priority, so it might be a good idea
to be very explicit with parens around bit operations unless you’re sure
what you’re doing is correct.
Here’s a similar example as we did for OR, starting with
num = 0xDA, clearing the 7th bit (index 6). We first
construct the mask step by step 1 << 6 = 01000000b,
followed by a negation ~01000000 = 10111111.
num   11011010
mask  10111111
AND & --------
10011010get, set and clear on a 32-bit
vectorAs mentioned before, let’s first consider only a 32-bit vector stored
in a single Number. The operations would be:
// Set the i-th bit to 1
function set(vec, i) {
    return vec | (1 << i);
}

// Clear the i-th bit
function clear(vec, i) {
    return vec & (~(1 << i));
}

// Return the value of the i-th bit
function get(vec, i) {
    var value = vec & (1 << i);
    // we convert to boolean to make sure the result is always 0 or 1,
    // instead of what is returned by the mask
    return value != 0;
}
Note that all of these functions return a new number as their result. Let’s test to see if it works:
// Since our bit vector is stored in a single number, we simply initialize it as 0.
var vec = 0;

vec = set(vec, 3);
console.log("is 3 in vec? " + get(vec, 3));
// is 3 in vec? true
console.log("is 4 in vec? " + get(vec, 4));
// is 4 in vec? false

vec = clear(vec, 3);
console.log("is 3 in vec? " + get(vec, 3));
// is 3 in vec? false
Remember the number only has 32-bits, so don’t use an index bigger
than 31. If you do, it will simply wrap around, so you’ll get
set(0, 0) == set(0, 32).
get, set and clear on an
arbitrary length bit vectorNow we’re finally ready to create the whole data structure, an
arbitrary length bit vector. We need to modify our get,
set, and clear to calculate the right
Number within the array first, and then to do the same bit
manipulation they did before.
Going again from the right, bits 0 - 31 will be stored in the 1st
Number (at index 0), bits 32 - 63 at index 1, 64 - 95 at
index 2, etc. From this, we can see that the index in the bigger array
is simply the bit index divided by 32 and rounded down. Simply
Math.floor(i / 32). This gives us the index of the
Number.
To get the bit index within the number, we simply take the remainder
of dividing by 32, or the modulo 32 of the original bit index. This
gives us i % 32 for the bit index. Putting this together
(note that since we’re using an Array, the bit vector is
now mutable, unlike the previous 32-bit version using only a
Number). I’ve added the original buildVector
function to make it easier to copy paste this code as a whole.
// Set the i-th bit to 1
function set(vec, i) {
    var bigIndex = Math.floor(i / 32);
    var smallIndex = i % 32;

    vec[bigIndex] = vec[bigIndex] | (1 << smallIndex);
}

// Clear the i-th bit
function clear(vec, i) {
    var bigIndex = Math.floor(i / 32);
    var smallIndex = i % 32;

    vec[bigIndex] = vec[bigIndex] & (~(1 << smallIndex));
}

// Return the value of the i-th bit
function get(vec, i) {
    var bigIndex = Math.floor(i / 32);
    var smallIndex = i % 32;

    var value = vec[bigIndex] & (1 << smallIndex);
    // we convert to boolean to make sure the result is always 0 or 1,
    // instead of what is returned by the mask
    return value != 0;
}

// A function which takes a number of bits and returns an initialized
// bit vector of given length.
function buildVector(bitCount) {
    // Total number of `Number` values in the vector.
    // Adding Math.ceil here to make sure we allocate enough space even if the size
    // is not divisible by 32.
    var elementCount = Math.ceil(bitCount / 32);
    var vector = new Array(elementCount);

    for (var i = 0; i < elementCount; i++) {
        vector[i] = 0;
    }

    return vector;
}
We can do a similar test as we did before to test our bit vector:
// Since our bit vector is stored in a single number, we simply initialize it as 0.
var vec = buildVector(64);

set(vec, 30);
console.log("is 30 in vec? " + get(vec, 30));
// is 30 in vec? true
console.log("is 40 in vec? " + get(vec, 40));
// is 40 in vec? false

clear(vec, 30);
console.log("is 30 in vec? " + get(vec, 30));
// is 30 in vec? falseArray of NumberModern browsers now provide a better and more efficient variant to an
Array of Number, which is using
Uint32Array. The difference here is that JavaScript
Array is not exactly the array you would expect if you came
out of a computer science class. It behaves more like a hash map with
integer keys. You can also store different types in the same array, for
example [1, "hello"] is completely valid JavaScript.
Secondly, Number is not a 32-bit integer. According
to the standard, Number is a IEEE-754 double precision
float. The trick here is that the bitwise operators convert their
operands to a 32-bit integer before applying the operation. The
conversion is defined as an abstract operation, so it most likely comes
down to how the implementation chooses to handle things.
The ideal scenario would be that the JIT (just in-time compiler) recognizes that we’re only doing bitwise operations on something that starts out as a constant zero, and thus uses a 32-bit integer as the backing store for our data, and also recognizes that the array doesn’t contain anything else, so it wouldn’t have to use a generic implementation that allows different types, but rather a continuous block of memory. While this might be possible, it’s most likely not what happens, at least not something that can be guaranteed to happen 100% of the time, because the JIT would need to understand everything your code is doing to prove that such optimization is possible. The halting problem however proves that the compiler can’t understand any arbitrary code, and as such any optimization could be only based on heuristics.
This is why the Uint32Array type was added to
JavaScript. While the compiler/interpreter/JIT can’t know that we only
intend to use 32-bit integers, we as the programmers do know it, so we
can choose a more specific data structure that allows for exactly that.
Uint32Array is a type which has only one purpose, to store
unsigned 32-bit integers in a continuous block of memory.
Using it is actually even simpler than what we did before, as our
buildVector function turns into a one liner.
function buildVector(bitCount) {
    // The constructor accepts a number of 32-bit integers in the array,
    // which is simply the number of bits in our bit vector divided by 32.
    // We also keep the `Math.ceil` just to make the API more robust.
    return new Uint32Array(Math.ceil(bitCount / 32));
}
On the outside, the Uint32Array behaves just like an
Array, with the exception that the operands to the indexer
[] operator get converted to unsigned 32-bit integers.
var arr = new Uint32Array(10);

arr[0] = "foo";
arr[1] = "123";
arr[2] = 3.14;

console.log(arr[0] + " " + arr[1] + " " + arr[2]);
// 0 123 3
Everything else about the bit vector (set,
get, and clear) will stay the same, so there
isn’t really anything we’re giving up for using the more efficient
Uint32Array version.
If you’ve read this far, you should now feel pretty confident about
how the bit vector works, and be able to implement it yourself. A bit
vector might not be the most popular data structure, but it can come
handy in various different scenarios. A specific example could be using
binary frames with the WebSocket API, in which case you
might want to minimize the network traffic as much as possible. When
working with binary frames, you will most certainly run into
Uint32Array and bitwise operators, so at least knowing how
a bit vector works can help you there. It’s also useful to know that
there are other built-in array types with predefined length, such as
Uint8Array, Int32Array (note the lack of
U, as this is a signed integer version of a 32-bit array),
Float64Array, etc. For more details on these check out the
Indexed
collections section under Global Objects on MDN. You might also be
interested in seeing browser
support of typed arrays in the modern browsers and different
polyfill options.
Lastly, I’d like to note a little bit about dynamically sized bit
vectors. Much like a regular array, a bit vector can also be implemented
in a way that allows for resizing. In the Array variant, we
would just need to push a few additional zeroed Number
instances into the array to make the bit vector larger, while the
Uint32Array variant would require us to allocate a new
Uint32Array with larger size and copy things over. At first
it might seem like the Array variant is clearly superior in
this regard, but here’s a few thoughts:
Array should use an efficient
packed 32-bit integer block of memory to store the data, pushing a new
element into it would do exactly the same as if we create a new
Uint32Array (there could be more optimizations going on,
but the same could be said for the JIT optimizing a resize of the
Uint32Array variant)Array is backed by a generic array of objects
with extended capacity for pushing new elements into it, the
push itself wouldn’t cost as much, but there could be a
price paid in terms of performance of the regular set,
get and clear operationsNote that this is mostly food for thought, I haven’t done any
benchmarks comparing the two variants, and could be very wrong with
regards what happens in actual JavaScript implementations. If I was made
to guess, I’d say the Uint32Array would outperform the
Array even with an occasional resize. But feel free to
correct me on this in the comments.
Seva Zaikov | January 27, 2018
Reduce is a very powerful concept, coming from the functional
programming (also known as fold), which allows to build any
other iteration function – sum, product,
map, filter and so on. However, how can we
achieve asynchronous reduce, so requests are executed consecutively, so
we can, for example, use previous results in the future calls?
In our example, I won’t use previous result, but rely on the fact that we need to execute these requests in this specific order
Let’s start with a naïve implementation, using just normal iteration:
I use async/await here, which allows us to wait inside
for ... of, or regularforloop as it was a synchronous call!
async function createLinks(links) {
  const results = [];
  for (link of links) {
    const res = await createLink(link);
    results.push(res);
  }

  return results;
}

const links = [url1, url2, url3, url4, url5];
createLinks(links);
This small code inside is, basically, a reducer, but with asynchronous flow! Let’s generalize it, so we’ll pass handler there:
async function asyncReduce(array, handler, startingValue) {
  let result = startingValue;

  for (value of array) {
    // `await` will transform result of the function to the promise,
    // even it is a synchronous call
    result = await handler(result, value);
  }

  return result;
}

function createLinks(links) {
  return asyncReduce(
    array,
    async (resolvedLinks, link) => {
      const newResolvedLink = await createLink(link);
      return resolvedLinks.concat(newResolvedLink);
    },
    []
  );
}

const links = [url1, url2, url3, url4, url5];
createLinks(links);
Now we have fully generalized reducer, but as you can see, the amount
of code in our createLinks function stayed almost the same
in size – so, in case you use once or twice, it might be not that
beneficial to extract to a general asyncReduce
function.
Okay, but not everybody can have fancy async/await – some projects have requirements, and async/await is not possible in the near future. Well, another new feature of modern JS is generators, and you can use them to essentially repeat the same behaviour (and almost the syntax!) as we showed with async/await. The only problem is the following:
Have you ever used iterators/generators in JS?
— Asen Bozhilov (@abozhilov) December 11, 2017
Apparently, not so many projects/people dive into generators, due to
their complicated nature and alternatives, and because of that, I’ll
separate our asyncReduce immediately, so you can hide
implementation details:
import co from 'co';

function asyncReduce(array, handler, startingValue) {
  return co(function* () {
    let result = startingValue;

    for (value of array) {
      // however, `co` does not wrap simple values into Promise
      // automatically, so we need to do so
      result = yield Promise.resolve(handler(result, value));
    }

    return result;
  });
}

function createLinks(links) {
  return asyncReduce(
    array,
    async (resolvedLinks, link) => {
      const newResolvedLink = await createLink(link);
      return resolvedLinks.concat(newResolvedLink);
    },
    []
  );
}

const links = [url1, url2, url3, url4, url5];
createLinks(links);
You can see that our interface remained the same, but the inside
changed to utilize co library –
while it is not that complicated, it might be pretty frustrating to
understand what do you need to do, if we ask all users of this function
to wrap their calls in co manually. You also will need to
import co or to write your own generator runner – which is
not very complicated, but one more layer of complexity.
Okay, but what about good old ES5? Maybe you don’t use babel, and need to support some old JS engines, or don’t want to use generators. Well, it is still good – all you need is available implementation of promises (which are hard to cancel) – either native or any polyfill, like Bluebird.
function asyncReduce(array, handler, startingValue) {
  // we are using normal reduce, but instead of immediate execution
  // of handlers, we postpone it until promise will be resolved
  array.reduce(
    function (promise, value) {
      return promise.then((acc) => {
        return Promise.resolve(handler(acc, value));
      });
    },
    // we started with a resolved promise, so the first request
    // will be executed immediately
    // also, we use resolved value as our acc from async reducer
    // we will resolve actual async result in promises
    Promise.resolve(startingValue)
  );
}
While the amount of code is not bigger (it might be even smaller), it is less readable and has to wrap your head around it – however, it works exactly the same.