Zsolt Nagy link
There are countless questions your interviewers may ask when it comes to how JavaScript works. The idea behind asking these questions is to assess whether you have recent experience in writing JavaScript code.
Some more clueless interviewers tend to ask you for lexical knowledge and edge cases that you could simply look up online. I personally think, this signals lack of competence from the end of my interviewers, and I tend to start getting concerned whether I am in the right place.
Usually, you are not allowed to use Google to find the answer, and you have to answer on the spot.
Answer: JavaScript passes function arguments by value. In case we pass an array or an object, the passed value is a reference. This means you can change the contents of the array or the object through that reference.
Read this article on value and reference types for more details.Question: Study the following code snippet:
let user1 = { name: 'FrontendTroll', email: 'ihatepopups@hatemail.com' };
let user2 = { name: 'ElectroModulator', email: 't2@coolmail.com' };
let users = [ user1, user2 ];
let swapUsers = function( users ) {
    let temp = users[0]; users[0] = users[1]; users[1] = temp;
    return users;
}
let setCredit = function( users, index, credit ) {
    users[ index ].credit = credit;
    return users;
}
console.table( swapUsers( [...users] ) );
console.table( setCredit( [...users], 0, 10 ) );
console.table( users );[...users] do? What is printed to the console?
Answer: [...users] makes a shallow
copy of the users array. This means we assemble a
brand new array from scratch. The elements of the new array are the same
as the elements of the original array.
However, each element is an object in each array. These objects are
reference types, which means that their content is reachable
from both arrays. For instance, modifying
[...users][0].name results in a modification in
users[0].name.
Let’s see the printed results one by one.
In the first console table, we expect the two elements to be swapped.
This change left the users array intact, because none of
its elements were modified.
console.table( swapUsers( [...users] ) );
// (index) name email
// 0 "ElectroModulator" "t2@coolmail.com"
// 1 "FrontendTroll" "ihatepopups@hatemail.com"
Let’s see the second result. We shallow copied the elements of the
users array again, and added a credit of 10 to
the first user. The order of the users is still
FrontendTroll before ElectroModulator, as the
order of the elements of the users array were not changed
by swapUsers due to shallow copying.
FrontendTroll receives ten credits in the cloned array. As
we only shallow copied the users array, this credit will
make it to the original array as well.
console.table( setCredit( [...users], 0, 10 ) );
// (index) name email credit
// 0 "FrontendTroll" "ihatepopups@hatemail.com"
// 10
// 1 "ElectroModulator" "t2@coolmail.com"
Based on the explanation, the third console.table will
be identical with the second, including the credit of
10:
console.table( users );
// 0 "FrontendTroll" "ihatepopups@hatemail.com"
// 10
// 1 "ElectroModulator" "t2@coolmail.com"
Read more on shallow and deep cloning in my article Cloning Objects in JavaScript.
You can execute and visualize this code on [pythontutor.com](http://pythontutor.com/visualize.html#code=let%20user1%20%3D%20%7B%20name%3A%20’FrontendTroll’,%20email%3A%20’ihatepopups%40hatemail.com’%20%7D%3B%0Alet%20user2%20%3D%20%7B%20name%3A%20’ElectroModulator’,%20email%3A%20’t2%40coolmail.com’%20%7D%3B%0A%0Alet%20users%20%3D%20%5B%20user1,%20user2%20%5D%3B%0A%0Alet%20swapUsers%20%3D%20function%28%20users%20%29%20%7B%0A%20%20%20%20let%20temp%20%3D%20users%5B0%5D%3B%0A%20%20%20%20users%5B0%5D%20%3D%20users%5B1%5D%3B%0A%20%20%20%20users%5B1%5D%20%3D%20temp%3B%0A%20%20%20%20return%20users%3B%0A%7D%0A%0Alet%20setCredit%20%3D%20function%28%20users,%20index,%20credit%20%29%20%7B%0A%20%20%20%20users%5B%20index%20%5D.credit%20%3D%20credit%3B%0A%20%20%20%20return%20users%3B%0A%7D%0A%0Aconsole.log%28%20swapUsers%28%20%5B…users%5D%20%29%20%29%3B%0Aconsole.log%28%20setCredit%28%20%5B…users%5D,%200,%2010%20%29%20%29%3B%0Aconsole.log%28%20users%20%29%3B&cumulative=false&curInstr=0&heapPrimitives=false&mode=display&origin=opt-frontend.js&py=js&rawInputLstJSON=%5B%5D&textReferences=false).
Answer: No. A function is pure if and only if it is
side-effect free. setCredit modifies a field in the global
object users[0] as a side-effect of the function
execution.
setCredit
from modifying the original array?
Answer: Instead of [...users], use deep
cloning. As we only work with data that can be represented using a
finite JSON string, we can stringify, then we can parse our original
object to get a deep copy.
Example:
const user1 = { name: 'FrontendTroll', email: 'ihatepopups@hatemail.com' };
const user2 = { name: 'ElectroModulator', email: 't2@coolmail.com' };
const users = [ user1, user2 ];
const deepClone = function( o ) {
    return JSON.parse( JSON.stringify( o ) );
}
let swapUsers = function( users ) {
    let temp = users[0]; users[0] = users[1]; users[1] = temp;
    return users;
}
let setCredit = function( users, index, credit ) { users[ index ].credit = credit;
    return users;
}
console.table( swapUsers( deepClone( users ) ) );
console.table( setCredit( deepClone( users ), 0, 10 ) );
console.table( users );Question: What is wrong in the following code?
let sum = (...args) => args.reduce( (a,b) => a+b, 0 );
let oneTwoThree = [1, 2, 3];

let moreNumbers = [ ...oneTwoThree, 4 ];
console.log( sum( ...moreNumbers, 5 ) );

let [...lessNumbers, ] = oneTwoThree;
console.log( sum( ...lessNumbers ) );Answer: In ES6, ... denotes both the
Spread operator and rest parameters.
In the first line, ...args is a rest parameter. The rest
parameter has to be the last parameter of the argument list, symbolizing
all the remaining arguments of the function. Given there are no more
arguments left after ...args, the rest parameter is in its
correct place.
The Spread operator spreads its elements into comma separated values.
Therefore:
moreNumbers = [ ...[1, 2, 3], 4 ] = [ 1, 2, 3, 4 ], because
...[1, 2, 3] becomes 1, 2, 3.
In a function call, the spread operator can also be used:
sum( ...[1, 2, 3, 4], 5 ) = sum( 1, 2, 3, 4, 5 ) , because
...[1, 2, 3, 4] becomes 1, 2, 3, 4.
Inside the destructuring assignment,
let [...lessNumbers, ] = oneTwoThree;,
...lessNumbers is a rest parameter. It has to stand at the
very end of the array. Given there is a comma after the rest parameter,
we expect the code to throw a SyntaxError, because the rest
parameter has to be the last element of the array. Due to the syntax
error, the last line of the code cannot be executed.
Question: Consider the following function:
let printArity = function() {
    console.log( typeof arguments, arguments.length );
    console.log( arguments.pop() );
}
printArity( 1, 2, 3, 4, 5 );[1,2,3].pop()
Answer: arguments is an object. It is
not an array! See the Mozilla
documentation for more details.
For some reason, arguments has a length
property, and it equals the number of arguments of the function, which
is 5.
Given that arguments is not an array, the
Array prototype method pop is not available.
Therefore, after printing object 5, the code throws a
TypeError, because arguments.pop is not a
function.
Whenever you can, use rest parameters instead of the
arguments array. You can read more details on the
relationship between the arguments array and rest parameters in ES6 in Practice.
0.1 + 0.2 equal to
0.3?
Answer: This is strictly speaking a computer science question and not a JavaScript question. All you need to know is that JavaScript uses floating point arithmetics, where a number is represented using a finite number of bits.
In this specific example, 0.1 + 0.2 adds up to
0.30000000000000004 due to floating point arithmetics.
div elements on a website? How can we retrieve a DOM
node collection of all div elements having the class
row-fluid on a website?
Answer: It is important that we do not need jQuery for this purpose. If your answer is based on jQuery, please think again, because reliance on jQuery in 2017 is not always optimal.
Regarding the first question, you can either use
document.getElementsByTagName or
document.querySelectorAll. The latter solution uses the
same selectors as jQuery does.
document.getElementsByTagName( 'div' )
HTMLCollection(274) [...]

document.querySelectorAll( 'div' )
HTMLCollection(274) [...]
Regarding the second question, you could filter the DOM node
collection obtained using getElementsByTagName:
Array.from(
    document.getElementsByTagName( 'div' )
).filter(
    x => x.className.split( ' ' ).indexOf( 'row-fluid' ) >= 0
);
We have to know how to convert a DOM node collection to an array, we
have to know how to access the class list of a DOM node, and how
indexOf works in case of arrays. High risk, low reward
solution. Let’s figure out something easier.
As you have just read, document.querySelectorAll can
process complex selectors. div.row-fluid will do all the
filtering for you:
document.querySelectorAll( 'div.row-fluid' )
Strictly speaking, the first solution is wrong, because the result is
not a NodeList, but an array of two nodes.
Answer: We can use destructuring to accomplish the desired result. Example:
let a = 1, b = 2;
[a, b] = [b, a];
console.log( a, b );
//2, 1
See this blog post for more exercises on destructuring.
A–F can either be in lower case or in upper
case.
Answer: The easiest way is to formulate a regular expression.
let checkHexNum = hexString => /^[0-9a-fA-F]+$/.test( hexString );
Explanation:
^ at the beginning specifies that the string has to
start with the specified sequence [0-9a-fA-F]+$ at the end specifies that the string has to end with
the specified sequence [0-9a-fA-F]+[0-9a-fA-F] is one arbitrary character, which is either
a digit or a letter between a and f, or a
letter between A and F. Note that the solution
[0123456789abcdefABCDEF] is equally acceptable, just
longer+ specifies that you can repeat the character
[0-9a-fA-F] as many times as you want provided that you
have provided at least one character.Common sense dictates that a problem with the above solution is that
it allows the first digit to be 0, which is not possible.
Notice the task description didn’t ask us to take care of this case, so
we can simpy omit it. However, if we want to go the extra mile, we could
write:
let checkHexNum = hexString => /^[1-9a-fA-F][0-9a-fA-F*$/.test( hexString ) || hexString == '0';
For more details, check out my article on Regular Expressions in JavaScript.
If you want to avoid using regular expressions, you can write a simple loop. Pay attention to the boolean condition though.
let checkHexNum = hexString => {
    for ( let ch of hexString ) {
        if ( '0123456789abcdefABCDEF'.indexOf( ch ) === -1 )
            return false;
    }
    return true;
}These ten questions gave you an overview of practical test questions that test your theoretical knowledge and JavaScript fundamentals.
Some of these questions are quite tricky, because you can only solve them if your ES6 fundamentals are good enough. This is why they make excellent interview questions.
If you are interested in brushing up your ES6 knowledge, sign up for the ES6 minicourse below!
JavaScript developers are in high demand in the IT world. If this is the role that best expresses your knowledge, you have a lot of opportunities to change the company you work for and increase your salary. But before you are hired by a company, you have to demonstrate your skills in order to pass the interview process. In this article I’ll show you 5 typical questions asked for a front end job to test the JavaScript skills of the candidate and their relative solutions. It’ll be fun!
Question 1: Scope Consider the following code:
(function() {
   var a = b = 5;
})();

console.log(b);Answer The code above prints 5.
The trick of this question is that in the IIFE there are two assignments but the variable a is declared using the keyword var. What this means is that a is a local variable of the function. On the contrary, b is assigned to the global scope.
The other trick of this question is that it doesn’t use strict mode (‘use strict’;) inside the function. If strict mode was enabled, the code would raise the error Uncaught ReferenceError: b is not defined. Remember that strict mode requires you to explicitly reference to the global scope if this was the intended behavior. So, you should write:
(function() {
   'use strict';
   var a = window.b = 5;
})();

console.log(b);
Question 2: Create “native” methods Define a repeatify function on the String object. The function accepts an integer that specifies how many times the string has to be repeated. The function returns the string repeated the number of times specified. For example:
console.log('hello'.repeatify(3));
Should print hellohellohello.
Answer A possible implementation is shown below:
String.prototype.repeatify = String.prototype.repeatify || function(times) {
   var str = '';

   for (var i = 0; i < times; i++) {
      str += this;
   }

   return str;
};
The question tests the knowledge of the developer about inheritance in JavaScript and the prototype property. It also verifies that the developer is able to extend native data type functionalities (although this should not be done).
Another important point here is to demonstrate that you are aware about how to not override possible already defined functions. This is done by testing that the function didn’t exist before defining your own:
String.prototype.repeatify = String.prototype.repeatify || function(times) {/* code here */};Question 3: Hoisting What’s the result of executing this code and why.
function test() {
   console.log(a);
   console.log(foo());

   var a = 1;
   function foo() {
      return 2;
   }
}

test();
Answer The result of this code is undefined and 2.
The reason is that both variables and functions are hoisted (moved at the top of the function) but variables don’t retain any assigned value. So, at the time the variable a is printed, it exists in the function (it’s declared) but it’s still undefined. Stated in other words, the code above is equivalent to the following:
function test() {
   var a;
   function foo() {
      return 2;
   }

   console.log(a);
   console.log(foo());

   a = 1;
}

test();
Question 4: How this works in JavaScript What is the result of the following code? Explain your answer.
var fullname = 'John Doe';
var obj = {
   fullname: 'Colin Ihrig',
   prop: {
      fullname: 'Aurelio De Rosa',
      getFullname: function() {
         return this.fullname;
      }
   }
};

console.log(obj.prop.getFullname());

var test = obj.prop.getFullname;

console.log(test());
Answer The code prints Aurelio De Rosa and John Doe. The reason is that the context of a function, what is referred with the this keyword, in JavaScript depends on how a function is invoked, not how it’s defined.
In the first console.log() call, getFullname() is invoked as a function of the obj.prop object. So, the context refers to the latter and the function returns the fullname property of this object. On the contrary, when getFullname() is assigned to the test variable, the context refers to the global object (window). This happens because test is implicitly set as a property of the global object. For this reason, the function returns the value of a property called fullname of window, which in this case is the one the code set in the first line of the snippet.
Answer The issue can be fixed by forcing the context of the function using either the call() or the apply() function. If you don’t know them and their difference, I suggest you to read the article What’s the difference between function.call and function.apply?. In the code below I’ll use call() but in this case apply() would produce the same result:
console.log(test.call(obj.prop));In this article we’ve discussed five typical questions that are asked at interviews to test a JavaScript developer. The actual questions may differ from interview to interview but the concepts and the topics covered are usually pretty similar. I hope you had fun testing your knowledge. In case you didn’t know some of all of the answers, don’t worry: there is nothing that studying and experience can’t fix.
If you have been asked some other interesting questions at interviews, don’t hesitate to share them with us. It’ll help a lot of developers.
Based on the statistics of my previous article 5 Typical JavaScript Interview Exercises, it seems that a lot of you are searching for a new job or, at least, want to test their JavaScript knowledge. Regardless of the reason(s) that lead you to read the article, in agreement with the JavaScript channel editor Colin Ihrig, I decided to write another one about some other typical questions asked at interviews. Have fun!
Question 1: Closures
Consider the following code:
var nodes = document.getElementsByTagName('button');
for (var i = 0; i < nodes.length; i++) {
   nodes[i].addEventListener('click', function() {
      console.log('You clicked element ##' + i);
   });
}Answer
The code above tests a very important concept of JavaScript: closures. A proper understanding and use of closures is vital for every JavaScript developer that wants to write more than five lines of code in a web page. If you need to be initiated on this topic or simply need a refresher, I strongly suggest you to read the tutorial JavaScript Closures Demystified by Colin Ihrig.
That said, the code prints two timesYou clicked element ##NODES_LENGTH where
NODES_LENGTH is the number of the nodes retrieved. The
reason is that after the for loop is completed, the
variable i assumes a value equal to the length of the nodes
list. In addition, because i was in scope at the time the
code attached the handler, the variable belongs to handler’s closure. As
you’ll recall, the value of the variables in closures isn’t static,
hence the value of i isn’t the value at the time the
handler was added (0 for the first button in the list, 1 for the second,
and so on). At the time the handler will be executed, on the console
will be printed the current value of the variable i, that
is equal to the length of the nodes list.
Question 2: Closures
Fix the previous question’s issue so that the handler prints 0 for the first button in the list, 1 for the second, and so on.Answer
The issue can be fixed in several different ways and here I’ll show you two of them.
The first solution involves the use of an IIFE to create another
closure so that the value of i will be the one expected.
The code implementing this approach is the following:
var nodes = document.getElementsByTagName('button');
for (var i = 0; i < nodes.length; i++) {
   nodes[i].addEventListener('click', (function(i) {
      return function() {
         console.log('You clicked element ##' + i);
      }
   })(i));
}
Another possible solution doesn’t involve the use of an IIFE and moves the function outside the loop. This approach is implemented by the following code:
function handlerWrapper(i) {
   return function() {
      console.log('You clicked element ##' + i);
   }
}

var nodes = document.getElementsByTagName('button');
for (var i = 0; i < nodes.length; i++) {
   nodes[i].addEventListener('click', handlerWrapper(i));
}
Question 3: Data Types
Consider the following code:
console.log(typeof null);
console.log(typeof {});
console.log(typeof []);
console.log(typeof undefined);Answer
The previous question seems a bit silly but it tests the knowledge of
the typeof operator. A lot of JavaScript developers aren’t
aware of some peculiarities of typeof. In this example, the
console will display the following:
object
object
object
undefined
The most surprising output is probably the third. Most developers
expect typeof [] to return Array. In case you
want to test if a variable contains an array, you can perform the
following test:
var myArray = [];
if (myArray instanceof Array) {
   // do something...
}
Question 4: Event Loop
What is the result of the following code? Explain your answer.
function printing() {
   console.log(1);
   setTimeout(function() { console.log(2); }, 1000);
   setTimeout(function() { console.log(3); }, 0);
   console.log(4);
}

printing();
Answer
The output of the code is:
1
4
3
2
To understand why the numbers are printed in this order, you have to
understand what setTimeout() does and how the browser’s
event loop works. The browser has an event loop which checks the event
queue and processes pending events. UI events (such as click, scroll,
and so on), Ajax callbacks, and callback provided to
setTimeout() and setInterval() are all
processed one at a time by the event loop. Therefore, when calling the
setTimeout() function the callback provided is queued, even
if the delay specified is zero. The callback stays in the queue until
the time specified has elapsed and the engine is ready to perform the
action (i.e. if it isn’t performing another action at the moment). So,
although a callback passed to setTimeout() is delayed by
zero milliseconds, it’ll be queued and executed after other non-delayed
statements declared in the same function.
setTimeout() function. Then, we have “4” because
it’s the first non-delayed number to print, so it isn’t queued, after
the delayed ones. Now, there are “2” and “3” left. Both have been added
to the queue but while the former has to wait one second, the latter can
be printed after 0 seconds (which means instantaneously after the engine
has completed all the other processes). This explains why “3” is printed
before “2”.
Question 5: Algorithms
Write anisPrime() function that returns true
if a number is prime and false otherwise.
Answer
I think this is one of the most frequently asked question at interviews. However, although recurrent and simple in its nature, the solution provided by the candidate tells a lot about the candidate’s mathematical and algorithmic knowledge.
First thing first: this is JavaScript, not C or Java, so you can’t trust the data type passed. If the interviewer doesn’t explicitly tells you that you can go straight to the solution, either ask if he/she wants you to check the input provided or start the function with the due checks. Seriously, always check the inputs provided to the function.
Second point to remember: negative numbers aren’t prime. Same goes for 1 and 0. So, test for these numbers first. Additionally, the only even number that is prime is 2. It’s really nonsense to verify 4, 6, 8, and so on using a loop. Even more, if a number isn’t divisible by 2, it isn’t divisible by 4, 6, 8, and so on. Therefore your loop must skip those numbers. If you test the input against even numbers, your algorithm will be slower by a factor of 2 (you test double the numbers). There are other smart optimizations that can be performed but the ones I’ve cited are in most cases enough. For example, if a number isn’t divisible by 5, it won’t be divisible by its multiples. So, it’s useless to test the input against 10, 15, 20, and so on. If you want to read about the solution of this problem in depth I suggest you to read the relevant Wikipedia page.
The third and final point: you don’t need to test numbers greater than the square root of the input number. I feel that people are allowed to miss this point and I don’t think they should obtain negative feedback for that. However, showing knowledge of this concept should give extra points.
Now that you have some background on this problem, here is the solution that takes into account all the previous points:
function isPrime(number) {
   // If your browser doesn't support the method Number.isInteger of ECMAScript 6,
   // you can implement your own pretty easily
   if (typeof number !== 'number' || !Number.isInteger(number)) {
      // Alternatively you can throw an error.
      return false;
   }

   if (number < 2) {
      return false;
   }

   if (number === 2) {
      return true;
   } else if (number % 2 === 0) {
      return false;
   }

   var squareRoot = Math.sqrt(number);
   for(var i = 3; i <= squareRoot; i += 2) {
      if (number % i === 0) {
         return false;
      }
   }

   return true;
}In this article, with the help of some questions and exercises, I’ve discussed other JavaScript key concepts that are typically part of any interview for a front-end developer role. I hope you successfully answered to all of them or that you learned something new so that you can perform better in your next interview.
Suppose an array of numbers is given. Create
toPalindromemethod that creates a palindrome out of your
array in the following way:
const arr = [1,2,3];
// [1, 2, 3]

const arr2 = arr.toPalindrome()
// [1, 2, 3, 2, 1]

const arr3 = arr2.toPalindrme()
// [1, 2, 3, 2, 1, 2, 3, 2, 1]

console.log( arr, arr2, arr3 );
// [1, 2, 3] [1, 2, 3, 2, 1] [1, 2, 3, 2, 1, 2, 3, 2, 1]
// undefined
toPalindrome() returns a new array. It keeps the element
arr[ arr.length - 1 ] the same, and concatenates all the
other elements of the array after the end in reverse order.
I encourage you to solve this exercise on your own before checking the reference solution. Even if you solve this exercise, you may learn a lot from my reference solution, as I will reveal my thought process to you both from an interviewer’s and from a candidate’s perspective.
This exercise is straightforward, it only requires basic JavaScript knowledge, including JavaScript prototypes.
We can go on the safe route, and just use basic ES5 constructs.
Array.prototype.toPalindrome = function() {
    const result = this.slice();
    for ( var i = this.length - 2; i >= 0; --i ) {
        result.push( this[i] );
    }
    return result;
}

[1, 2, 3].toPalindrome()
// [1, 2, 3, 2, 1]

[1, 2, 3].toPalindrome().toPalindrome()
// [1, 2, 3, 2, 1, 2, 3, 2, 1]
In order to solve this task, you need to know the following about JavaScript:
Array objectfor loop to iterate on the elements of
the original array that we want to push to the end of the
array. Push modifies the original result array.This is a safe and straightforward solution. You can use some more native array methods to make the solution more compact:
Array.prototype.toPalindrome = function() {
    return this.slice().concat( this.slice( 0, this.length - 1 ).reverse() )
}

[1, 2, 3].toPalindrome()
// [1, 2, 3, 2, 1]

[1, 2, 3].toPalindrome().toPalindrome()
// [1, 2, 3, 2, 1, 2, 3, 2, 1]
The solution can be explained as follows:
slice still makes a shallow copy of the original
arraythis.slice( 0, this.length - 1 ) makes a shallow copy
of the original array, excluding the last elementreverse reverses the elements of the array. Although
reverse mutates the original array, we are mutating the
shallow copy this.slice( 0, this.length - 1 ).concat concatenates two arraysconst arr = [1,2,3];
// slice: shallow copy
const arr2 = arr.slice();
// [1, 2, 3]
arr2[ 1 ] = 5;
console.log( arr, arr2 );
// [1, 2, 3] [1, 5, 3]
const arr3 = arr.slice( 0, arr.length - 1 );
// [1, 2]
// reverse
arr2.reverse();
console.log( arr, arr2 );
// [1, 2, 3] [3, 5, 1]
// concat
arr.concat( arr3 );
// [1, 2, 3, 1, 2]
console.log( arr, arr3 )
// [1, 2, 3] [1, 2]
arr.concat( arr3.reverse() )
// [1, 2, 3, 2, 1]
arr3
// [2, 1]If we use ES6, we can replace the slice and the
concat methods with the spread operator:
Array.prototype.toPalindrome = function() {
    return [...this, ...this.slice( 0, this.length - 1 ).reverse() ];
}
If you would like to read more about the spread operator, sign up for my ES6 minicourse or check out my article on the Spread Operator and Rest Parameters.
As you can see, this simple exercise is linked to a lot of JavaScript knowledge. A good interview question often reveals how well a candidate can use their thought process as well as JavaScript language constructs for delivering a working solution.
Suppose a positive integer N is given. Determine the
binary representation of N, and find the longest
subsequence of form 10*1 in this representation, where
0* stands for any number of zeros in the sequence.
Examples: 11, 101, 1001,
10001 etc. Return the number of zeros in the longest
sequence you found. If you didn’t find such a sequence, return zero.
You can read the original task description on Codility.
Whenever you deal with a riddle, bear in mind, it doesn’t matter what techniques you use as long as your solution is correct. Don’t try to impress your interviewers with fancy techniques, don’t even think about announcing that you are going to use “functional programming” or “recursion” or anything else. Just get the job done.
Do explain your thought process! If you are on the right track, your interviewers will appreciate relating to how you think. If you are on the wrong track, your interviewers will often help you out, because they relate to you, and they want you to succeed.
You can read more interviewing tips in The Developer’s Edge.
Before coding, always plan your solution, and explain how you want to solve your task. Your interviewers may correct you, and best case, they say, you can start coding. In our case, the plan looks as follows:
N into a binary stringObtaining the binary representation: You may or may not know that
integers have a toString method, and the first argument of
toString is the base in which the number should be
interpreted. Base 2 is binary, so all you need to do to
convert an integer into its binary representation is
const n1 = 256, n2 = 257;
n1.toString( 2 )
// "100000000"

n2.toString( 2 )
// "100000001"
Chances are, you don’t know this trick. No problem. In most tech interviews, you can use google. If you formulate the right search expression such as “javascript binary representation of a number”, most of the time, you get a nice, compact StackOverflow page explaining the solution. Be careful with copy-pasting tens of lines of code. Look for deep understanding of the problem, and just implement a compact solution.
Never google for the exact solution of the task, because your interviewers may not know how to handle such an attempt.
In the unlikely case you are not allowed to use Google, nothing is lost. You can still solve the same problem in vanilla JavaScript. How do we convert a decimal number to binary on paper?
Suppose your number is 18.
18 / 2 = 9, and the remainder is 0.9 / 2 = 4, and the remainder is 1.4 / 2 = 2, and the remainder is 0.2 / 2 = 1, and the remainder is 0.1 / 2 = 0, and the remainder is 1.Read the digits from bottom-up to get the result: 10010.
Let’s write some code to get the same result:
const IntToBinary = N => {
    let result = '';
    while ( N > 0 ) {
        result = (N % 2) + result;
        N = Math.trunc( N / 2 );
    }
    return result;
}
The % (modulus) operator gives you the remainder of the
division. The trunc function truncates the results. For
instance, Math.trunc( 9.5 ) becomes 9.
If you can’t come up with this algorithm on your own, think in another way:
// 18 is
1 * 16 + 0 * 8 + 0 * 4 + 1 * 2 + 0 * 1
// yielding 10010
First we have to get the largest digit value, which is
16:
// Constraint: N > 0.
const getLargestBinaryDigit = N => {
    let digit = 2;
    while ( N >= digit ) digit *= 2;
    return digit / 2;
}
Then we divide this digit value by 2 until we get
1 to retrieve the digits of the binary number one by one.
Whenever N is greater than or equal to the digit value, our
upcoming digit is 1, and we have to subtract digit from
N. Otherwise, our upcoming digit value is
0:
const IntToBinary = N => {
    let result = '';
    for ( let digit = getLargestBinaryDigit( N ); digit >= 1; digit /= 2 ) {
        if ( N >= digit ) {
            N -= digit;
            result += '1';
        } else {
            result += '0';
        }
    }
    return result;
}
Enough said about the integer to binary conversion. Let’s continue with the state space of the solution.
Determining the state space:
function solution( N ) {
    let str = N.toString( 2 ),
        zeroCount = 0,
        result = 0;
    // ...
    return result;
}
We will use N.toString( 2 ) here to get the binary
representation of N.
In order to identify a sequence of zeros bounded by ones, we have to
know if the sequence has a left border. As every single positive binary
number starts with 1, this condition is automatically
true.
Side note: if N was allowed to be 0, even
then, our function would return the correct result, because the string
'0' does not have a trailing 1 in the
sequence.
Therefore, the state space is quite simple: we need to know the binary string of the input, the number of zeros currently read in the sequence, and the longest string found so far.
Iteration: We have to read each digit of the solution one by one. The traditional way in most programming languages is a for loop.
function solution( N ) {
    let str = N.toString( 2 ),
        zeroCount = 0,
        result = 0;
    for ( let i = 0; i < str.length; ++i ) {
        // ...
    }
    return result;
}
We can also use the for..of loop of ES6 that enumerates
each character of the string. Strings work as iterators and iterable
objects in ES6. For more information, read my article titled ES6
Iterators and Generators in Practice. You can also find six more
exercises belonging to this topic in this blogpost.
function solution( N ) {
    let str = N.toString( 2 ),
        zeroCount = 0,
        result = 0;
    for ( let digit of str ) {
        // ...
    }
    return result;
}
Reading the digits: Each digit can either be a zero or a one. We will branch off with an if-else statement:
function solution( N ) {
    let str = N.toString( 2 ),
        zeroCount = 0,
        result = 0;
    for ( let digit of str ) {
        if ( digit === '0' ) {
            // ...
        } else /* if ( digit === '1' ) */ {
            // ...
        }
    }
    return result;
}
Process the digits: If we read a zero, we have to
increment the zero counter by one. If we read a one, we have to
determine if we have just read the longest sequence of zeros by taking
the maximum of result and zeroCount, and
saving this maximum in result. After determining the new
result value, we have to make sure to reset
zeroCount to 0.
function solution( N ) {
    let str = N.toString( 2 ),
        zeroCount = 0,
        result = 0;
    for ( let digit of str ) {
        if ( digit === '0' ) {
            zeroCount += 1;
        } else /* if ( digit === '1' ) */ {
            result = Math.max( result, zeroCount );
            zeroCount = 0;
        }
    }
    return result;
}
If you execute this algorithm in Codility, you can see that all your tests pass. I encourage you to solve other Codility tasks, as Codility is a great platform to practice coding challenges.
Suppose an 8*6 Connect-Four table is given. Each cell of the table is
either empty (null), or contains the player’s number from
the possible values 1 and 2. Determine if any
player has won the game by connecting four of their symbols horizontally
or vertically. For simplicity, ignore diagonal matches.
I encourage you to solve this exercise on your own before checking the reference solution. Even if you solve this exercise, you may learn a lot from my reference solution, as I will reveal my thought process to you both from an interviewer’s and from a candidate’s perspective.
As there is no example data, we have to model the table ourselves.
const createEmptyTable = () =>
    new Array( 8 ).fill( null ).map(
        () => new Array( 6 ).fill( null )
    );
This simple arrow function returns an empty 6*8 array:
let table = createEmptyTable()
// (8) [Array(6), Array(6), Array(6), Array(6), Array(6), Array(6), Array(6), Array(6)]
// 0 : (6) [null, null, null, null, null, null]
// 1 : (6) [null, null, null, null, null, null]
// 2 : (6) [null, null, null, null, null, null]
// 3 : (6) [null, null, null, null, null, null]
// 4 : (6) [null, null, null, null, null, null]
// 5 : (6) [null, null, null, null, null, null]
// 6 : (6) [null, null, null, null, null, null]
// 7 : (6) [null, null, null, null, null, null]
It is evident that we will need a function that checks all elements of the array for four consecutive matches. I encourage you to implement this function yourself. Reading my solution will be more beneficial to you in case you put in the effort to understand what is going on.
const checkElements = ( [head, ...tail], matchCount = 0, lastElement = null ) => {
    if ( matchCount === 3 && head === lastElement ) return true;
    if ( tail.length === 0 ) return false;
    if ( head === null ) return checkElements( tail );
    if ( head === lastElement ) return checkElements( tail, matchCount + 1, head );
    return checkElements( tail, 1, head );
}
The solution is based on simple recursion. If we find four matches,
the function returns true.
If there are no more elements left, and there is no match possible
anymore, the function returns false. Note that the second
if is only reachable if the first condition is evaluated to
false. In general, due to the return
statements, we know that in each line, all if conditions of
the lines above are false.
In the last two conditions, we check if the head is
null, or matches the sequence we are looking for. In both
cases, our task is to recursively call our function with the correct
argument list. Eventually, in the last line, we know that
head contains a non-null element that is different than the
last element. In this case, we have to restart the matching process.
Note that if you know how regular expressions work, you could simply write a regex to perform the same work:
const checkElements = arr => /([12]),\1,\1,\1/.test( arr.toString() );[12] is an arbitrary character that is either a
1 or a 2. We capture it using parentheses,
then repeat the captured character using the \1 capture
group reference. We insert the commas in-between. If you want to brush
up your regex skills, check out my articles on regular expressions.
Columns are easy to match using the reduce function.
Check out exercise 2 of this article for more details on how the reduce
function works.
const checkColumns = table =>
    table.reduce(
        (hasMatch, column) => hasMatch || checkElements( column ),
        false
    );
If you still have trouble interpreting what is going on, insert a console log inside the arrow function, and study the logged output:
const checkColumns = table =>
    table.reduce(
        (hasMatch, column) => {
            console.log( hasMatch, column );
            return hasMatch || checkElements( column );
        },
        false
    );
We now need to check the rows. We could google how transposing an
array works in JavaScript. However, there is no need to make the
solution more complicated than it is. A simple for loop
will do:
const checkRows = table => {
    for ( let i = 0; i < table[0].length; ++i ) {
        let rowArray = table.map( column => column[i] );
        if ( checkElements( rowArray ) ) return true;
    }
    return false;
}
The function works as follows: the for loop goes through
each element of the first column. Note that in a table, each column has
the same number of elements. For this reason, we can form
rowArray by taking the ith element from each
column using the map function. The map
function takes each column of the table, and substitutes it with the
ith element in the column. For more exercises on the
map function, check out exercises 2 and 3 from this
article.
Now that we have an array of consecutive elements, we can use our
checkElements function to derive the matches. As soon as we
find a match, we can return true. If execution reaches the
end of the for loop, we know that none of the rows matched. Therefore,
we can safely return false. Let’s create a function that
checks the whole table for matches:
const checkTable = table =>
    checkRows( table ) ||
checkColumns( table );17th January 2018 by zsolt-nagy
You might not know about me that I have conducted tech interviews with over 500 software developers from more than twenty countries with the objective of identifying and hiring the best talent. I have also been in the candidate position, interviewing for positions ranging from junior developer to CTO.
In this series, I am exposing the secrets of JavaScript interviewing. You will get a chance to solve a tech interview exercise every single week. You will not only refresh your JavaScript skills, but above all, you will learn the mindset required for solving interview exercises. We will start with simple tasks, and then transition to complex exercises that you could even use to build your portfolio.
We are covering each aspect of the job interviewing process. You have already seen some theoretical questions that demonstrate how well you can use JavaScript. You have seen some coding challenges that not only let you showcase your problem solving abilities, but they also demonstrate your theoretical knowledge, let alone your algorithmic skills. You are yet to experience some longer homework assignment type of tasks that challenge your abilities to write maintainable software. Some of these challenges are timed, some require you to use some frameworks or libraries, while others require you to structure your code.
The challenge I have chosen for this session is an online coding challenge on a site called HackerRank.
I have already recommended that you go through the challenges of a similar site called Codility. HackerRank ups the ante a bit more by giving you challenges of continuously increasing difficulty.
Once you sign up, HackerRank recommends a thirty day challenge for you. You get one exercise a day, which often takes just a couple of minutes. The thirty day challenge is very healthy, because if builds a habit of coding just a bit every single day.
Consider the option of using challenges like the ones HackerRank provides to improve your problem solving skills.
As an illustration, I will now solve a coding challenge that can be found in the Data Structures section of HackerRank. The challenge is called Height of a Binary Tree.
For advanced positions, you will be expected to know some data structures and algorithms, as well as some programming techniques like pure functional programming and recursion. We will build on some of this knowledge.
You can either read the task by signing up on HackerRank and visiting the link, or by reading my summary here:
Suppose a binary tree is given with root
R. Each node may be connected to zero, one, or two child nodes. The edges of the tree are directed from the parent nodes towards child nodes. Determine the height of the tree, defined as the maximal number of edges fromRto any node in the tree.
The JavaScript data structure of a node is as follows:
// type Node = { data: number, left: Node | null, right: Node | null }Solution:
Let’s sketch a plan:
01 plus the maximum of the height of the left subtree and
the right subtreeThese are all the ideas you need to demonstrate to be able to solve this exercise. Let’s create a solution function.
const treeHeight = tree =>
    Math.max(
        tree.left === null ? 0 : 1 + treeHeight( tree.left ),
        tree.right === null ? 0 : 1 + treeHeight( tree.right )
    );
That’s it. We have solved this exercise with recursion.
Notice the solution is purely functional, as it is not relying on any
side-effects. Also notice the elegance of the solution in a sense that
we just described the input (tree) and the return
value.
Now, your interviewer may ask you to solve this exercise without recursion. Remember, for every recursive solution, there exists an equivalent iterative solution. In order to find the iterative solution, we need to save the upcoming recursive calls in a queue-like data structure (a simple array will do), and introduce some accumulator variables that store the current state of the computation.
Let’s start writing the frame of substituting recursion:
const treeHeight = root => {
    let nodes = [{ root, distance: 0 }];
    let maxHeight = 0;

    while ( nodes.length > 0 ) {
        let node = nodes.pop();
        // ...
    }
}
We put the tree in a data structure where we save the distance from the root. We also initialize the maximum height of the tree to zero.
Instead of recursion, we have a while loop. As long as there are
nodes in the nodes array, we pop one, and process its
consequences. During the processing, we may push more nodes to the
array:
const treeHeight = root => {
    let nodes = [{ node: root, distance: 0 }];
    let maxHeight = 0;

    while ( nodes.length > 0 ) {
        let currentTree = nodes.pop();
        maxHeight = Math.max( maxHeight, currentTree.distance );
        if ( currentTree.node.left !== null ) {
            nodes.push( {
                node: currentTree.node.left,
                distance: currentTree.distance + 1
            } );
        }
        if ( currentTree.node.right !== null ) {
            nodes.push( {
                node: currentTree.node.right,
                distance: currentTree.distance + 1
            } );
        }
    }

    return maxHeight;
}
Now that you have completed the iterative solution, a common question is whether you can write a recursive solution that is tail call optimized. Let’s see the original recursive solution:
const treeHeight = tree =>
    Math.max(
        tree.left === null ? 0 : 1 + treeHeight( tree.left ),
        tree.right === null ? 0 : 1 + treeHeight( tree.right )
    );
The recursive calls are inside Math.max, so they are not
in tail position. We have to extract them out from the
Math.max. The question is how.
The iterative solution always gives you an idea for tail recursion. Even if you are unsure about the exact definition of tail position for recursive function calls, you can just take the state space of the iterative function, implement the while loop using recursion:
const treeHeight = root =>
    treeHeightRecursive( [{ node: root, distance: 0}], 0 );

const treeHeightRecursive = ( nodes, maxHeight ) => {
    let currentTree = nodes.pop();
    maxHeight = Math.max( maxHeight, currentTree.distance );
    if ( currentTree.node.left !== null ) {
        nodes.push( {
            node: currentTree.node.left,
            distance: currentTree.distance + 1
        } );
    }
    if ( currentTree.node.right !== null ) {
        nodes.push( {
            node: currentTree.node.right,
            distance: currentTree.distance + 1
        } );
    }
    if ( nodes.length === 0 ) return maxHeight;
    return treeHeightRecursive( nodes, maxHeight );
}
One minor difference with respect to the iterative solution is that
we have to manually create an exit condition from recursion with the
nodes.length === 0 condition.
22nd January 2018 | Zsolt Nagy | Link
We will now move on and add some basic HTML and CSS knowledge to the mix of JavaScript interview questions. Remember, it is not worth specializing to an extent that you can’t take care of the basics. The ability to use basic HTML and CSS to a front end or full stack developer is as essential as knowing how to read. This is the advantage of a T-shaped professional versus the specialist. The horizontal line in the T indicates some generalist knowledge. The vertical is your specialization. Without at least some generalist knowledge, it is very hard to get things done on your own, because not many people are willing to employ a web developer who cannot initialize a repository.
In other words, “everything JavaScript touches, is our kingdom”. Right, I got it, maybe I watched too much Lion King during my childhood.
In case you want to read more about developing your T-shaped profile, check out The Developer’s Edge. If you visit the book page from this link, you can get 40% off from the book until I take the offer down.
This exercise is designed as an on-site interview question. This means, you don’t have hours to complete it, therefore, we will not use heavy templates, Babel, or any tooling.
Create a webpage, where you can paing on a canvas. The user should be able to select the color and the thickness (pixel) of the drawn line. You may use any HTML5 elements.
You can see a screenshot of my example implementation here:
Different browsers render the same elements differently. To combat
this problem, the demonstration of using CSS resets or normalizers is
beneficial. Resets remove all element styles, while normalizers make the
default styles consistent for as many browsers as possible. I chose to
use normalize.css. You can get it using
npm install normalize.css.
We can reference this normalizer in our HTML file. Let’s create our
index.html file:
<!doctype html>
<html>
    <head>
        <title>Paint - zsoltnagy.eu</title>
        <link rel="stylesheet" href="node_modules/normalize.css/normalize.css">
        <link rel="stylesheet" href="styles/styles.css">
    </head>
    <body>
        <input type="color"  class="js-color-picker  color-picker">
        <canvas class="js-paint  paint-canvas" width="600" height="300"></canvas>

    </body>
</html>
Save the file as index.html.
The markup contains a color picker, and the canvas element.
Notice that we created a reference to styles/styles.css.
Let’s create it, and put some border settings around the canvas for
clarity:
.paint-canvas {
  border: 1px black solid;
  display: block;
  margin: 1rem;
}

.color-picker {
  margin: 1rem 1rem 0 1rem;
}
The canvas is now clearly visible, and we can also select the color.
In the JavaScript file, we will first reference our canvas element by
selecting the .js-canvas element. Notice I used the
.js- prefix in the class in order to make it clear, this
class is used for functionality, not for styling. This is separation
of concerns in action.
Using a
.js-prefixed class in the CSS is discouraged. Imagine a web styler using your.js-class to hack some styles in your application. Then one day, the implementer of a feature decides the.js-class is not needed anymore. Relying on the naming, he deletes the.js-class, breaking the styles. We don’t want these things to happen. We also want to give both parties the flexibility of owning their own class names. Styling and functionality are two independent aspects. They should be separated properly.
In the canvas, we can choose between a 2D and a 3D graphical context. We will retrieve the two dimensional context for drawing on the canvas.
const paintCanvas = document.querySelector( '.js-paint' );
const context = paintCanvas.getContext( '2d' );
The color picker reference is also needed. Let’s use this reference to add a change event listener that console logs the chosen color:
const colorPicker = document.querySelector( '.js-color-picker');

colorPicker.addEventListener( 'change', event => {
    console.log( event.target.value );
} );
As we know the chosen color, we can set the stroke style of the graphical context to this color:
colorPicker.addEventListener( 'change', event => {
    context.strokeStyle = event.target.value;
} );
Let’s get to business and start drawing. We need to listen to three events of the canvas:
mousedown indicates that we have to start drawingmousemove indicates that we have to draw a line from
the last position where the cursor was to the current
position.mouseup indicates that we have to stop drawingWhy do we need to draw a line from the last position to the current position? Because by just drawing a dot at the current position, our image would depend on the frame rate of the browser. This frame rate is not constant. The garbage collector may start running, your browser may start slowing down, a notification may appear, and so on. We don’t want our image to depend on external conditions.
In order to make the drawing happen, we need to determine the state
space of the application. We need to keep track of the x
and y coordinates, and the state of the mouse.
let x = 0, y = 0;
let isMouseDown = false;
Thinking about the state space is always an important step when it comes to an animation. In more complex examples, you might want to store the position, velocity, and acceleration of objects that may collide. This is where your high school physics studies come handy.
In a canvas, the top-left point has the coordinates
(x,y) = (0,0), and the bottom-right point has the
coordinates (x,y) = (canvas.width, canvas.height). You can
get the current mouse coordinates from the mousemove
event.
Let’s implement the three canvas event listeners:
paintCanvas.addEventListener( 'mousedown', () => {
    isMouseDown = true;
} );
paintCanvas.addEventListener( 'mousemove', event => {
    if ( isMouseDown ) {
        console.log( event );
    }
} );
paintCanvas.addEventListener( 'mouseup', () => {
    isMouseDown = false;
} );
For now, the mousemove event only contains a conditional
console log. When we execute the code and start logging some values, we
may get confused seeing all the different values. Let me give you an
example:
event
    .clientX: 425
    .clientY: 109
    .layerX: 405
    .layerY: 35
    .offsetX: 409
    .offsetY: 109
    .pageX: 425
    .pageY: 109
    .screenX: 426
    .screenY: 560
    .x: 425
    .y: 109
If you randomly select a pair of values that make sense to you, you
increase your chances of failing an interview. Not knowing which value
stands for what is fully acceptable. Just start searching for the answer
and move on. Don’t guess. Don’t experiment either, because these values
are tricky. The fact that clientX, pageX, and
x have the same value in this one object, does not
imply that they are always equal. They are only equal if their
definitions say so. Therefore, it’s time to look up these
definitions.
We can conclude that x is indeed equal to
clientX, because in the documentation
of MouseEvent.x, we can read that “The MouseEvent.x
property is an alias for the MouseEvent.clientX property.”.
However, after reading a bit more about these properties, it turns out
that they are not the ones we need.
Once we read the documentation of MouseEvent.offsetX, depending on temperament, we could imitate the Backstreet Boys singing “you’re the one I need”. Oh well, they are right about the mouse event, just don’t listen to their songs for dating advice.
Now that we know that the current coordinates are
event.offsetX and event.offsetY, and the
initial coordinates are saved in our state space as x and
y, we know everything to draw our line:
paintCanvas.addEventListener( 'mousemove', event => {
    if ( isMouseDown ) {
        const newX = event.offsetX;
        const newY = event.offsetY;
        context.beginPath();
        context.moveTo( x, y );
        context.lineTo( newX, newY );
        context.stroke();
        [x, y] = [newX, newY];
    }
} );
As we start drawing, we can notice a couple of problems.
First of all, when we first start drawing, a line connects the point
we first moved to with (0,0). Second, after releasing the
mouse, once we start drawing again, a line connects our last drawing
with the current one.
Both problems are due to not setting x and
y in the state space to an initial value once we pressed
the mouse.
We can solve this problem in multiple ways. One fix involves setting
x and y to null whenever we stop
drawing. Their initial values should also be null. Then,
once we start drawing, in the condition, we have to check if
x and y are numbers. If x and
y are null, we ignore drawing.
This solution looks all right on screen, but it is not pixel perfect, because it ignores the very first line of our path. Even if no-one pointed it out, notice that you would have to change the code in at least three different places. Let alone any future modifications in case we wanted to define more events.
We will therefore look for an easier fix. event.offsetX
and event.offsetY are also available inside the
mousedown event. Therefore, we can initialize the value of
x and y there.
paintCanvas.addEventListener( 'mousedown', event => {
    isMouseDown = true;
    [x, y] = [event.offsetX, event.offsetY]
} );
Wow! Drawing is now working like charm. There is just one task left: the ability to change the line thickness.
For this purpose, we will use a HTML5 <slider>
element. We will initialize its value to 1, and allow our
range of thickness between 1Px and 72Px.
In order to read the value of the slider, we will also add a label, displaying the thickness of the line:
<!doctype html>
<html>
    <head>
        <title>Paint - zsoltnagy.eu</title>
        <link rel="stylesheet" href="node_modules/normalize.css/normalize.css">
        <link rel="stylesheet" href="styles/styles.css">
    </head>
    <body>
        <input type="color" class="js-color-picker">
        <input type="range" class="js-line-range" min="1" max="72" value="1">
        <label class="js-range-value">1</label>Px
        <canvas class="js-paint  paint-canvas" width="600" height="300"></canvas>
    </body>
</html>
In the JavaScript code, after getting the reference of both objects,
we will listen to an event of the slider. If we used the change event,
we would get an unwanted surprise: the change event only fires once we
release the slider. After looking up the documentation, you can find the
input event, which fires upon changing the value of the
slider.
const lineWidthRange = document.querySelector( '.js-line-range' );
const lineWidthLabel = document.querySelector( '.js-range-value' );

lineWidthRange.addEventListener( 'input', event => {
    const width = event.target.value;
    lineWidthLabel.innerHTML = width;
    context.lineWidth = width;
} );
As we start drawing a thicker line, another unwanted phenomenon occurs: whenever we make curves, our lines do not form a curvy path. We can see some irregularities instead.
This is because we have not set up the lineCap property
of the graphical context to round:
context.lineCap = 'round';
This wraps up the canvas painter exercise. We can draw a line of any
color and any thickness ranging from 1px to
72px.
Play around with it.
Hmmmm… If you are thorough, you might have done the following scenario: press the mouse button on the canvas and start drawing. Without releasing the mouse button, exit the canvas. Release the mouse button outside the canvas. Scroll back to the canvas with your mouse button in released state. Surprise: drawing continues.
This is because we modeled the mouse button in our internal state, but we never took care of the mouse release if it happened outside the scope of the canvas.
How can we fix this?
We set the isMouseDown method to false in
the mouseup event of paintCanvas.
paintCanvas.addEventListener( 'mouseup', () => {
    isMouseDown = false;
} );
A dirty trick might inspire you to change the
paintCanvas to document. If you do this and
test your code in a shallow way, you might even succeed to a certain
extent.
However, dirty tricks often get caught. In a Windows machine for instance, you can start drawing, then press ALT+TAB to change the currently active task, and click your current window. After the click, your mouse button is in released state, and, surprise, we keep drawing.
A proper fix entails listening to the mouseout event of
paintCanvas. For the sake of maintainability, we can also
refactor the handler function to indicate that mouseup and
mouseout handlers take care of the same piece of
functionality. This way, other people maintaining your code will not
forget adding their fix to one of the event handlers:
const stopDrawing = () => { isMouseDown = false; }
paintCanvas.addEventListener( 'mouseup', stopDrawing );
paintCanvas.addEventListener( 'mouseout', stopDrawing );
In fact, to make our code more semantic, we can do this refactoring for all our drawing event handlers.
const startDrawing = event => {
    isMouseDown = true;
    [x, y] = [event.offsetX, event.offsetY];
}
const stopDrawing = () => { isMouseDown = false; }
const drawLine = event => {
    if ( isMouseDown ) {
        const newX = event.offsetX;
        const newY = event.offsetY;
        context.beginPath();
        context.moveTo( x, y );
        context.lineTo( newX, newY );
        context.stroke();
        [x, y] = [newX, newY];
    }
}

paintCanvas.addEventListener( 'mousedown', startDrawing );
paintCanvas.addEventListener( 'mousemove', drawLine );
paintCanvas.addEventListener( 'mouseup', stopDrawing );
paintCanvas.addEventListener( 'mouseout', stopDrawing );
Refactoring is always great. For instance, suppose an angry customer
comes to you with a complaint. He says, our canvas is a piece of crap,
because if we click without moving the mouse, nothing is drawn on
screen. As you examine the code, you may already be grateful for the
above refactoring step, because the request can be handled by adding
just one line to startDrawing:
const startDrawing = event => {
    isMouseDown = true;
    [x, y] = [event.offsetX, event.offsetY];
    drawLine( event );
}
Problem solved.
Check out the final result in this CodePen.
You can play with the results here
31st January 2018 | Zsolt Nagy | Link
Implement a video player that can play an mp4 video. Add five buttons
below the video player:
– 1x, 1.5x, 2x: when clicked, it
sets the playback speed to the displayed value on the button
– -30s, +30s when clicked, it offsets the
current time of the video by the displayed value
You can use HTML5 tags in the exercise, and you don’t have to worry about cross-browser compatibility.
As an example, you can use the video
http://clips.vorwaerts-gmbh.de/big_buck_bunny.mp4.
Make your solution extensible so that it will be easy to add more fully functional playback speed and offset buttons without changing anything in your JavaScript code.
If you have never used the HTML5 video API, it’s time to google it. The video markup looks as follows:
<video class="js-video"
       width="540"
       height="360"
       controls
       src="http://clips.vorwaerts-gmbh.de/big_buck_bunny.mp4">
</video>
We will also need some buttons:
<button class="js-speed-button"  data-speed="1">1x</button>
<button class="js-speed-button"  data-speed="1.5">1.5x</button>
<button class="js-speed-button"  data-speed="2">2x</button>

<button class="js-offset-button" data-offset="30">+30s</button>
<button class="js-offset-button" data-offset="-30">-30s</button>
I kept the markup lean, and added some classes that will make it easy to identify each button. As we have to take care of extensibility, it makes sense to reference each button with the same class.
We also used some data attributes to customize the offset. We will read these data in the event handlers.
We will write the event handlers such that the code handles all buttons of the same type in a generic way:
document.querySelectorAll( '.js-speed-button' ).forEach( item =>
    item.addEventListener( 'click', function( e ) {
        // Handle the playback speed update
    } )
);

document.querySelectorAll( '.js-offset-button' ).forEach( item =>
    item.addEventListener( 'click', function( e ) {
        // Handle the offset update
    } )
);
document.querySelectorAll is similar to jQuery’s
$ function. We pass it a selector, and it returns a DOM
node collection. As this collection is an iterable, we can iterate on
the elements. We can attach an event listener to each event.
Study the Video API reference to conclude how to change the playback speed and the offset.
Let’s start with the playback speed:
document.querySelectorAll( '.js-speed-button' ).forEach( item =>
    item.addEventListener( 'click', function( e ) {
        const speed = e.target.dataset.speed;
        const video = document.querySelector( '.js-video' );
        video.playbackRate = speed;
    } )
);
Notice how we retrieve the data-speed attribute:
e.target.dataset contains all the data attributes belonging
to a DOM node.
The .js-video video HTML5 element has a
playbackRate property. If we set it to a floating point, we
can change the playback rate.
We can conclude this exercise with the implementation of the offset buttons:
document.querySelectorAll( '.js-offset-button' ).forEach( item =>
    item.addEventListener( 'click', function( e ) {
        const video = document.querySelector( '.js-video' );
        const duration = video.duration;
        const offset = Number.parseInt( e.target.dataset.offset );
        let newTime = video.currentTime + offset;
        if ( newTime > duration ) newTime = duration;
        if ( newTime < 0 ) newTime = 0;

        video.currentTime = newTime;
    } )
);
The video duration is in seconds. We can retrieve the offset from the
data-offset attribute via the property
e.target.dataset.offset. The currentTime
property of the video contains the place where the video is at
currently. After adding the offset to the current time, we have to check
if we are still within the boundaries of the video in order to avoid
indexing out from the video.
As the currentTime property of the video element is
writable, we simply have to assign the new value to it to make the
offset work.
Experiment with the solution in this codepen.
6th February 2018 | Zsolt Nagy | Link
This exercise will lay down the foundations for the upcoming weeks. We will build a simple Pomodoro App. Next week, we will extend this application with new features.
If you don’t know what the pomodoro technique is, you can read about it here.
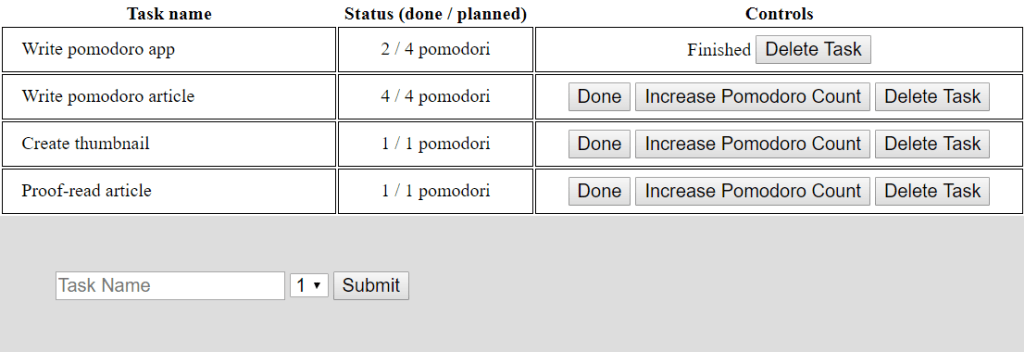
Create a client side application that displays a table of tasks with the following columns:
pomodori;Done,
Increase Pomodoro Count, and Delete.When pressing the Done button, the Done and
the Increase Pomodoro Count buttons are replaced by the
static text Finished.
When pressing Increase Pomodoro Count, the number of
pomodori done is increased by 1 in the Status column. The
initial value of the number of pomodori done is zero.
When pressing Delete, the corresponding row is removed
from the table.
Create a form that allows you to add a new task. The task name can be
any string, and the number of pomodori planned can be an integer between
1 and 4.
This task may be an exercise that you can either solve during an interview, or as a homework exercise.
Always respect the requirements, and never invent anything on your own. It is absolutely fine to clarify questions on the spot if you have time to ask them. If you solve this task as a homework assignment, it is also fine to send your questions to your contacts via email.
Pointing out the flaws in the specification is a great asset to have as long as you demonstrate that you can cooperate with your interviewers.
My usual way of cooperation is that I ask my questions along with the first submitted version of my task. This means I implement everything I can implement without getting blocked, and then I enumerate my assumptions and improvement suggestions attached to the first version.
This sends the message that you are aware of a flaw in the specification, and you are willing to fix it in case it is needed. You also signal that you were proactive in implementing everything you could based on the information available to you.
Most of the time your interviewers will just accept your solution. Sometimes they may ask you to go ahead and make changes to your application based on their feedback.
Remember, don’t block yourself just because the task is underspecified. You can implement exactly what’s needed, and tackle the improvement suggestions later.
In this example, there are quite a few unusual elements.
First, the task name may be an empty string. There is no validation specified in the task description. You may point this out as an improvement suggestion. Implementing validation on your own would mean that you don’t respect the specification.
Second, different rows may contain the same task.
Third, there is no way to undo pressing the Done button.
When a task is finished, it will stay finished.
Fourth, the pomodoro counter may increase above the planned number of pomodori.
Fifth, pomodoro is singular, pomodori is
plural, but we always display pomodori in the status
column.
You can point all these anomalies out as improvement suggestions. Improvising and implementing these features without asking for permission would imply that you don’t respect the specification. Some hiring crews will not care about it, while others may even reward you for improvising. However, chances are, if you continuously improvise, your interviewers will ask themselves the question if they can cooperate with you smoothly.
This is why I suggest putting all your improvement suggestions in the documentation attached to your solution. You even save yourself time.
Let’s start with the markup:
<!doctype html>
<html>
    <head>
        <title>Pomodoro Timer - zsoltnagy.eu</title>
        <link rel="stylesheet" href="node_modules/normalize.css/normalize.css">
        <link rel="stylesheet" href="styles/styles.css">
    </head>
    <body>
        <table>
            <thead>
                <tr>
                    <th>Task name</th>
                    <th>Status (done / planned)</th>
                    <th>Controls</th>
                </tr>
            </thead>
            <tbody class="js-task-table-body">
            </tbody>
        </table>

        <form class="js-add-task"
              action="javascript:void(0)">
            <input type="text"
                   name="task-name"
                   class="js-task-name"
                   placeholder="Task Name" />
            <select name="pomodoro-count"
                    class="js-pomodoro-count">
                <option value="1">1</option>
                <option value="2">2</option>
                <option value="3">3</option>
                <option value="4">4</option>
            </select>
            <input type="submit" />
        </form>
    </body>
    <script src="js/pomodoro.js"></script>
</html>
Note the following DOM nodes:
js-task-table-body: this is where we will insert the
tasks one by one as table rowsjs-add-task: the form to add new tasks. We will listen
to the submit event of this formjs-task-name: a textfield containing the task name
inside the js-add-task formjs-pomodoro-count: a dropdown list containing the
number of planned pomodori inside the js-add-task form.
Usually more than four pomodori would mean that we haven’t broken down
the task well enough, this is why we only allow up to four pomodori as a
limitLet’s write some JavaScript in the js/pomodoro.js
file.
let tasks = [];
const pomodoroForm = document.querySelector( '.js-add-task' );
const pomodoroTableBody = document.querySelector( '.js-task-table-body' );
First, notice we need an array of tasks to store the contents of the table. We also need a reference to the pomodoro form and the table body.
Our plan is that we will handle the form submission with an event handler.
const addTask = function( event ) {
    event.preventDefault();
    // ...
    this.reset();
    // ...
}

pomodoroForm.addEventListener( 'submit', addTask );
Notice the preventDefault call. When we submit a form, a
redirection is made. The default action defined in HTML forms is that a
server handles our submitted form data, and renders new markup for us.
In a client side application, we rarely need this default action from
the end of the server. Therefore, we can prevent this default action by
calling the preventDefault method of the submit event.
Technically, this is not mandatory, because the action of the
form is javascript:void(0), which does not
make any redirections. I showed you this option in the markup, but I
still recommend using preventDefault from JavaScript’s end
to avoid the consequences someone accidentally removing
javascript:void(0) from the markup.
The context inside the event handler is the form element itself.
Calling the reset method of the form resets all form fields
to their default values. We can safely reset the form once we are done
processing the values.
Let’s do this processing now:
const addTask = function( event ) {

    // 1. Prevent default action
    event.preventDefault();

    // 2. Extract form field values
    const taskName = this.querySelector( '.js-task-name' ).value;
    const pomodoroCount = this.querySelector( '.js-pomodoro-count' ).value;

    // 3. Create a new task item by updating the global state
    tasks.push( {
        taskName,
        pomodoroDone: 0,
        pomodoroCount,
        finished: false
    } );

    // 4. Reset the form
    this.reset();

    // 5. Render the global state
    renderTasks( pomodoroTableBody, tasks );
}
We have already covered steps 1 and 4.
Step 2 is about extracting the values the user entered. Notice the
this.querySelector construct. Remember? The value of
this is the DOM node of the form. Therefore, we can use the
querySelector method of this DOM node to search for the
corresponding form fields and take their value
attribute.
In Step 3, we create a new object. Notice the object shorthand
notation. Remember, in ES6, { x } is equivalent to
{ x: x }. You can learn this and many more tricks in ES6 in Practice.
I decided on implementing rendering in a separate function, because
this feature will likely be needed later once we update the form. Let’s
finish Step 5 by implementing the renderTasks function. I
will use the ES6 Template Literal format. If you have not seen it in
action before, read my article on Strings
and Template Literals in ES6.
We can conveniently include newline characters in the template
without terminating it. We can also evaluate JavaScript expressions in
the form ${expression}:
const renderTasks = function( tBodyNode, tasks = [] ) {
    tBodyNode.innerHTML = tasks.map( ( task, id ) => `
        Template goes here for task[${id}] with name ${task.taskName}
    ` ).join( '' );
}
We will set the innerHTML property of
tBodyNode to a text node containing the string that we
assemble.
The assembly is made using the map method of the
tasks array. Map is a higher order function,
because it expects a function as an argument. This function is executed
on each element of the tasks array one by one, transforming
tasks[id] also accessible as task onto string
return values. The template is assembled by joining these string
values.
If you are not familiar with map, the code is almost the
same as the below for loop equivalent. The only difference
is the whitespacing inside the template literal.
const renderTasks = function( tBodyNode, tasks = [] ) {
    let template;
    for ( let i = 0; i < tasks.length; ++i ) {
        template += `Template goes here for task[${i}] with name ${tasks[i].taskName}`;
    }
    tBodyNode.innerHTML = template;
}
As a loose tangent, technically, we don’t need the
template variable, because we could simply append each
template row to tBodyNode.innerHTML. Right?
Well, right and wrong. Technically, you could do this, and your code
would look shorter. In practice, always bear in mind that DOM operations
are more expensive than JavaScript operations. So much so, that once I
managed to dige inside the jQuery UI Autocomplete code to shove off more
than 95% of the execution time of opening the autocomplete by assembling
the $node.innerHTML += type of DOM manipulations in memory,
and making just one DOM insertion at the end.
Back to business. Let’s assemble our task table row:
const renderTasks = function( tBodyNode, tasks = [] ) {
    tBodyNode.innerHTML = tasks.map( ( task, id ) => `
        <tr>
            <td class="cell-task-name">${task.taskName}</td>
            <td class="cell-pom-count">${task.pomodoroDone} / ${task.pomodoroCount} pomodori</td>
            <td class="cell-pom-controls">
            ${ task.finished ? 'Finished' : `
                <button class="js-task-done" data-id="${id}">Done</button>
                <button class="js-increase-pomodoro" data-id="${id}">Increase Pomodoro Count</button>`
            }
                <button class="js-delete-task" data-id="${id}">Delete Task</button>
            </td>
        </tr>
    ` ).join( '' );
}
The td classes are there for styling. I won’t bother you
with the details, you can check out the CSS code on my GitHub
repository.
The button classes are there for event handling. After
all, we will have to handle the button clicks later. In order to make
our life easier, we can also add the id data attribute to
the button.
The ternary ? : operator makes sure that we either
display the Finished text, or we display the two buttons
described in the specification.
So far, the code is straightforward. I mean, you have to know what you are doing to come up with a solution like this. You also have to know the ins and outs of writing basic HTML markup and basic JavaScript.
Progress may even give you a false illusion. You might have perceived that the main adversity is the creation and rendering the table. Now that you are done, you might think, the rest of the task is a piece of cake.
This is when a surprise knocks you off. In most well written stories, the hero’s journey contains a twist after the hero defeats the enemy. This is when the hero realizes that shit is a lot deeper than originally expected.
This is also the point when the hero needs to reverse engineer a prophecy in order to move forward. It is now time to reveal the prophecy: “One Event Handler to Rule Them All”.
I bet you were about to consider how you would implement one event handler for each button in the DOM. It is definitely feasible. Once you render the markup, you have to take care of dynamically adding the corresponding event listeners. You have to make sure you don’t mess up event handling.
This seems to be a lot of unnecessary work. The stubborn hero could implement it like this:
const finishTask = ( e ) => {
    const taskId = e.target.dataset.id;
    tasks[ taskId ].finished = true;
    renderTasks( pomodoroTableBody, tasks );
}

const increasePomodoroDone = ( e ) => {
    const taskId = e.target.dataset.id;
    tasks[ taskId ].pomodoroDone += 1;
    renderTasks( pomodoroTableBody, tasks );
}

const deleteTask = ( e ) => {
    const taskId = e.target.dataset.id;
    tasks.splice( taskId, 1 );
    renderTasks( pomodoroTableBody, tasks );
}

const addTaskEventListeners = () => {
    document.querySelectorAll( '.js-task-table-body .js-increase-pomodoro' ).forEach( button =>
        button.addEventListener( 'click', increasePomodoroDone )
    );
    document.querySelectorAll( '.js-task-table-body .js-task-done' ).forEach( button =>
        button.addEventListener( 'click', finishTask )
    );
    document.querySelectorAll( '.js-task-table-body .js-delete-task' ).forEach( button =>
        button.addEventListener( 'click', deleteTask )
    );
}

const renderTasks = function( tBodyNode, tasks = [] ) {
    tBodyNode.innerHTML = tasks.map( ( task, id ) => `
       ...
    ` ).join( '' );
    addTaskEventListeners();
}
Just imagine. If you store 100 tasks in your list, you add 300 event
listeners each time you make one tiny modification to the table. The
code is also very WET (We Enjoy Typing). After all, the first and the
third row of the functions increasePomodoroDone,
finishTask, and deleteTask are all the same.
We also have to do three tedious forEach helpers and
copy-paste the structure to add the event listeners. Let alone adding
the event listeners after each render. Who guarantees that we can’t
manipulate the DOM without calling the renderTasks
function?
This is a bit too much. The structure is not clean enough, and it requires too much maintenance. Therefore, it is now time to consider our prophecy and start thinking.
One event handler to rule them all. When a click on a DOM node happens and an event handler is not defined on the node, the event handler defined on the closest parent node captures and handles the event.
In order to handle event propagation without the need for adding
event listeners during runtime, we have to find an ancestor node that
contains the buttons. This node is the table body node
.js-task-table-body. Let’s define our event listener
there:
const handleTaskButtonClick = function( event ) {
    const classList = event.target.className;
    const taskId = event.target.dataset.id;

    // increase pomodoro count or finish task or delete task

    renderTasks( pomodoroTableBody, tasks );
}

pomodoroTableBody.addEventListener( 'click', handleTaskButtonClick );
The click handler will stay in place throughout the whole lifecycle of the application.
The event itself belongs to the button we clicked.
Therefore, we can easily extract the class attribute and the
data-id attribute. className contains all
classes added to the node.
After performing the requested action, we have to re-render the table.
Let’s see how to perform the actions. We have to determine if
classList contains a class we are looking for. We can
simply do it with a regex matching. If you are interested in more
details on regexes, check it out my post on JavaScript
regular expressions.
const finishTask = ( tasks, taskId ) => {
    tasks[ taskId ].finished = true;
}

const increasePomodoroDone = ( tasks, taskId ) => {
    tasks[ taskId ].pomodoroDone += 1;
}

const deleteTask = ( tasks, taskId ) => {
    tasks.splice( taskId, 1 );
}

const handleTaskButtonClick = function( event ) {
    const classList = event.target.className;
    const taskId = event.target.dataset.id;
    switch ( true ) {
        case /js-task-done/.test( classList ):
            finishTask( tasks, taskId );
            break;
        case /js-increase-pomodoro/.test( classList ):
            increasePomodoroDone( tasks, taskId );
            break;
        case /js-delete-task/.test( classList ):
            deleteTask( tasks, taskId );
            break;
    }
    renderTasks( pomodoroTableBody, tasks );
}

pomodoroTableBody.addEventListener( 'click', handleTaskButtonClick );
Note we could have used
event.target.matches( '.js-task-done' ) instead of
/js-task-done/.test( classList ). Both solutions are the
same.
Notice that finishTask,
increasePomodoroDone, and deleteTask are now
DRY compared to their previous version.
The renderTasks function was also reverted to its
original version, because we don’t have to add any event listeners after
rendering.
If you like ternary operator abuse, you can even get rid of the switch:
const handleTaskButtonClick = function( event ) {
    const classList = event.target.className;
    const taskId = event.target.dataset.id;

    /js-task-done/.test( classList ) ? finishTask( tasks, taskId ) :
    /js-increase-pomodoro/.test( classList ) ? increasePomodoroDone( tasks, taskId ) :
    /js-delete-task/.test( classList ) ? deleteTask( tasks, taskId ) :
    null;

    renderTasks( pomodoroTableBody, tasks );
}
Otherwise, you can also translate it to if-else
constructs.
Check out the source code on GitHub.
This is the end of part one. We can do a lot of cool stuff with our pomodoro application such as:
We will revisit and extend this example in some of the future exercises.
Refactor the Pomodoro App from the previous exercise such that your tasks will be placed on cards, not table rows. Use the block-element-modifier syntax in your CSS and emphasize separation of concerns. Take care of the styling of the application as well as the functionality.
You have a free choice in your design decisions.
This time, you are the freelancer, and you are supposed to drive all design decisions. If you don’t know what you are doing, check out tools that have solved the same problem. In order to save your time, I suggest searching for screenshots of Trello and KanbanFlow boards. Don’t worry, you don’t have to implement a full board… yet. We are just focusing on one column.
Let’s start with creating the markup for our column:
<div class="task-column">
    <div class="task-column__header">Tasks</div>
    <div class="task-column__body  js-task-column">
        <div class="task  js-task" data-id="0">
            <span class="task__name">Write Article</span>
            <span class="task__pomodori">0 / 2 pomodori</span>
            <div class="task__controls">
                <span class="task-controls__icon  js-task-done">✔</span>
                <span class="task-controls__icon  js-increase-pomodoro">➕</span>
                <span class="task-controls__icon  js-delete-task">🗑</span>
            </div>
        </div>
    </div>
</div>
Notice the block-element-modifier syntax. A container is connected to
an element via __. We can only use one __ in a
class name, som instead of task__controls__done, we just
used task-controls__done. We could attach modifiers to
these classes with --. Block-element-modifier classes
should not be referenced in our JavaScript code. They are for styling
purposes only. This is how we achieve separation of concerns.
Let’s style the elements.
.task-column {
    width: 20rem;
    background-color: #ccc;
    border: 1px #333 solid;
}

.task-column__header {
    width: 14rem;
    margin: 1rem 1rem 0 1rem;
    padding: 2rem;
    background-color: #777;
    color: #eee;
    text-align: center;
    font-size: 1.5rem;
}

.task-column__body {
    width: 16rem;
    margin: 0 1rem 1rem 1rem;
    padding: 0.8rem 1rem;
    background-color: #999;
    min-height: 2rem;
}

.task {
    width: 12rem;
    height: 3rem;
    margin: 0.5rem 1rem;
    background-color: #eee;
    padding: 1rem;
    user-select: none;
}

.task__name {
    display: block;
}

.task__pomodori {
    display: inline-block;
    float: left;
}

.task__controls {
    display: inline-block;
    float: right;
}

.task-controls__icon {
    cursor: pointer;
}
I will not get into the details of explaining each rule. Understanding CSS is a lot easier than JavaScript, you can reverse engineer each rule with some googling. Some minimal styling knowledge always comes handy.
Let’s connect the markup with the JavaScript code. First of all, let’s delete the static tasks from the markup:
<div class="task-column">
    <div class="task-column__header">Tasks</div>
    <div class="task-column__body  js-task-column"></div>
</div>
In the JavaScript code belonging to the previous example, let’s
replace js-task-table-body with js-task-column
on line 3. Let’s also replace the variable name
pomodoroTableBody with pomodoroColumn:
const pomodoroColumn = document.querySelector( '.js-task-column-body' );.
Don’t forget to replace all occurrences of
pomodoroTableBody with pomodoroColumn in the
code.
We have one task left: let’s rewrite the renderTasks
function to generate the new markup structure:
const renderTasks = function( tBodyNode, tasks = [] ) {
    tBodyNode.innerHTML = tasks.map( ( task, id ) => `
        <div class="task  js-task" data-id="0">
            <span class="task__name">${task.taskName}</span>
            <span class="task__pomodori">${task.pomodoroDone} / ${task.pomodoroCount} pomodori</span>
            <div class="task__controls">
            ${ task.finished ? 'Finished' : `
                <span class="task-controls__icon  js-task-done"
                      data-id="${id}">\u{2714}</span>
                <span class="task-controls__icon  js-increase-pomodoro"
                      data-id="${id}">\u{2795}</span>`
            }
                <span class="task-controls__icon  js-delete-task"
                      data-id="${id}">\u{1f5d1}</span>
            </div>
        </div>
    ` ).join( '' );
}
We are done.
There was not much JavaScript in this task. I included it, because it is important to emphasize that in frontend and full stack development, you need to be competent in refactoring markup and add some basic CSS. In some occasions, you also have to showcase your creativity and grit by taking the initiative and designing the interface of your applications.
Exercise: Store the state of the application in a local storage. Make sure the application state is reloaded once you refresh the page.
Solution: Clone PomodoroTracker2
from my GitHub repository as a starting point. Alternatively, you can
use your own solution too. We will only modify the JavaScript code,
js/pomodoro.js.
Local storage is very simple to use. There is a
localStorage variable in the global scope.
localStorage may contain keys with string values that
persist in your browser. This is client side persistence, so your
changes do not carry over to a different browser or computer.
As you can only use strings as values in the local storage, you have
to stringify your object or array using JSON.stringify.
Let’s write a function to save the application state to the local storage:
function saveState( tasks ) {
  localStorage.setItem( 'tasks', JSON.stringify( tasks ) );
}
Once we retrieve the application state from the local storage, we
have to parse it as an array. We will use JSON.parse:
function loadState() {
    return JSON.parse( localStorage.getItem( 'tasks' ) ) || [];
}
If the application state was not saved previously, we fall back to an empty array as a default value.
Try out the code a bit. First, add some tasks, finish a few of them,
and complete some pomodori. Then save by executing:
saveState( tasks ) in the console. Refresh your browser.
You should see an empty tasks column. Now load your tasks and render
your application:
loadState() renderTasks(pomodoroColumn, tasks ).
How do we know when to load the state? The answer is surprisingly
simple. You load the state when you initialize your tasks
variable. Replace the [] initial value with
loadState(): let tasks = loadState();.
Don’t forget to render your application after initialization:
let tasks = loadState();
const pomodoroForm = document.querySelector( '.js-add-task' );
const pomodoroColumn = document.querySelector( '.js-task-column-body' );
renderTasks( pomodoroColumn, tasks );
Make sure you avoid temporal dead zone issues with the
renderTask function. If you declared it as:
const renderTasks = (...) => {...} make it
function renderTasks(...) {...} instead.
Our last task is saving the state. When does it make sense to save
our state? In theory, we could figure out where we call
renderTasks and place the saving there.
The problem with this approach is that no-one guarantees that you
won’t forget saving if there was another occurrence of changing the
tasks array and rendering it.
Therefore, I would rather bundle this responsibility with
renderTasks to remind me of persistently saving the state
whenever we render:
function renderTasks( tBodyNode, tasks = []){
  tBodyNode.innerHTML = // ... saveState( tasks );
}
If you test the solution, you can see that everything appears correct. Are we done? Hell no! Our solution is very dangerous.
Why doesn’t it make sense to place saveState inside
renderTasks? Think about it.
Simply because we violate the single responsibility principle. We bundle the hidden responsibility of saving the state into the responsibility of rendering tasks. This does not make sense.
Let’s change this experience by packaging renderTasks
and saveState inside another function. Without a better
idea, I called it saveAndRenderState.
function saveAndRenderState( tBodyNode, tasks ){
  renderTasks( tBodyNode, tasks );
  saveState( tasks );
}
function renderTasks( tBodyNode, tasks = []){
  tBodyNode.innerHTML = // ...
}
Our last task is to replace the two renderTask
occurrences with saveAndRenderState:
const addTask = function( event ) {
    event.preventDefault();
    const taskName = this.querySelector( '.js-task-name' ).value;
    const pomodoroCount = this.querySelector( '.js-pomodoro-count' ).value;
    this.reset();
    tasks.push( {
        taskName,
        pomodoroDone: 0,
        pomodoroCount,
        finished: false
    } );
    saveAndRenderState( pomodoroColumn, tasks );
}

// ...

const handleTaskButtonClick = function( event ) {
    const classList = event.target.className;
    const taskId = event.target.dataset.id;

    /js-task-done/.test( classList ) ?
        finishTask( tasks, taskId ) :
    /js-increase-pomodoro/.test( classList ) ?
        increasePomodoroDone( tasks, taskId ) :
    /js-delete-task/.test( classList ) ?
        deleteTask( tasks, taskId ) :
    null;

    saveAndRenderState( pomodoroColumn, tasks );
}
We are now done with exercise 11.
Recently, I had the idea for a site which allowed you to brainstorm ideas. Here’s what I had basically envisioned:
A user would start off with a central idea or thought and be able to branch off related ideas or thoughts. This would be great for planning lessons, presentations or even studying. As I was brainstorming this idea, I came up with 4 components that the project would need:
To do this, I quickly ran into a problem. Creating an input/textarea is easy. Creating a button that creates a new input/textarea is also pretty easy. The difficult piece is visually designing it in a way that is both functional and makes sense visually. For example, for simplicity’s sake we could simply have each button that creates a new form element place the form element vertically below the previous element. Although this would be simpler from a programming standpoint, visually, it wouldn’t make much sense for the user, as it would be hard to tell which branched text box was connected to which previous idea or text box. As usually serves me well, I decided to start small, and see if I could get the mechanics working on a small scale first. I started with dots, each dot representing a from element / text box. Each dot is 25 pixels in width and 25 pixels in height, black in color. My first goal was to add a new dot when the first dot is clicked, and then distribute subsequent dots around the first dot each time it is clicked. To solve this, I created a variable called “click” and set it to 0; Then, on each click event, I add one.
let clicks = 0;
$('button').click(function() {
    clicks = clicks + 1;
});
Then I create an element inside an if statement.
if(clicks == 1) {
  let blackDot = document.createElement('div');
  blackDot.id = "outerDiv1";
  document.body.appendChild(blackDot);
  document.getElementById('container').appendChild(blackDot);
  blackDot.className = "blackDotClass";
}
That’s the basics of it. Then I add a top and left margin to it. The isn’t included in the class “blackDotClass” because the margin will be different for each created element. For example, the first dot will be to the right of the parent element, the second created dot will be below it, and the third to the left, etc, etc. I’ll insert it like this:
if(clicks == 1) {
  let blackDot = document.createElement('div');
  blackDot.id = "blackDotID1";
  document.body.appendChild(blackDot);
  document.getElementById('container').appendChild(blackDot);
  blackDot.style.marginTop = "25px";
  blackDot.style.marginLeft = "200px";
  blackDot.className = "blackDotClass";
}
Then, if the parent dot is clicked a second time, we could do something like this:
if(clicks == 2) {
  let blackDot = document.createElement('div');
  blackDot.id = "blackDotID2";
  document.body.appendChild(blackDot);
  document.getElementById('container').appendChild(blackDot);
  blackDot.style.marginTop = "0px";
  blackDot.style.marginLeft = "200px";
  blackDot.className = "blackDotClass";
}
The only thing we’ve changed is the “ID” and the top margin. Then for the third element, we would probably change the top and left margin, to place each new element in a circle around the parent dot. This part is simple enough but still, this would be confusing for a user without physical lines that connect one dot to another. Otherwise, again, it would be really difficult to tell which elements are actually connected, with nothing more to go on than spaces.
My initial idea to solve this was to use polygons. Since each “dot” or “element” or whatever we’re using will have a set of x and y coordinates, I could use the coordinate of the parent element and the coordinates to draw a polygon line from one element to the next. Here’s a diagram of what I had envisioned:

I actually went through several iterations of this idea before coming to the conclusion that svg polygons wouldn’t work. The reason is that polygons are an svg element, and have to be inside an svg container. Because of this, you aren’t simply lining a up with b. But you’re also lining them up with the svg element itself, which has it’s own set of dimensions. Take this for example:

You might start the process, and have everything lined up properly, and end up with the above example, where the line doesn’t connect from point a to point b. Naturally, the assumption is that the line isn’t long enough, and is a problem with either the coordinates, or length of the polygon. When you’re problem could be that the svg container isn’t the right size or isn’t aligned properly. What you actually have is this:
You’re line is right, and your coordinates may be right, but because the svg container is too small, you only see a small portion of the actual polygon. Sure, you can make a border around the container to see where it is, but imagine how complex doing this gets when you have several elements, then the svg containers and polygons…it’s a nightmare.
So I came up with a slightly more simple solution. Just a div, with a width of 1 and a border. Each time I click “A” and create a new child element “B”, I also create a third element, “C” a line connecting the two, or a div with a border, between the two elements.

If A and B are on the same X axis, and the display is set to inline, or they’re contained in a span tag, then your job is done, because you don’t need to may any calculations for the y axis. However, again, from the user standpoint, it would be difficult to know where ideas and elements are connected if everything is in a straight line. Thus, in these mind mapping diagrams, they usually tend to be circular in shape. So here’s what I came up with. After I’ve created B, from clicking A, I get the coordinates of each, just like I had done with the polygon.
let element1 = dot1.getBoundingClientRect();
let element2 = dot2.getBoundingClientRect();
console.log(element1);
console.log(element2);
I also want to find the midpoint of my element. In case my dot is 300px large, I don’t want the line to connect to the top, but rather the middle. I do this by dividing the height and width by 2, which is data I can find from my “getboundingClient” function.
let midpointX1 = element1.width/2;
  let midpointY1 = element1.height/2;

  let midpointX2 = element2.width/2;
  let midpointY2 = element2.height/2;
Now, my thought process is this. If I know the x and y coordinates, aslo included in the “getBoudningClient” function, then I can hopefully do some math. What I want to know is the length of the line that would connect both elements, and the angle of the line. I can do this with some trigonometry, First, I’ll find the length with the Pythagorean Theorem: A squared + B squared = C squared.
By turning the relationship of the two elements into the corners of a triangle, we can then use math to discover the length of the line, as I mentioned above, and then we can use the tangent to discover the angle of the line. What I’ll do is create a function that takes the coordinates of both and runs them to find what I’m looking for.
let midpointX1 = element1.width/2;
  let midpointY1 = element1.height/2;

  let midpointX2 = element2.width/2;
  let midpointY2 = element2.height/2;

  let top1 = element1.top - midpointY1;
  let top2 = element2.top - midpointY2;
  let left1 = element1.left - midpointX1;
  let left2 = element2.left - midpointX2;

  function findTriangle (w, x, y, z) {

    let difference = function (a, b) { return Math.abs(a - b); }
    let opposite = difference(w, x);
    let adjacent = difference(y, z);

    let hypotenuseLengthSquared = Math.pow(opposite, 2) + Math.pow(adjacent, 2);
    console.log(hypotenuseLengthSquared);

    let hypotenuseLength = Math.sqrt(hypotenuseLengthSquared);
    console.log(hypotenuseLength);
    console.log(adjacent);

    let angle = Math.atan(opposite/adjacent)*100;
    console.log(angle);
    return [opposite, adjacent, hypotenuseLength, angle];
  }
  let triangle = findTriangle(top1, top2, left1, left2);
  console.log(triangle);
The function “findTriangle” takes the element top and left, minus the midpoint, assuming our elements are symmetrical, and gives it basically the x and y coordinates of both elements to calculate the angle and length of the hypotenuse. I also have the function return the adjacent and opposite sides in case I need to use them later as well. Now, I’ll create my div, using those coordinates and returns.
let newDiv = document.createElement('div');
  newDiv.id = "test";
  document.body.appendChild(newDiv);
  document.getElementById('dot1').appendChild(newDiv);
  newDiv.style.borderColor = "##1cce3a";
  newDiv.style.borderWidth = "3px";
  newDiv.style.borderStyle = "solid";
  newDiv.style.borderColor = "##1cce3a";
  newDiv.style.width = ""+triangle[2]+"px";
  newDiv.style.transform = "rotate("+triangle[3]+"deg)";
  newDiv.style.zIndex = -1;
Because my return statement is an array, when I call for the width and transform of my element, I’m using only the array indices that I need [2] and [3].
Now, I can run this exact same function inside my second if statement. Since the second dot will appear slightly lower on the DOM than the first, the function will calculate the distance between the two and return the connecting line (div) so that they will be visually connected on the screen, and we can have something similar to what my original vision was. However, even with these precise calculations, things can easily go bad here. For example, if the container is set to a flexbox display, it will throw all of the calculations off. But, all in all, it’s a pretty fun exercise. Feel free to reach out for feedback or questions. Thanks!
Ethan Jarrell

I recently had a job interview which had me complete several problems from the project euler website. These problems are great practice for anyone, whether you need some practice for a technical interview, or just want to have some fun, and you have a 10 to 15 hour lunch break. All of the questions can be found at projecteuler.net.
Two of my favorites were problems #8 and #11, and I wanted to walk through my solutions for both problems, mainly because my solution for both problems was pretty similar. But I would love to have some feedback, and any alternative solutions you used to get the answer.
The four adjacent digits in the 1000-digit number that have the greatest product are 9 × 9 × 8 × 9 = 5832.
73167176531330624919225119674426574742355349194934
96983520312774506326239578318016984801869478851843
85861560789112949495459501737958331952853208805511
12540698747158523863050715693290963295227443043557
66896648950445244523161731856403098711121722383113
62229893423380308135336276614282806444486645238749
30358907296290491560440772390713810515859307960866
70172427121883998797908792274921901699720888093776
65727333001053367881220235421809751254540594752243
52584907711670556013604839586446706324415722155397
53697817977846174064955149290862569321978468622482
83972241375657056057490261407972968652414535100474
82166370484403199890008895243450658541227588666881
16427171479924442928230863465674813919123162824586
17866458359124566529476545682848912883142607690042
24219022671055626321111109370544217506941658960408
07198403850962455444362981230987879927244284909188
84580156166097919133875499200524063689912560717606
05886116467109405077541002256983155200055935729725
71636269561882670428252483600823257530420752963450
Find the thirteen adjacent digits in the 1000-digit number that have the greatest product. What is the value of this product?
My thought process on this was to convert the entire Number into an array. To do so, I first converted the entire thing into a string, and then did string split, and then looped through all the individual string and converted each one to a number.
let numStr = "7316717653133062491922511967442657474235534919493496983520312774506326239578318016984801869478851843858615607891129494954595017379583319528532088055111254069874715852386305071569329096329522744304355766896648950445244523161731856403098711121722383113622298934233803081353362766142828064444866452387493035890729629049156044077239071381051585930796086670172427121883998797908792274921901699720888093776657273330010533678812202354218097512545405947522435258490771167055601360483958644670632441572215539753697817977846174064955149290862569321978468622482839722413756570560574902614079729686524145351004748216637048440319989000889524345065854122758866688116427171479924442928230863465674813919123162824586178664583591245665294765456828489128831426076900422421902267105562632111110937054421750694165896040807198403850962455444362981230987879927244284909188845801561660979191338754992005240636899125607176060588611646710940507754100225698315520005593572972571636269561882670428252483600823257530420752963450";let strSplt = numStr.split('');
console.log(strSplt);let longArr = [];
for (var i = 0; i < strSplt.length; i++) {
let number = parseInt(strSplt[i]);
longArr.push(number);
}
console.log(longArr);Next, I set up an array I’m calling a comparison Array. I know I only need to compare 13 digits from the array at once, so I loop through longArr, and push a series of arrays into longArr, consisting of 13 adjacent digits to the current digit.
let comparisonArr = [];
for (var i = 0; i < longArr.length; i++) {
    comparisonArr.push([longArr[i-6],longArr[i-5],longArr[i-4],longArr[i-3],longArr[i-2],longArr[i-1],longArr[i],longArr[i+1],longArr[i+2],longArr[i+3],longArr[i+4],longArr[i+5],longArr[i+6],])
}
Next, I’m creating a “total” array, where I’ll calculate the product of each array item in the comparisonArr. That way I can compare the totals, and return the largest. So I loop through
let total = [];
for (var i = 0; i < comparisonArr.length; i++) {
  let totalA = comparisonArr[i].reduce(function(a,b){return a*b;});
  total.push([totalA, comparisonArr[i]])
}
Here, my reduce and multiply function is included inside my for loop.
Next I get the largest product of the total array by looping through the total array. I compare each iteration against the a test number which I set to 100. If the current iteration is larger than 100, then I set the thest number to the value of that iteration, and continue with the next iteration. I end up with the product, and the 13 numbers that made that product.
let testNum = 100;
let finalArr = [];
for (var i = 0; i < total.length; i++) {
  if(total[i][0] > testNum) {
    testNum = total[i][0];
    finalArr = total[i];
  }
}
console.log(testNum); //final product
console.log(finalArr); //numbers that made that product, productIt’s easy to see the similarities between #8 and #11. Number 11 is basically the same, but with 1 caveat. You’re only looking for 4 adjacent numbers to get the product of, but the numbers can be adjacent horizontally, vertically or diagonally. Here’s how the problem reads:
In the 20×20 grid below, four numbers along a diagonal line have been marked in red.
08 02 22 97 38 15 00 40 00 75 04 05 07 78 52 12 50 77 91 08
49 49 99 40 17 81 18 57 60 87 17 40 98 43 69 48 04 56 62 00
81 49 31 73 55 79 14 29 93 71 40 67 53 88 30 03 49 13 36 65
52 70 95 23 04 60 11 42 69 24 68 56 01 32 56 71 37 02 36 91
22 31 16 71 51 67 63 89 41 92 36 54 22 40 40 28 66 33 13 80
24 47 32 60 99 03 45 02 44 75 33 53 78 36 84 20 35 17 12 50
32 98 81 28 64 23 67 10 26 38 40 67 59 54 70 66 18 38
64 70
67 26 20 68 02 62 12 20 95 63 94 39 63 08 40 91 66 49
94 21
24 55 58 05 66 73 99 26 97 17 78 78 96 83 14 88 34 89
63 72
21 36 23 09 75 00 76 44 20 45 35 14 00 61 33 97 34 31
33 95
78 17 53 28 22 75 31 67 15 94 03 80 04 62 16 14 09 53 56 92
16 39 05 42 96 35 31 47 55 58 88 24 00 17 54 24 36 29 85 57
86 56 00 48 35 71 89 07 05 44 44 37 44 60 21 58 51 54 17 58
19 80 81 68 05 94 47 69 28 73 92 13 86 52 17 77 04 89 55 40
04 52 08 83 97 35 99 16 07 97 57 32 16 26 26 79 33 27 98 66
88 36 68 87 57 62 20 72 03 46 33 67 46 55 12 32 63 93 53 69
04 42 16 73 38 25 39 11 24 94 72 18 08 46 29 32 40 62 76 36
20 69 36 41 72 30 23 88 34 62 99 69 82 67 59 85 74 04 36 16
20 73 35 29 78 31 90 01 74 31 49 71 48 86 81 16 23 57 05 54
01 70 54 71 83 51 54 69 16 92 33 48 61 43 52 01 89 19 67 48
The product of these numbers is 26 × 63 × 78 × 14 = 1788696.
What is the greatest product of four adjacent numbers in the same direction (up, down, left, right, or diagonally) in the 20×20 grid?
I started off this problem in a similar way, eventually converting the grid into an array. Although instead of doing the split between each value, I did the split between each space, since they are groups of 2 digit numbers.
Once you have the grid as an array, the next part is pretty simple. I wanted to push an array of adjacent numbers into a new array. Each time I push a number, it would be a series of four digits:
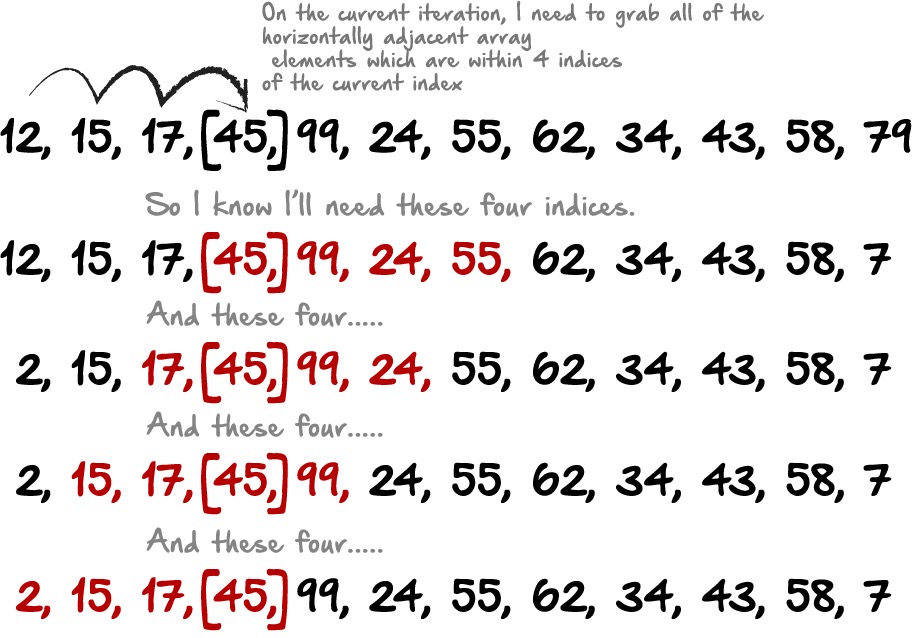
So from here, I simply looped through the array and pushed the current iteration, along with that iteration +1, +2, +3, etc, to get each of the iteration sets I needed.
let compareArr = []
for (var i = 0; i < ridArr.length; i++) {
  compareArr.push([ridArr[i], ridArr[i+1], ridArr[i+2], ridArr[i+3]]);
  compareArr.push([ridArr[i], ridArr[i-1], ridArr[i-2], ridArr[i-3]]);
  compareArr.push([ridArr[i], ridArr[i-1], ridArr[i+1], ridArr[i+2]]);
  compareArr.push([ridArr[i], ridArr[i-2], ridArr[i-1], ridArr[i+1]]);
}
This gives me all of the horizontally adjacent digits. And I can do the same thing vertically, but modifying the +1, +2, +3 etc to +20, +40, +60, etc.
compareArr.push([ridArr[i], ridArr[i+20], ridArr[i+40], ridArr[i+60]]);
  compareArr.push([ridArr[i], ridArr[i-20], ridArr[i-40], ridArr[i-60]]);
  compareArr.push([ridArr[i], ridArr[i-20], ridArr[i+20], ridArr[i+40]]);
  compareArr.push([ridArr[i], ridArr[i-40], ridArr[i-20], ridArr[i+20]]);
Diagonally was a little tricker to figure out the correct index, since you need to grab diagonal in two directions:
compareArr.push([ridArr[i], ridArr[i+21], ridArr[i+42], ridArr[i+63]]);
  compareArr.push([ridArr[i], ridArr[i-21], ridArr[i-42], ridArr[i-63]]);
  compareArr.push([ridArr[i], ridArr[i-21], ridArr[i+21], ridArr[i+42]]);
compareArr.push([ridArr[i], ridArr[i-42], ridArr[i-21], ridArr[i+21]]);compareArr.push([ridArr[i], ridArr[i+19], ridArr[i+38], ridArr[i+57]]);
compareArr.push([ridArr[i], ridArr[i-19], ridArr[i-38], ridArr[i-57]]);
compareArr.push([ridArr[i], ridArr[i-19], ridArr[i+19], ridArr[i+57]]);
compareArr.push([ridArr[i], ridArr[i-38], ridArr[i-19], ridArr[i+19]]);After closing off my for loop, I use the exact same code I used in problem #8 to find and return the greatest product from the array of arrays.
let greatestSum = 0;
for (var i = 0; i < compareArr.length; i++) {
  let tempSum = compareArr[i].reduce(function(a,b){return a*b;});
  if (tempSum > greatestSum){
    greatestSum = tempSum;
  }
}
console.log(greatestSum);Thanks for reading, and again, I would love any feedback you have, especially if you solved it differently than I did. Thanks!
Ethan Jarrell | Jan 15 
I just finished project euler #17. I’ll go through my thought process in solving it here, but would love feedback, especially if your solution was different than mine. I’m sure there are many more elegant and simplistic solutions.
The problem goes as follows:
If the numbers 1 to 5 are written out in words: one, two, three, four, five, then there are 3 + 3 + 5 + 4 + 4 = 19 letters used in total.
If all the numbers from 1 to 1000 (one thousand) inclusive were written out in words, how many letters would be used?
NOTE: Do not count spaces or hyphens. For example, 342 (three hundred and forty-two) contains 23 letters and 115 (one hundred and fifteen) contains 20 letters. The use of “and” when writing out numbers is in compliance with British usage.
My first thought was that I would need to loop over the numbers 1 to 1000 and convert each number into the written word corresponding to that number.
Naturally, I could just make an array containing every written word. But I didn’t want to have to write every number. Instead, I thought about doing something like this:

Without defining every letter, I could make an array of the numbers 1 through 9, and then another array of the letters “one” through “nine”.
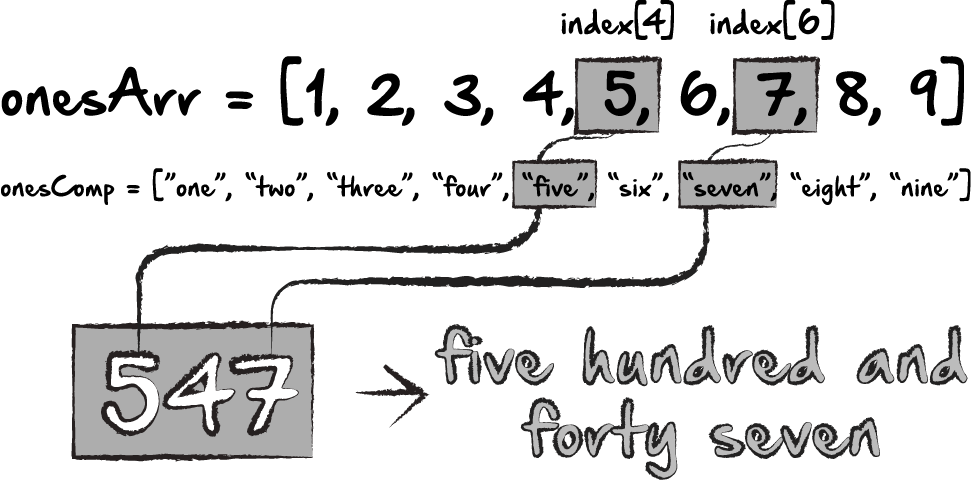
If, for example, the number is 547, then I could see if the first number of the given number set matches any numbers from the onesArr. Then I could do the same for the last number. Once it finds a match, I’ll simply grab the value of the onesComp array instead, but at the same index where I found the match in the onesArr.
Although, this wouldn’t work for “twenty”, “thirty”, “forty” etc. It also wouldn’t work with 10 through 19. So, I could make a couple of additional arrays, and do the same thing, depending on the length of the given number.

Something like this would allow me to have a number array for 1–10, and a matching word array for “one”-“ten”. Then the same thing for teens, and tens. The key for me, is having the index values match. So my ones array starts at 1 instead of 0, since we aren’t using zero, and my teens array does include a zero, since that starts at 10, and I’ll be looking for the 0 in the number 10, just like I’ll be looking for the 1 in 11 and the 2 in 12, etc. Then the tens array starts with 2 and twenty. At that point, the next obstacle would be to determine the length of the number. My thought there would be to loop over the array of 1 to 1000. For each item, I would turn the number into a string and then split the string, so it would give me an array of each number. Then, inside and if statement, I would use parseInt() to convert it back into a number and check it against the value of the compare array. That part would probably look something like this:
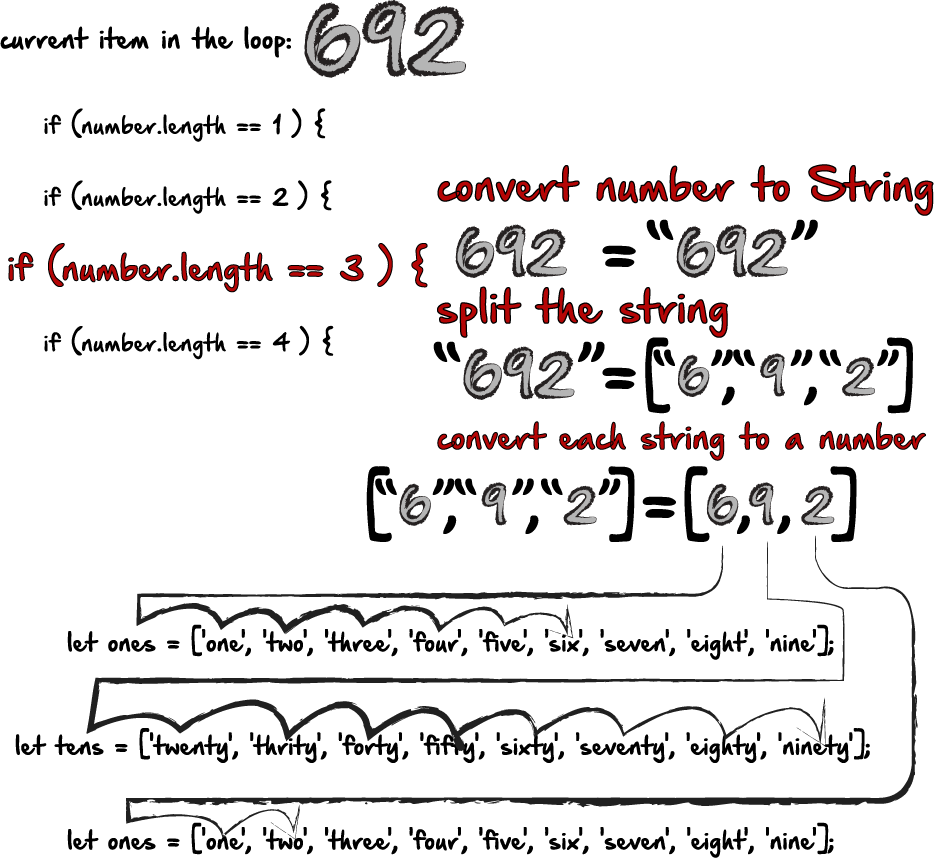
Here’s the final code:
let ones = ['one', 'two', 'three', 'four', 'five', 'six', 'seven', 'eight', 'nine'];
let teens = ['ten', 'eleven', 'twelve', 'thirteen', 'fourteen', 'fifteen', 'sixteen', 'seventeen', 'eighteen', 'nineteen'];
let tens = ['twenty', 'thrity', 'forty', 'fifty', 'sixty', 'seventy', 'eighty', 'ninety'];
let thousands = ['thousand'];
let compareOnes = [1,2,3,4,5,6,7,8,9];
let compareTeens = [0,1,2,3,4,5,6,7,8,9];
let compareTens = [2,3,4,5,6,7,8,9];
let numbers = [];
for (var i = 1; i <= 1000; i++) {
numbers.push(i);
}let currentCount = 0;for (var i = 0; i < numbers.length; i++) {
let numStr = numbers[i].toString();
let numStrArr = numStr.split("");
if(numStrArr.length == 1){
let digit1 = parseInt(numStrArr[0]);
let index = compareOnes.indexOf(digit1);
currentCount = currentCount + ones[index];
}
if(numStrArr.length == 2 && numbers[i]>=20){
let digit1 = parseInt(numStrArr[0]);
let digit2 = parseInt(numStrArr[1]);
let index = compareTens.indexOf(digit1);
let index2 = compareOnes.indexOf(digit2);
currentCount = currentCount + tens[index] + ones[index2];
}
if(numStrArr.length == 2 && numbers[i]<20){
let digit2 = parseInt(numStrArr[1]);
let index2 = compareTeens.indexOf(digit2);
currentCount = currentCount + teens[index2];
}
if(numStrArr.length == 3 && numStrArr[1] == "0" && numStrArr[2] == "0"){
let digit1 = parseInt(numStrArr[0]);
let digit2 = parseInt(numStrArr[1]);
let digit3 = parseInt(numStrArr[2]);
let index3 = compareOnes.indexOf(digit1);
let index2 = compareTens.indexOf(digit2);
let index = compareOnes.indexOf(digit3);
currentCount = currentCount + ones[index3]+"hundred";
}
if(numStrArr.length == 3 && numStrArr[1] == "0" && numStrArr[2] !== "0"){
let digit1 = parseInt(numStrArr[0]);
let digit2 = parseInt(numStrArr[1]);
let digit3 = parseInt(numStrArr[2]);
let index3 = compareOnes.indexOf(digit1);
let index2 = compareTens.indexOf(digit2);
let index = compareOnes.indexOf(digit3);
currentCount = currentCount + ones[index3]+"hundred"+"and"+tens[index2]+ones[index];
}
if(numStrArr.length == 3 && numStrArr[1] == "1"){
let digit1 = parseInt(numStrArr[0]);
let digit2 = parseInt(numStrArr[1]);
let digit3 = parseInt(numStrArr[2]);
let index3 = compareOnes.indexOf(digit1);
let index2 = compareTeens.indexOf(digit3);
currentCount = currentCount + ones[index3]+"hundred"+"and"+teens[index2];
}
if(numStrArr.length == 3 && numStrArr[1] !== "0" && numStrArr[2] !== "0" && numStrArr[1] !== "1"){
let digit1 = parseInt(numStrArr[0]);
let digit2 = parseInt(numStrArr[1]);
let digit3 = parseInt(numStrArr[2]);
let index3 = compareOnes.indexOf(digit1);
let index2 = compareTens.indexOf(digit2);
let index = compareOnes.indexOf(digit3);
currentCount = currentCount + ones[index3]+"hundred"+"and"+tens[index2]+ones[index];
}
if(numStrArr.length == 3 && numStrArr[1] !== "0" && numStrArr[2] == "0" && numStrArr[1] !== "1"){
let digit1 = parseInt(numStrArr[0]);
let digit2 = parseInt(numStrArr[1]);
let digit3 = parseInt(numStrArr[2]);
let index3 = compareOnes.indexOf(digit1);
let index2 = compareTens.indexOf(digit2);
let index = compareOnes.indexOf(digit3);
currentCount = currentCount + ones[index3]+"hundred"+"and"+tens[index2];
}
if(numStrArr.length == 4){
currentCount = currentCount + "one"+"thousand";
}
}
let newCurrent = currentCount.replace(/undefined/g, "");
console.log(newCurrent);
console.log(newCurrent.length)You may notice my bit of regex at the bottom there. I kept having undefined come up, and it was just added in there. I could have tried to figure out why, but it was obvious that all the other words I needed were still in there, so I just wrote a bit of regex to get rid of any undefined in the final string.
Here’s what the final string looks like…well, just the first 75 numbers:
onetwothreefourfivesixseveneightnineteneleventwelvethirteenfourteenfifteensixteenseventeeneighteennineteentwentytwentyonetwentytwotwentythreetwentyfourtwentyfivetwentysixtwentyseventwentyeighttwentyninethritythrityonethritytwothritythreethrityfourthrityfivethritysixthrityseventhrityeightthrityninefortyfortyonefortytwofortythreefortyfourfortyfivefortysixfortysevenfortyeightfortyninefiftyfiftyonefiftytwofiftythreefiftyfourfiftyfivefiftysixfiftysevenfiftyeightfiftyninesixtysixtyonesixtytwosixtythreesixtyfoursixtyfivesixtysixsixtysevensixtyeightsixtynineseventyseventyoneseventytwoseventythreeseventyfourseventyfiveEthan Jarrell
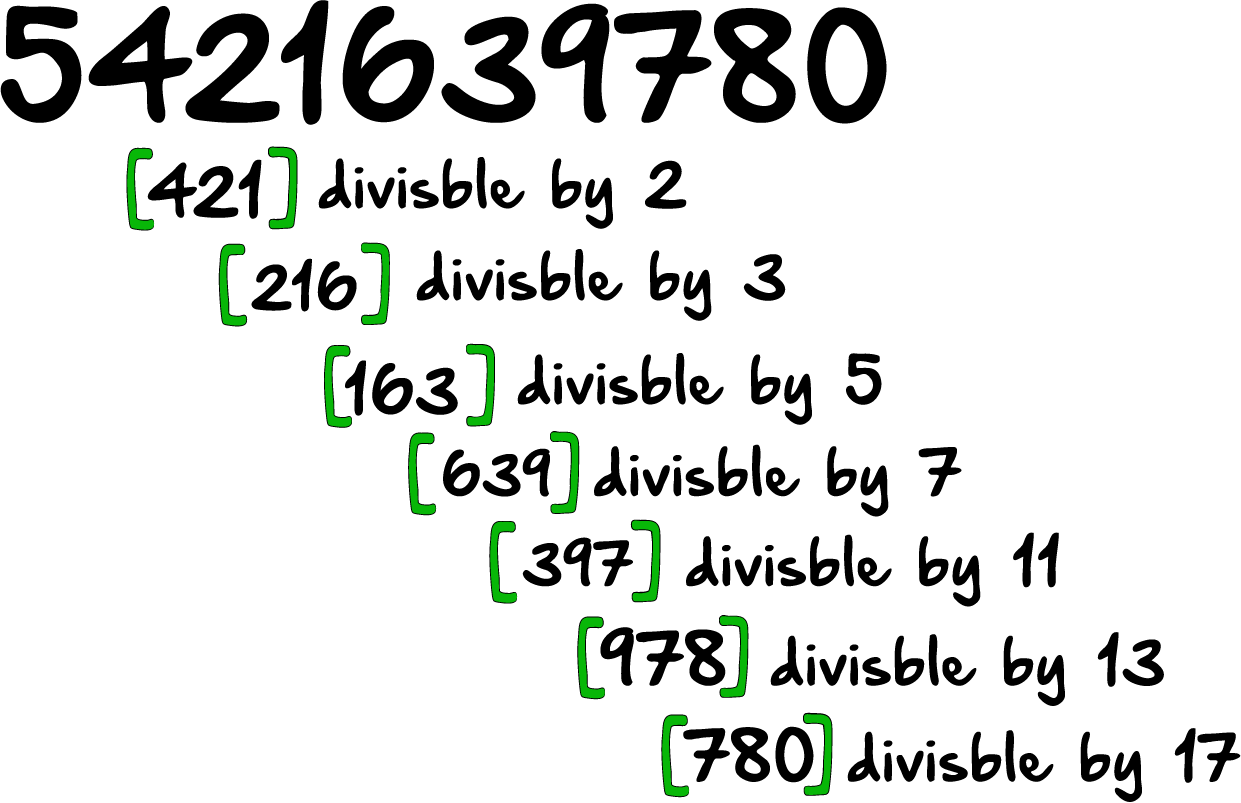
I finished #43 from projecteuler.net. I’m going to walk through my process here of how I came to the solution. Fair warning however, I am not a mathematician. I’m barely a decent programmer, but definitely not a mathematician. As I was doing this problem, it became evidently clear that my ineptitude at math is definitely a stumbling block when it comes to problems like these. So most of my solutions are absolutely the “brute force” approach for that reason. Anyway, with that out of the way, Here’s the problem:
The number, 1406357289, is a 0 to 9 pandigital number because it is made up of each of the digits 0 to 9 in some order, but it also has a rather interesting sub-string divisibility property.
Let d1 be the 1st digit, d2 be the 2nd digit, and so on. In this way, we note the following:
Find the sum of all 0 to 9 pandigital numbers with this property.
So here’s the way I thought of this. For better or worse, I looked at this as a problem where, instead of one long 10 digit number, what I was really looking at was a series of 3 digit numbers. In the example below, the first group [421] would need to be divisible by 2 in order to meet the criteria. Then the second group, [216] would need to be divisible by 3 in order to meet the criteria, and so on and so forth.
My thought was that I could simply grab all of the numbers between 100 and 999, and test each number to see if it was divisible by 2, 3, 5, 7, etc. But then I realized I needed to modify my search because just getting the numbers between 100 and 999 isn’t all I needed. I also needed numbers that started with 0.
Take the following for example:

If I’m getting all the numbers between 100 and 999, and I’m at, for example, 258. There’s no reason to modify this digit. If 2 is a, 5 is b, and 8 is c, I don’t also need the combination bca and cba, because simply continuing up to 999 will also grab both of those. However, it would not grab some of these:
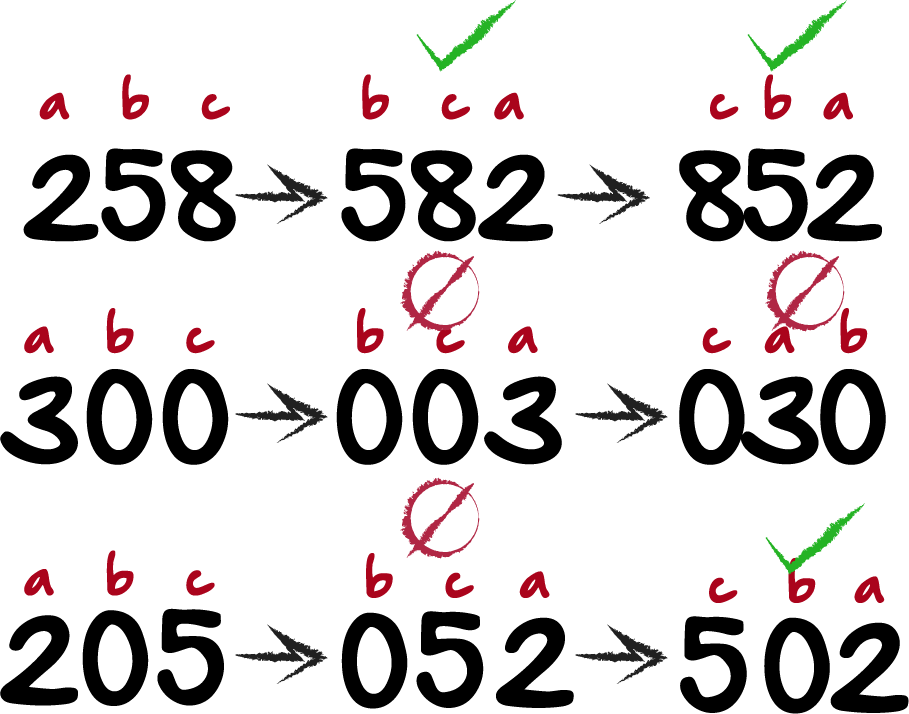
If the current number I’m grabbing is 300, my current method won’t also get 003 or 030. Or, if I’m on 205, I wouldn’t also get 052, but I would get 502. Then I realized that the pandigital numbers don’t repeat or duplicate any digits. So in the middle example, I wouldn’t need 300, 003 or 030, since it repeats the 0 twice. In the bottom example I would need 052, but 502 would already be part of my method, so no modification there either. In these examples, the only combinations of letters I need are “abc” and “bca”, but only “bca” if the middle digit is 0. Here’s how that part of my code looks:
let numbersToTest = [];
for(i = 100; i < 999;  i += 1) {
    let str = i.toString();
    let split = str.split("");
    let a = parseInt(split[0]);
    let b = parseInt(split[1]);
    let c = parseInt(split[2]);
    let combo1 = [a,b,c];
    let combo3 = [0,a,c];
    if(a != b &&
       a != c &&
       b != c){
    numbersToTest.push(combo1);
  }
    if(b == 0 &&
      a !== c &&
      c !== 0){
      numbersToTest.push(combo3);
    }
  }
What I did was loop over the numbers 100 to 999. I turn it into a string, split it, and convert each array element back into a number. Then I have combo1 and combo2. If b is 0, I push combo3, and if b isn’t 0, I push combo1. I also don’t want a, b, or c to be equal to each other, to avoid duplicates, so if any of them do equal each other, they don’t get pushed at all. I end up with all the 3 digit combinations that have only unique digit combinations between 100 and 999.
Now, I realize that there are two different things I need to test for in each combination. First, I need to figure out whether it’s divisible by a given number, ie, 2, 3, 5, 7, 11, 13, or 17.
But, look again at this chart:
Since I now have these in groups of 3, I’m eventually going to smoosh them together and create a 10 digit number. However, in the first group here [421], the second and third digit of this group are equal to the first and second digit of the next group [216], and so on.
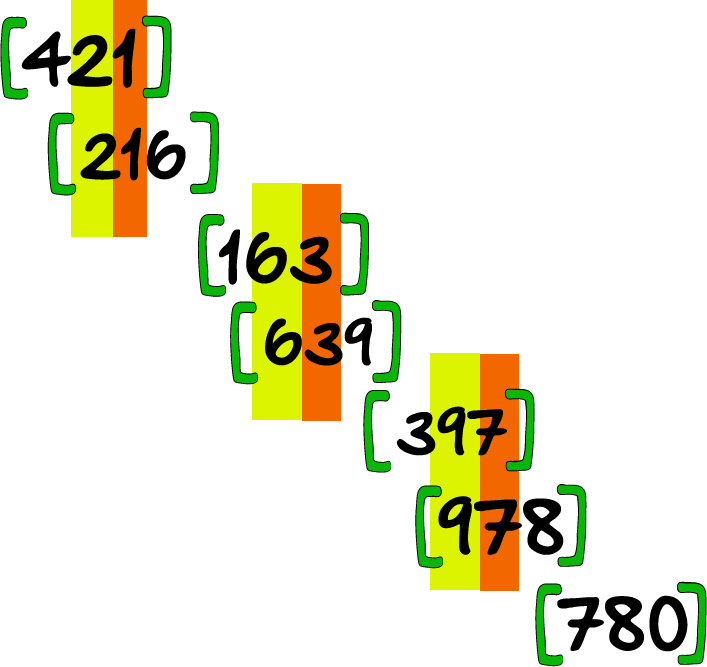
So as I go through each group of 3, I need to test whether or not it’s divisible by a certain number, and also see if the digits match the digits in the previous group. If it’s not divisible by the number I’m looking for, or the numbers aren’t a match, I will discard it.
What I set out to do, was start with an array of all “x”s. Then, as I loop through my array of numbers to test, if the group is divisible by 2, then I push those three digits into my array of “x”s and replace and x with a number from that array. In my head, it should look like this:
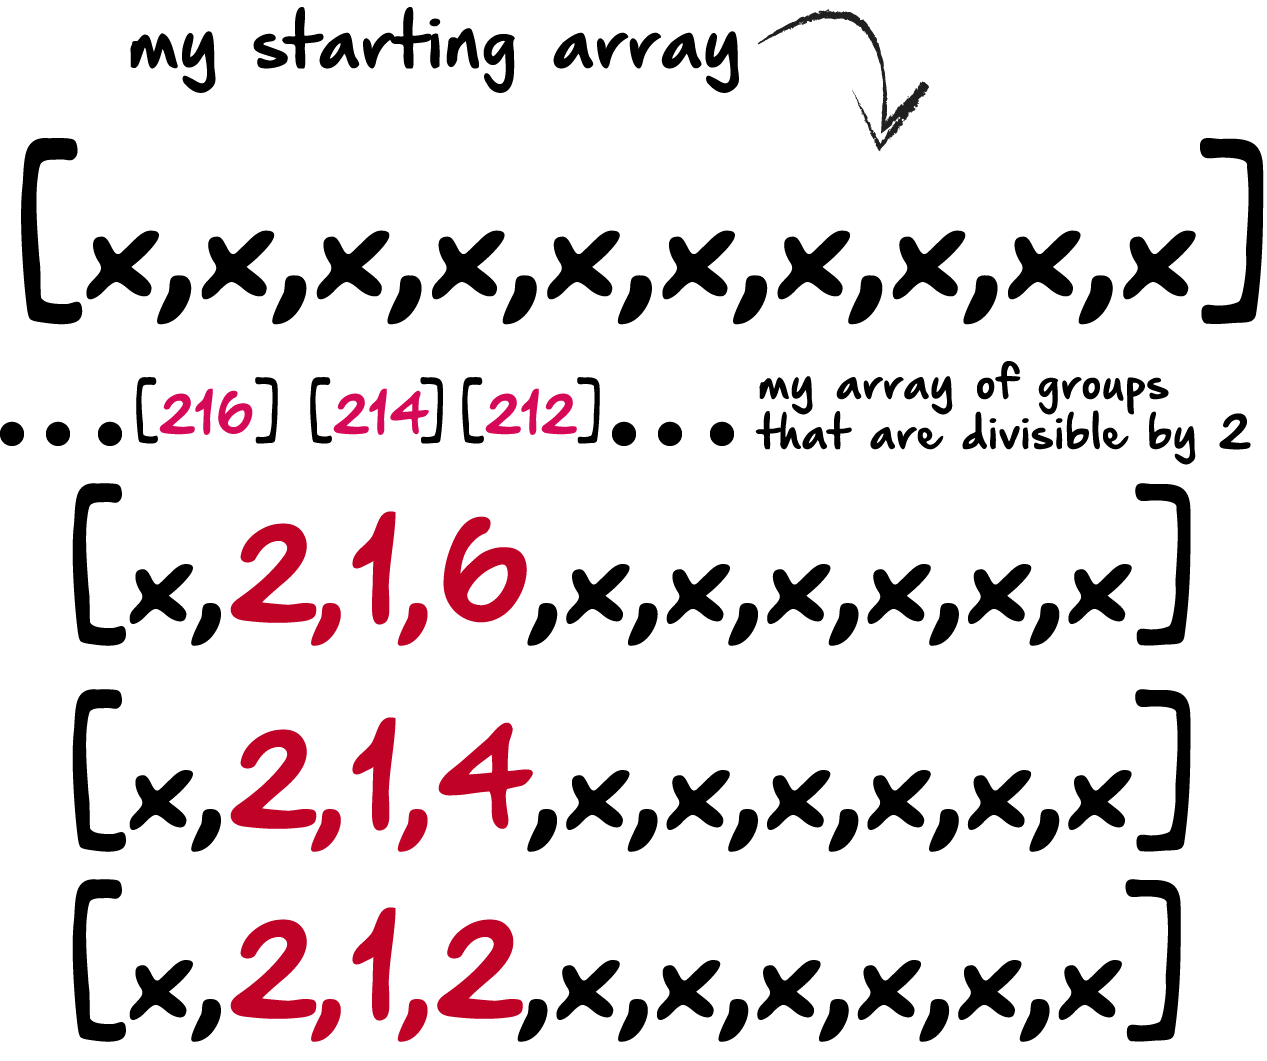
Then I should have the same array I had before, but just with x’s along with the 3 digit numbers divisible by 2 occupying the 2nd, 3rd and 4th space in the array. My code looks something like this:
let testArr2 = [];
  for (var i = 0; i < numbersToTest.length; i++) {
    let testArr1 = ["x","x","x","x","x","x","x","x","x","x"];
    let numbersJoin = numbersToTest[i].join("");
    let number = parseInt(numbersJoin);
    if (number % 2 == 0) {
      testArr1[1] = numbersToTest[i][0];
      testArr1[2] = numbersToTest[i][1];
      testArr1[3] = numbersToTest[i][2];
      testArr2.push(testArr1);
    }
  }
At this point, testArr2 holds the data that looks like the weird array in the diagram above with numbers and x’s. Next, I want to do the same thing, but with numbers divisible by 3, which would look like this:
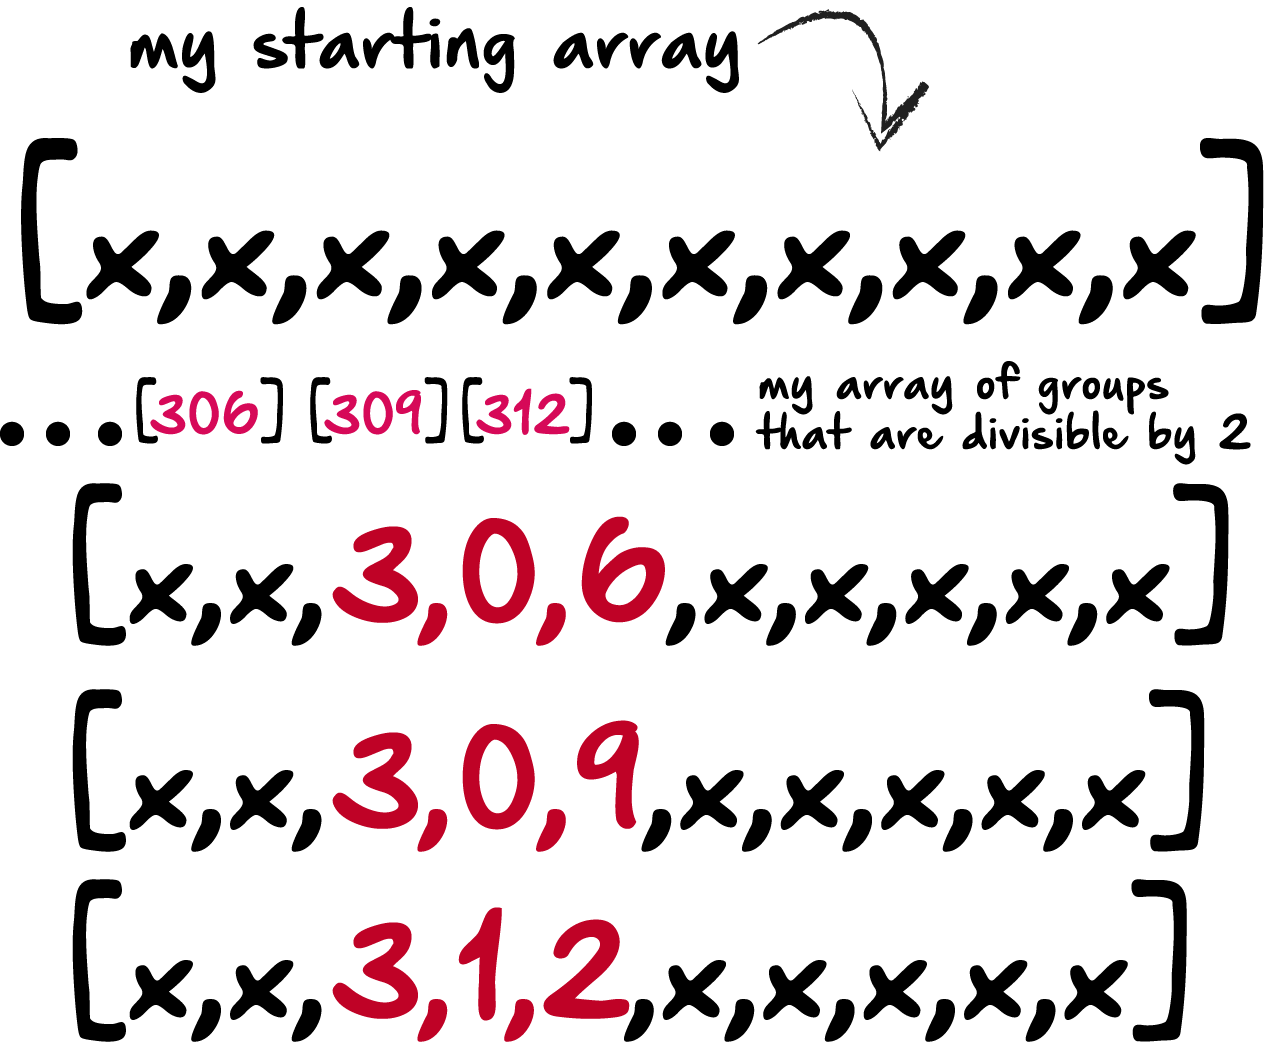
And the JavaScript…
let testArr3 = [];
  for (var i = 0; i < numbersToTest.length; i++) {
    let testArr1 = ["x","x","x","x","x","x","x","x","x","x"];
    let numbersJoin = numbersToTest[i].join("");
    let number = parseInt(numbersJoin);
    if (number % 3 == 0) {
      testArr1[2] = numbersToTest[i][0];
      testArr1[3] = numbersToTest[i][1];
      testArr1[4] = numbersToTest[i][2];
      testArr3.push(testArr1);
    }
  }
Once I get through all of the groups, I’ll have all these arrays with x’s, and a group of 3 numbers. Then, I’ll have to go back through, and see which groups match with each other. Here are the rest of my loops for numbers divisible by 5, 7, 11, 13, and 17:
let testArr4 = [];
  for (var i = 0; i < numbersToTest.length; i++) {
    let testArr1 = ["x","x","x","x","x","x","x","x","x","x"];
    let numbersJoin = numbersToTest[i].join("");
    let number = parseInt(numbersJoin);
    if (number % 5 == 0) {
      testArr1[3] = numbersToTest[i][0];
      testArr1[4] = numbersToTest[i][1];
      testArr1[5] = numbersToTest[i][2];
      testArr4.push(testArr1);
    }
  }
  let testArr5 = [];
  for (var i = 0; i < numbersToTest.length; i++) {
    let testArr1 = ["x","x","x","x","x","x","x","x","x","x"];
    let numbersJoin = numbersToTest[i].join("");
    let number = parseInt(numbersJoin);
    if (number % 7 == 0) {
      testArr1[4] = numbersToTest[i][0];
      testArr1[5] = numbersToTest[i][1];
      testArr1[6] = numbersToTest[i][2];
      testArr5.push(testArr1);
    }
  }
  let testArr6 = [];
  for (var i = 0; i < numbersToTest.length; i++) {
    let testArr1 = ["x","x","x","x","x","x","x","x","x","x"];
    let numbersJoin = numbersToTest[i].join("");
    let number = parseInt(numbersJoin);
    if (number % 11 == 0) {
      testArr1[5] = numbersToTest[i][0];
      testArr1[6] = numbersToTest[i][1];
      testArr1[7] = numbersToTest[i][2];
      testArr6.push(testArr1);
    }
  }
  let testArr7 = [];
  for (var i = 0; i < numbersToTest.length; i++) {
    let testArr1 = ["x","x","x","x","x","x","x","x","x","x"];
    let numbersJoin = numbersToTest[i].join("");
    let number = parseInt(numbersJoin);
    if (number % 13 == 0) {
      testArr1[6] = numbersToTest[i][0];
      testArr1[7] = numbersToTest[i][1];
      testArr1[8] = numbersToTest[i][2];
      testArr7.push(testArr1);
    }
  }
  let testArr8 = [];
  for (var i = 0; i < numbersToTest.length; i++) {
    let testArr1 = ["x","x","x","x","x","x","x","x","x","x"];
    let numbersJoin = numbersToTest[i].join("");
    let number = parseInt(numbersJoin);
    if (number % 17 == 0) {
      testArr1[7] = numbersToTest[i][0];
      testArr1[8] = numbersToTest[i][1];
      testArr1[9] = numbersToTest[i][2];
      testArr8.push(testArr1);
    }
  }
Now, what I’m thinking is that I can cycle through each array like this:
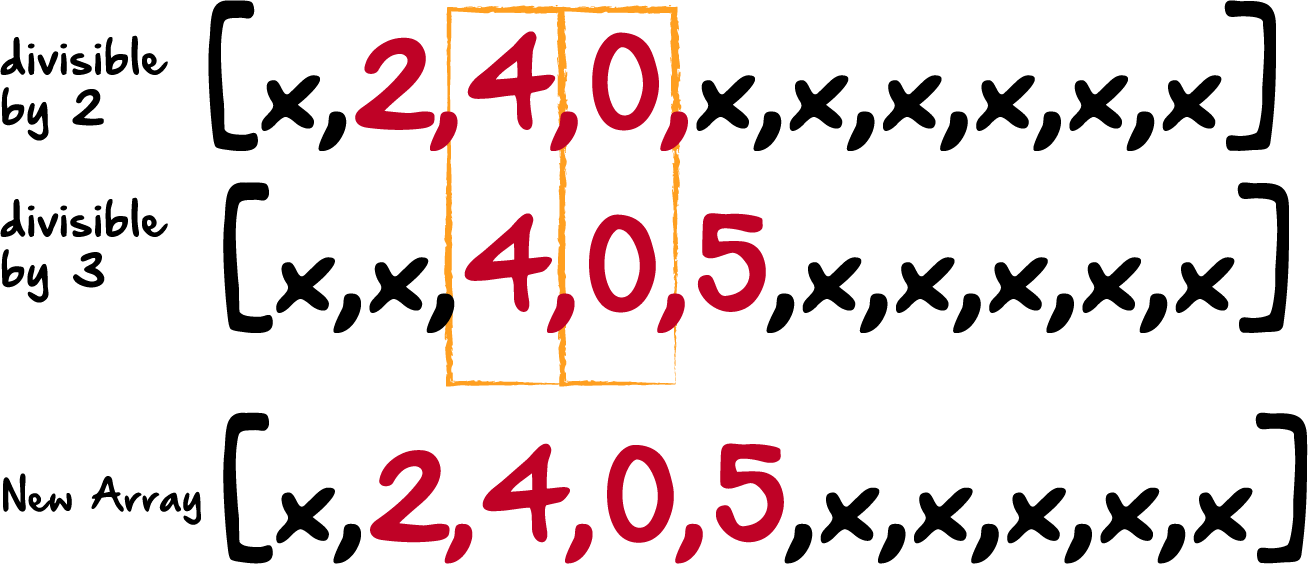
I would be checking to see if index 2 and 3 of array1, and index 2 and 3 of array2 match. If there’s a match, I create a new array, including the first number from array1, and the last number from array2. Then, I would do the same thing, comparing the new array, with the array of numbers divisible by 5, like so:
With each loop, I would add one digit onto my magical set of numbers. Here’s the actual JavaScript code, using nested for loops to make each match.
let finalArr9 = [];
  for (var i = 0; i < testArr2.length; i++) {
    for (var k = 0; k < testArr3.length; k++) {
      let tempArr = ["x","x","x","x","x","x","x","x","x","x"];
      if(testArr2[i][2] == testArr3[k][2] &&
         testArr2[i][3] == testArr3[k][3]){
           tempArr[1] = testArr2[i][1];
           tempArr[2] = testArr2[i][2];
           tempArr[3] = testArr2[i][3];
           tempArr[4] = testArr3[k][4];
           finalArr9.push(tempArr);
         }
    }
  }
  let finalArr10 = [];
  for (var i = 0; i < finalArr9.length; i++) {
    for (var k = 0; k < testArr4.length; k++) {
      let tempArr = ["x","x","x","x","x","x","x","x","x","x"];
      if(finalArr9[i][3] == testArr4[k][3] &&
         finalArr9[i][4] == testArr4[k][4]){
           tempArr[1] = finalArr9[i][1];
           tempArr[2] = finalArr9[i][2];
           tempArr[3] = finalArr9[i][3];
           tempArr[4] = finalArr9[i][4];
           tempArr[5] = testArr4[k][5];
           finalArr10.push(tempArr);
         }
    }
  }
  let finalArr11 = [];
  for (var i = 0; i < finalArr10.length; i++) {
    for (var k = 0; k < testArr5.length; k++) {
      let tempArr = ["x","x","x","x","x","x","x","x","x","x"];
      if(finalArr10[i][4] == testArr5[k][4] &&
         finalArr10[i][5] == testArr5[k][5]){
           tempArr[1] = finalArr10[i][1];
           tempArr[2] = finalArr10[i][2];
           tempArr[3] = finalArr10[i][3];
           tempArr[4] = finalArr10[i][4];
           tempArr[5] = finalArr10[i][5];
           tempArr[6] = testArr5[k][6];
           finalArr11.push(tempArr);
         }
    }
  }
  let finalArr12 = [];
  for (var i = 0; i < finalArr11.length; i++) {
    for (var k = 0; k < testArr6.length; k++) {
      let tempArr = ["x","x","x","x","x","x","x","x","x","x"];
      if(finalArr11[i][5] == testArr6[k][5] &&
         finalArr11[i][6] == testArr6[k][6]){
           tempArr[1] = finalArr11[i][1];
           tempArr[2] = finalArr11[i][2];
           tempArr[3] = finalArr11[i][3];
           tempArr[4] = finalArr11[i][4];
           tempArr[5] = finalArr11[i][5];
           tempArr[6] = finalArr11[i][6];
           tempArr[7] = testArr6[k][7];
           finalArr12.push(tempArr);
         }
    }
  }
  let finalArr13 = [];
  for (var i = 0; i < finalArr12.length; i++) {
    for (var k = 0; k < testArr7.length; k++) {
      let tempArr = ["x","x","x","x","x","x","x","x","x","x"];
      if(finalArr12[i][6] == testArr7[k][6] &&
         finalArr12[i][7] == testArr7[k][7]){
           tempArr[1] = finalArr12[i][1];
           tempArr[2] = finalArr12[i][2];
           tempArr[3] = finalArr12[i][3];
           tempArr[4] = finalArr12[i][4];
           tempArr[5] = finalArr12[i][5];
           tempArr[6] = finalArr12[i][6];
           tempArr[7] = finalArr12[i][7];
           tempArr[8] = testArr7[k][8];
           finalArr13.push(tempArr);
         }
    }
  }
  let finalArr14 = [];
  for (var i = 0; i < finalArr13.length; i++) {
    for (var k = 0; k < testArr8.length; k++) {
      let tempArr = ["x","x","x","x","x","x","x","x","x","x"];
      if(finalArr13[i][7] == testArr8[k][7] &&
         finalArr13[i][8] == testArr8[k][8]){
           tempArr[1] = finalArr13[i][1];
           tempArr[2] = finalArr13[i][2];
           tempArr[3] = finalArr13[i][3];
           tempArr[4] = finalArr13[i][4];
           tempArr[5] = finalArr13[i][5];
           tempArr[6] = finalArr13[i][6];
           tempArr[7] = finalArr13[i][7];
           tempArr[8] = finalArr13[i][8];
           tempArr[9] = testArr8[k][9];
           finalArr14.push(tempArr);
         }
    }
  }
At this point, I should have all of my arrays, completely full of numbers, except for the first digit, so I loop through all my new arrays, and I find out which digit of 0–9 is missing, and add that digit to index 1 of the array.
let finalArr15 = [];
  for (var i = 0; i < finalArr14.length; i++) {
    let tempArr = ["x","x","x","x","x","x","x","x","x","x"];
    tempArr[1] = finalArr14[i][1];
    tempArr[2] = finalArr14[i][2];
    tempArr[3] = finalArr14[i][3];
    tempArr[4] = finalArr14[i][4];
    tempArr[5] = finalArr14[i][5];
    tempArr[6] = finalArr14[i][6];
    tempArr[7] = finalArr14[i][7];
    tempArr[8] = finalArr14[i][8];
    tempArr[9] = finalArr14[i][9];
    if (finalArr14[i].includes(0)==false){
      tempArr[0] = 0;
    }
    else if (finalArr14[i].includes(1)==false){
      tempArr[0] = 1;
    }
    else if (finalArr14[i].includes(2)==false){
      tempArr[0] = 2;
    }
    else if (finalArr14[i].includes(3)==false){
      tempArr[0] = 3;
    }
    else if (finalArr14[i].includes(4)==false){
      tempArr[0] = 4;
    }
    else if (finalArr14[i].includes(5)==false){
      tempArr[0] = 5;
    }
    else if (finalArr14[i].includes(6)==false){
      tempArr[0] = 6;
    }
    else if (finalArr14[i].includes(7)==false){
      tempArr[0] = 7;
    }
    else if (finalArr14[i].includes(8)==false){
      tempArr[0] = 8;
    }
    else if (finalArr14[i].includes(9)==false){
      tempArr[0] = 9;
    }
    if(tempArr[0] !== 0){
    finalArr15.push(tempArr);
  }
  }
Now, If you did it this way, which I hope you didn’t because I know it’s garbage, but whatever. Like I said, I’m definitely not a great mathematician. But, whatever. If you did it like me, you ended up with a butt load of duplicates. So, I looped through them all again, and if they included a digit twice, I don’t use it.
let finalArr16 = [];
  for (var i = 0; i < finalArr15.length; i++) {
    if(
      finalArr15[i].includes(0) == true &&
      finalArr15[i].includes(1) == true &&
      finalArr15[i].includes(2) == true &&
      finalArr15[i].includes(3) == true &&
      finalArr15[i].includes(4) == true &&
      finalArr15[i].includes(5) == true &&
      finalArr15[i].includes(6) == true &&
      finalArr15[i].includes(7) == true &&
      finalArr15[i].includes(8) == true &&
      finalArr15[i].includes(9) == true
    ){
      finalArr16.push(finalArr15[i]);
    }

  }
After all that, you end up with only six matches:
Then, it’s simply a matter of converting the arrays back to numbers, and adding them together.
I know this is by far not the best solution, but, for a not mathematician, I think I did okay. I’m going to go give myself a bit pat on the back, drink an ice cold root beer, and eat a half pint of ice cream.
A JavaScript interview often consists of fundamental JavaScript theory questions. Although it is not possible to cover everything about JavaScript, this post will give you an opportunity to test your knowledge.
You have probably seen that most tests contain questions that are a bit outdated. This test reflects 2017-18 standards, which means that you can, and sometimes you have to make use of your ES6 knowledge.
I suggest answering the questions one by one, so that you can grade yourself. Once you figure out your shortcomings, you can construct a learning plan for yourself.
Without looking at the solutions, you can access all ten questions at once here. I encourage you to solve the exercises on your own. Take out your favorite text editor or a piece of paper, and write down your answers. At first, do not use Google.
var and let variables. What is the temporal
dead zone? (6 points)prototype property via an
example! (5 points)this value in JavaScript! Illustrate your
explanation with an example! (6 points)== and ===
in general. Determine the result of a comparison, when two values are:
null and undefined,NaN to itself'5' (6 points)if ( typeof x === 'object' ) {
x.visited = true;
}The maximum score is 50 points. Multiply your score by 2 to get your percentage. As you are not reading a bullshit horoscope test, I will not describe what each score range means to you. You can easily figure it out yourself. Note though that this test is in strict mode, in most interviews, your interviewers are a lot more forgiving.
Once you are done with all the answers, start searching for relevant information that can improve your solutions. Make sure you write these enhancements with a different color, or in a different document.
Verify your original solutions, the ones without using Google. Determine your score.
Verify your enhanced solutions. Have you missed anything?
Special thanks to senocular for the valuable comments that made the reference solutions a lot more accurate than the first version.
Explain scoping in JavaScript! Enumerate the different types of scopes you know about. (6 points)
Answer:
The scope of variables determines where you can access them in your code. (1 point)
Without taking ES6 modules into consideration, scope can be global or local. (1 point) In modules, a third scope is the module scope.
Global scope consists of global variables and constants that can be accessed from anywhere in your code. (1 point)
Local scope can be local to a function or a block. (1 point)
Variables defined using var inside a function have
function scope. These variables are accessible/visible inside the
function they are defined in. (1 point)
Variables and constants defined inside a block using let
and const have block scope. They are accessible/visible
inside the block they are defined in. (1 point)
When var, let, or const are
used in global or module scope, their scope is obviously going to be
global or module.
Explain hoisting with one or more examples including var
and let variables. What is the temporal dead zone? (6
points)
Answer: In JavaScript, variable declarations are hoisted to the top of their scope. (1 point)
Both function and block scoped variables are hoisted to the top of their scope. (1 point)
In case of function scoped variables, the value of a variable before
its first assignment takes place is undefined. (1
point)
In case of a block scoped variable, its value is inaccessible before the intended location of its declaration. This is called the temporal dead zone. Accessing a variable in its temporal dead zone results in a thrown error. (1 point)
Example for block scope: (1 point)
{
console.log( x );
let x = 3;
}
// Uncaught ReferenceError: x is not definedReason:
{
// let x; is hoisted to the top of the block
console.log( x ); // temporal dead zone
let x = 3;
}Tricky example:
{
try { console.log( x ); } catch( _ ) { console.log( 'error' ); }
let x;
console.log( x );
x = 3;
}
// error
// undefinedReason:
{
// let x; // hoisting
// start of temporal dead zone for x
try { console.log( x ); } catch( _ ) { console.log( 'error' ); }
// end of temporal dead zone for x
// x = undefined; // at the point of its intended declaration
console.log( x );
x = 3;
}Example for function scope: (1 point)
const f = function() {
// var x; is hoisted to the top
console.log( x );
var x = 3;
}
f();
// undefinedExplain the role of the prototype property via an
example! (5 points)
Answer: JavaScript functions defined using the ES5 syntax have prototypes. (1 point)
Remark: ES6 arrow functions don’t have prototypes. Methods defined using the concise method syntax don’t have prototypes.
These prototypes become important once a function is used for instantiation. In JavaScript terminology, these functions are constructor functions. (1 point)
A prototype may contain functions that are available in every instance of created by the constructor functions. (1 point)
Example:
function Wallet() {
this.amount = 0;
}
Wallet.prototype.deposit = function( amount ) {
this.amount += amount;
}
Wallet.prototype.withdraw = function( amount ) {
if ( this.amount >= amount ) {
this.amount -= amount;
} else {
throw 'Insufficient funds.';
}
}
let myWallet = new Wallet();
myWallet.deposit( 100 );
myWallet.amount
// 100(2 points)
Extend your example from question 3 to demonstrate prototypal inheritance! (5 points)
Answer:
function BoundedWallet( maxAmount ) {
Wallet.call( this ); // 1 point
this.maxAmount = maxAmount; // 1 point
}
BoundedWallet.prototype = Object.create( Wallet.prototype ); // 1 point
BoundedWallet.prototype.constructor = BoundedWallet; // 1 point
BoundedWallet.prototype.deposit = function( amount ) {
if ( this.amount + amount > this.maxAmount ) {
throw 'Insufficient wallet capacity';
}
Wallet.prototype.deposit.call( this, amount ); // this.amount += amount;
} // 1 pointOne construct worth mentioning is
Wallet.prototype.deposit.call( this, amount );. Here
instead of writing this.amount += amount;, it is
semantically more correct to reuse the deposit
functionality of the base class. In ES5, this is the way to go.
Although the rest of the code is not self-explanatory, you can find an explanation for a very similar example in Chapter 4: Classes of ES6 in Practice. You can access this chapter even in the free sample.
Use the ES6 class syntax to rewrite the code you wrote in questions 3 and 4. (7 points)
Answer:
class Wallet { // 1 point
constructor() { this.amount = 0; } // 1 point
deposit( amount ) { this.amount += amount; }
withdraw( amount ) {
if ( this.amount >= amount ) {
this.amount -= amount;
} else {
throw 'Insufficient funds.';
}
} // 1 point
}
class BoundedWallet extends Wallet { // 1 point
constructor( maxAmount ) {
super(); // 1 point
this.maxAmount = maxAmount;
}
deposit( amount ) {
if ( this.amount + amount > this.maxAmount ) {
throw 'Insufficient wallet capacity';
}
super.deposit( amount );
} // 1 point
}
let myWallet = new Wallet();
myWallet.deposit( 100 );
myWallet.amount // 1 point
// 100You need to demonstrate the following six items for a complete solution:
class keyword, class name, and braces to define a
constructor functionextends keywordsuper in the constructor of the child
classsuper.deposit( amount ); accessed the deposit method of the
Wallet classFor more information, read Chapter 4: Classes of ES6 in Practice of ES6 in Practice.
Explain the this value in JavaScript! Illustrate your
explanation with an example! (6 points)
Answer: In JavaScript, this is a global
or function scoped variable. (1 point)
When used in global scope, this equals the global
object, which is window in the browser. (1 point)
When used inside a function, the value of this is
dynamically determined when the function is called and its value equals
the context of the function. (2 points)
Example:
class C { f() { return this; } }
class D extends C {}
const d = new D();
console.log( d.f() === d );
// trueHere, f() was inherited with prototypal inheritance from
class C. When creating the d object using the
class (constructor function) D, any method of
d gets this assigned to d. (2
points)
The value of this can be changed using context
binding. (1 point)
Explain context binding using an example. (3 points)
Answer:
let f = function() {
console.log( this );
}
f.bind( {a: 5} )();
> {a: 5}( 2 points)
f.bind( {a: 5} ) creates a function, where the value of
this becomes {a: 5}. (1 point)
Explain the difference between == and ===
in general. Determine the result of a comparison, when two values
are:
null and undefined,NaN to itself'5'Symbol.for( 'a' ) to Symbol.for( 'a' ) (6
points)Answer: == converts its operands to the
same type, while === is type safe, and is only equal when
the types and values are equal. (1 point)
There are six primitive datatypes in JavaScript: boolean, null, undefined, number, string, and symbol.
For null values, undefined values, booleans, strings, and numbers
except NaN, a == b and a === b
yield the same result, which is true whenever the values
are the same. (1 point, you may miss the NaN exception)
For NaN, NaN == NaN and
NaN === NaN is false. (1 point)
When it comes to arrays and objects, both == and
=== compare the references. So, for instance,
let a = [], b = [], c = a;
// a == b // or a === b
false
// a == c // or a === c
true(1 point)
The null == undefined comparison is true by
definition. null === undefined is false. You may argue why
this is worth a point. In practice, you must have encountered this case
during writing code. If you are unsure about this comparison, this may
indicate lack of hands on experience. (1 point)
5 === '5' is false, because the types don’t match. In
case of 5 == '5', the string operand is converted to a
number. As the number values match, the result is true. (1 point)
Whenever a Symbol is created, they are always unique.
Therefore,
// Symbol() == Symbol()
falseWhen using the global symbol registry, we get the exact same symbol
belonging to the string 'a', whenever we call
Symbol.for( 'a' ). Therefore,
// Symbol.for( 'a' ) === Symbol.for( 'a' ) // or ==
true(1 point)
Don’t confuse Symbol.for( 'a' ) with
Symbol( 'a' ). Only the former accesses the global symbol
registry. The latter is a mere label associated with the symbol, and
different symbols may have the same label:
// Symbol( 'a' ) == Symbol( 'a' )
false
// Symbol.for( 'a' ) == Symbol( 'a' )
falseFor more information, check out my post ES6 Symbols and their Use Cases.
How can you check if a variable is an array? (2 points)
Answer:
Array.isArray( x ) gives you a true result
if and only if x is an array. (2 points)
If you don’t know the above check, you can still invent your own
array type checker function. This function may be less correct than
Array.isArray, as it may not work in exceptional cases.
The check x.constructor === Array is incorrect and is
worth zero points, because we could extend the Array class:
class MyArray extends Array {}
let x = new MyArray();
Array.isArray( x )
// true
x.constructor === Array
// falseYou might have used this check in your code before, so if you can
recall the '[object Array]' value of the
Object.prototype.toString function applied on an array,
then you definitely deserve the points.
// Object.prototype.toString.call( [] )
"[object Array]"
// Object.prototype.toString.call( x ) === "[object Array]"An almost correct check is the usage of the instanceof
operator:
x instanceof Array
// trueIn an interview setting, I would accept the instanceof
solution, because it is generally not expected to look up edge cases
described by e.g. this
StackOverflow article, where instanceof gives a
different result than Array.isArray.
In case the solution mentions that it is not perfect, a thorough
definition using the typeof operator is worth 1 point:
typeof x === 'object' &&
typeof x.length === 'number' &&
typeof x.push === 'function'Suppose we would like to detect if a variable is an object using the following code:
if ( typeof x === 'object' ) {
    x.visited = true;
}What can go wrong? How would you fix this error? (4 points)
Answer:
typeof null is also an object. (1 point)
The value null cannot have properties, so the code will
crash with an error. (1 point)
We have to add a null check in the condition. (1 point)
if ( x !== null && typeof x === 'object' ) {
    x.visited = true;
}
If you prefer not including arrays, you can use your array checker from question 8 to exclude arrays. (1 point)