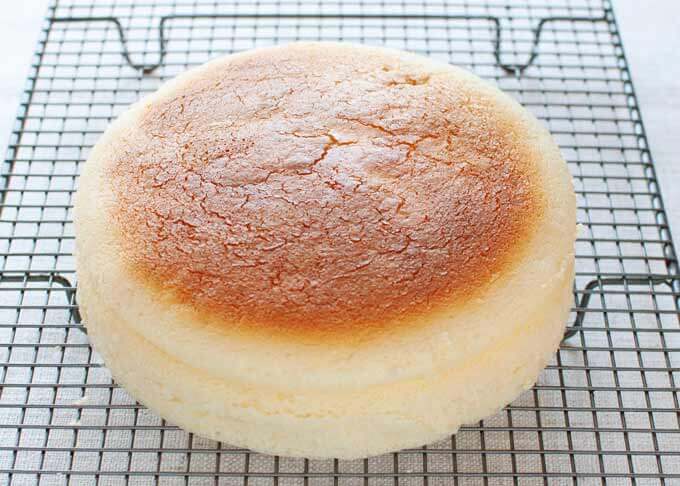
Light, fluffy, moist and less sweet than any other cheesecakes -
Japanese Cheesecake is not difficult to make. But if you want to perfect
it with a smooth surface and soufflé texture, you need to do a bit
extra. And it’s worth the effort as it’s so delicious.
The time does not include the time to cool down the cheesecake on a
rack.
A baking tray or a large non loose-base cake pan to comfortably fit
in the cake pan , for water bath
An oven tray or a baking tray to place a water bath tray on
Hot water , about 80C (176F)
Instructions
Pre-heat the oven to 160C (320F). (note 2)
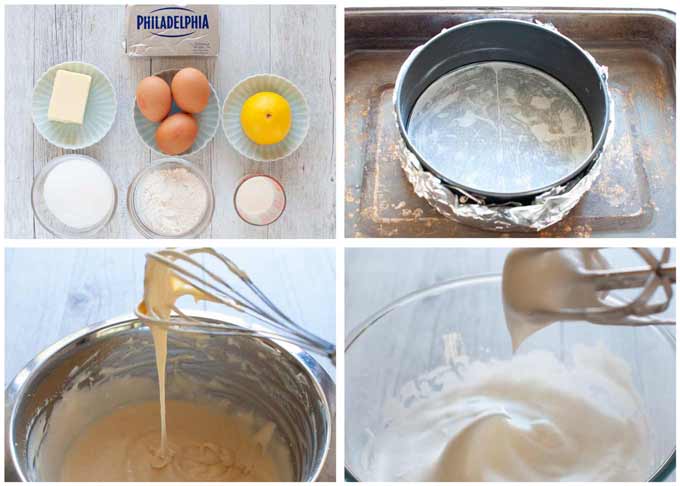
Grease the bottom and the side of the cake pan with butter (not in
ingredients) and line the bottom with baking paper (note 3).
If the cake pan has a loose bottom, cover the bottom and side of the
cake pan with large aluminium foil (or a disposable round aluminium
tray) so that the foil continuously covers the bottom and the side to
just below the rim.
Add cream cheese in a bowl and whisk over water bath (not too hot)
to soften the cream cheese. Add butter and whisk until the mixture
becomes creamy with no lumps.
Remove the bowl from the water bath and add the remaining Batter
ingredients one by one in the order of the ingredients list. Mix every
time an ingredient is added. Mix well until the colour of the batter
becomes consistent.
In a new bowl, add egg whites and beat until they become foamy.
Add sugar in 3-4 batches while beating the egg whites fast. Beat
until soft peaks form (note 4).
Add a third of the meringue to the batter and fold gently using a
spatula until white meringue mixes into the batter.
Now transfer the batter to the meringue bowl and fold gently until
the trace of the white meringue disappears.
Pour the batter into the cake pan. Drop the pan from 10cm (4”) high
few times to remove air bubbles.
Baking
Place the cake pan in a deep baking tray or a large non loose-base
cake tin. Fill hot water to 1.5cm (⅝”) high (water bath).
Place an oven tray/baking tray on the middle rack of the oven, place
the water bath tray with the cake pan inside and bake for 20
minutes.
Reduce the heat to 140C (284F) and bake further 40 minutes.
Turn off the oven and leave the cake in the oven for 30 minutes
(note 5).
Insert a thin bamboo stick in the middle of the cake. If it comes
out dry, the cake is cooked. If still slightly wet, turn the oven on to
160C (320F) and cook for 5-10 minutes.
Remove the cake from the water bath and gradually cool the cake down
for further 20 minutes in the oven by slightly leaving the oven door by
sticking the oven mitt or a cloth to the door (note 6).
Remove the cake from the cake tin and place the cake on a rack to
cool down to room temperature.
Better to be served after chilling it in the fridge. (note 7)
Recipe Notes
Note 1: It will make a cheese cake about 4.5cm (1¾”)
high. If you are using a 20cm or 23 cm (8” or 9”) cake pan, you may want
to increase the ingredients by a quarter or a third to maintain the
height of the cake (a third is easier considering the eggs). The first
cooking time at 160C (320F) needs to be increased to 30 minutes but the
rest of the instructions remains the same.
Note 2: Temperature is critical. Make sure that the
inside of the oven is the right temperature as some ovens have
discrepancies between the actual inside temperature and what the setting
indicates. Also, I used a fan forced oven. A standard oven needs to be a
bit higher but do not go too high. It is better to have a lower than
required temperature than higher.
Note 3: I don’t line the side of the tin because it
will leave creased mark on the side of the cake. But if you are not
concerned about it, line the side of the cake tin and grease with
butter.
Note 4: Soft peaks: When you lift the whisker, the
meringue forms a peak but then slowly folds. Do not beat too much or you
will get a hard peak – the meringue peak does not fold and is stiff.
Note 5: This is to prevent the inflated cake from
collapsing. It also continues to cook the cake.
Note 6: This step can be skipped if you are in a
hurry, though the cheesecake might shrink a little bit.
Note 7: Japanese Cheesecake looks attractive as it is
with no decorations but if you insist, you could sprinkle icing sugar
over it. The icing sugar will dissolve as time goes by so decorate just
before serving. I am not a fan of topping the cake with jam syrup or
icing sugar as I believe it defeats the whole idea of lightly sweetened
cake. But if you have a sweet tooth, why not?
Note 8: Because each oven is different and the volume
of the cake can vary even slightly, you may find that the surface of the
baked cake is not as brown as my cake. If you wish to make it browner,
you can turn the upper heat on for a short while. But don’t over
bake.