
Samer Buna
Node.js streams have a reputation for being hard to work with, and even harder to understand. Well I’ve got good news for you — that’s no longer the case.
Over the years, developers created lots of packages out there with the sole purpose of making working with streams easier. But in this article, I’m going to focus on the native Node.js stream API.
“Streams are Node’s best and most misunderstood idea.” — Dominic Tarr
Streams are collections of data — just like arrays or strings. The difference is that streams might not be available all at once, and they don’t have to fit in memory. This makes streams really powerful when working with large amounts of data, or data that’s coming from an external source one chunk at a time.
However, streams are not only about working with big data. They also give us the power of composability in our code. Just like we can compose powerful linux commands by piping other smaller Linux commands, we can do exactly the same in Node with streams.
const grep = ... // A stream for the grep output
const wc = ... // A stream for the wc inputgrep.pipe(wc)Many of the built-in modules in Node implement the streaming interface:
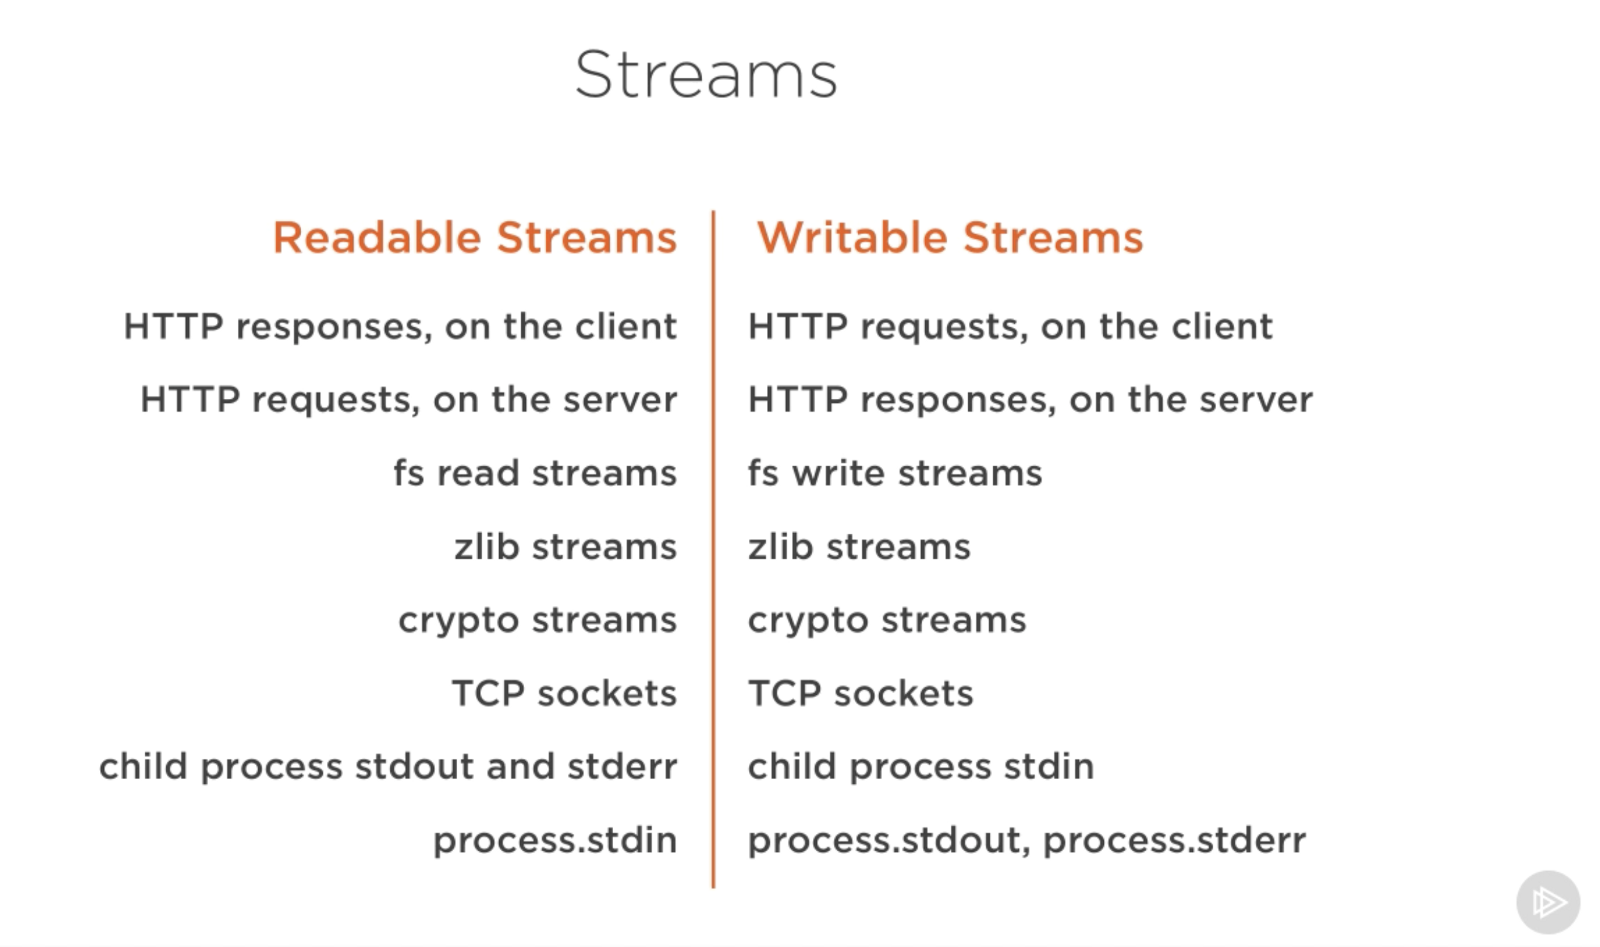
The list above has some examples for native Node.js objects that are also readable and writable streams. Some of these objects are both readable and writable streams, like TCP sockets, zlib and crypto streams.
Notice that the objects are also closely related. While an HTTP
response is a readable stream on the client, it’s a writable stream on
the server. This is because in the HTTP case, we basically read from one
object (http.IncomingMessage) and write to the other
(http.ServerResponse).
Also note how the stdio streams (stdin,
stdout, stderr) have the inverse stream types
when it comes to child processes. This allows for a really easy way to
pipe to and from these streams from the main process stdio
streams.
Theory is great, but often not 100% convincing. Let’s see an example demonstrating the difference streams can make in code when it comes to memory consumption.
Let’s create a big file first:
const fs = require('fs');
const file = fs.createWriteStream('./big.file');

for(let i=0; i<= 1e6; i++) {
  file.write('Lorem ipsum dolor sit amet, consectetur adipisicing elit, sed do eiusmod tempor incididunt ut labore et dolore magna aliqua. Ut enim ad minim veniam, quis nostrud exercitation ullamco laboris nisi ut aliquip ex ea commodo consequat. Duis aute irure dolor in reprehenderit in voluptate velit esse cillum dolore eu fugiat nulla pariatur. Excepteur sint occaecat cupidatat non proident, sunt in culpa qui officia deserunt mollit anim id est laborum.\n');
}

file.end();
Look what I used to create that big file. A writable stream!
The fs module can be used to read from and write to
files using a stream interface. In the example above, we’re writing to
that big.file through a writable stream 1 million lines
with a loop.
Running the script above generates a file that’s about ~400 MB.
Here’s a simple Node web server designed to exclusively serve the
big.file:
const fs = require('fs');
const server = require('http').createServer();

server.on('request', (req, res) => {
  fs.readFile('./big.file', (err, data) => {
    if (err) throw err;

    res.end(data);
  });
});

server.listen(8000);
When the server gets a request, it’ll serve the big file using the
asynchronous method, fs.readFile. But hey, it’s not like
we’re blocking the event loop or anything. Every thing is great, right?
Right?
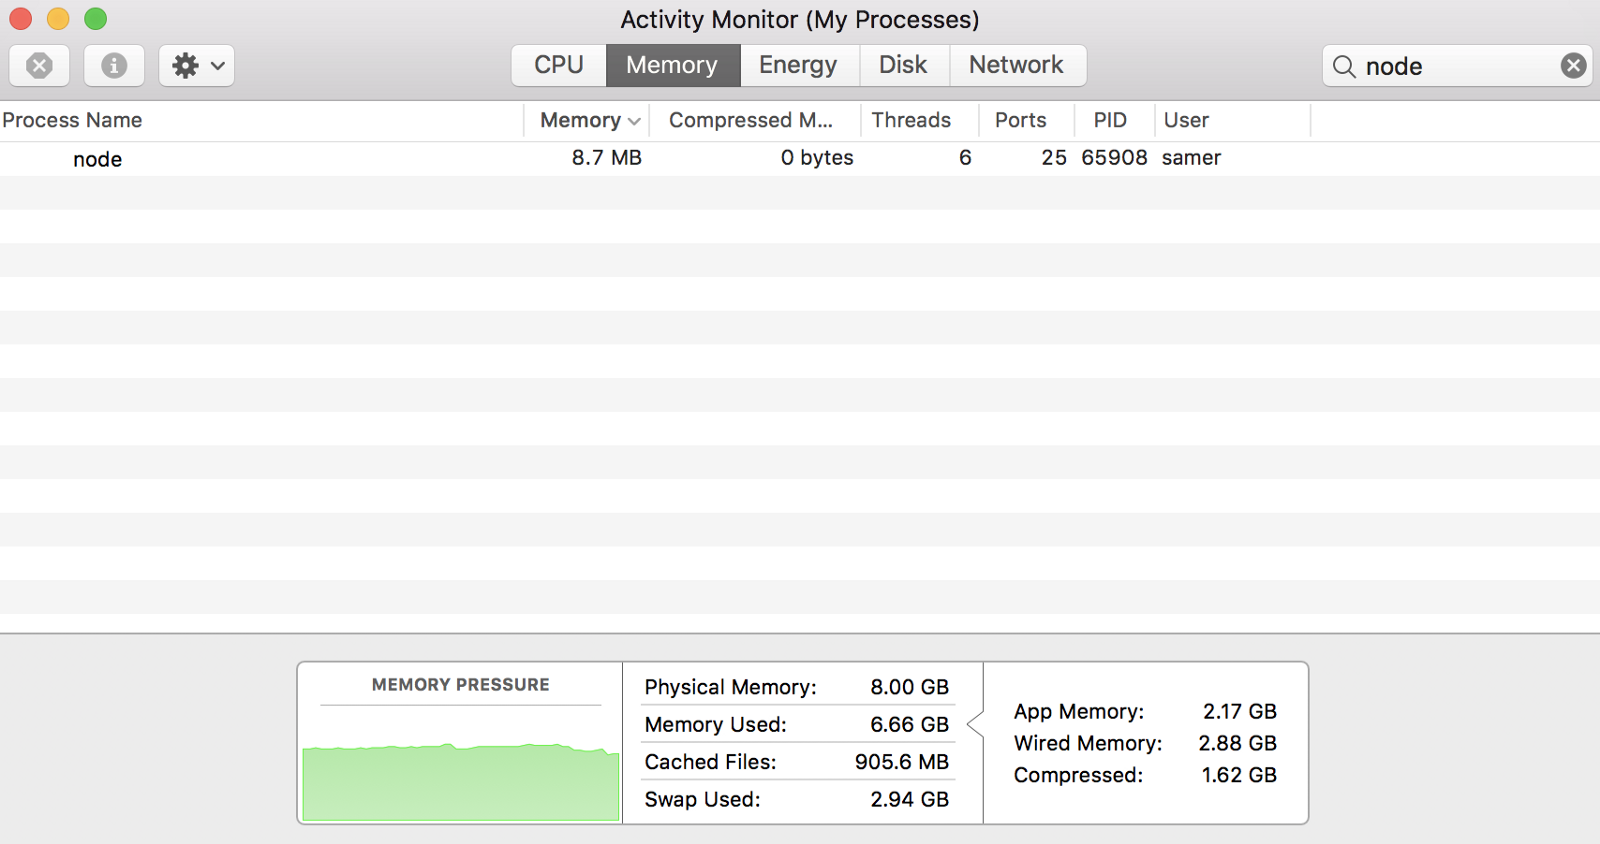
Well, let’s see what happens when we run the server, connect to it, and monitor the memory while doing so.
When I ran the server, it started out with a normal amount of memory, 8.7 MB:
Then I connected to the server. Note what happened to the memory consumed:
Wow — the memory consumption jumped to 434.8 MB.
We basically put the whole big.file content in memory
before we wrote it out to the response object. This is very
inefficient.
The HTTP response object (res in the code above) is also
a writable stream. This means if we have a readable stream that
represents the content of big.file, we can just pipe those
two on each other and achieve mostly the same result without consuming
~400 MB of memory.
Node’s fs module can give us a readable stream for any
file using the createReadStream method. We can pipe that to
the response object:
const fs = require('fs');
const server = require('http').createServer();

server.on('request', (req, res) => {
  const src = fs.createReadStream('./big.file');
  src.pipe(res);
});

server.listen(8000);
Now when you connect to this server, a magical thing happens (look at the memory consumption):
What’s happening?
When a client asks for that big file, we stream it one chunk at a time, which means we don’t buffer it in memory at all. The memory usage grew by about 25 MB and that’s it.
You can push this example to its limits. Regenerate the
big.file with five million lines instead of just one
million, which would take the file to well over 2 GB, and that’s
actually bigger than the default buffer limit in Node.
If you try to serve that file using fs.readFile, you
simply can’t, by default (you can change the limits). But with
fs.createReadStream, there is no problem at all streaming 2
GB of data to the requester, and best of all, the process memory usage
will roughly be the same.
Ready to learn streams now?
This article is a write-up of part of my Pluralsight course about Node.js. I cover similar content in video format there.
There are four fundamental stream types in Node.js: Readable, Writable, Duplex, and Transform streams.
fs.createReadStream
method.fs.createWriteStream method.zlib.createGzip stream to compress the data
using gzip. You can think of a transform stream as a function where the
input is the writable stream part and the output is readable stream
part. You might also hear transform streams referred to as “through
streams.”All streams are instances of EventEmitter. They emit
events that can be used to read and write data. However, we can consume
streams data in a simpler way using the pipe method.
Here’s the magic line that you need to remember:
readableSrc.pipe(writableDest)In this simple line, we’re piping the output of a readable stream — the source of data, as the input of a writable stream — the destination. The source has to be a readable stream and the destination has to be a writable one. Of course, they can both be duplex/transform streams as well. In fact, if we’re piping into a duplex stream, we can chain pipe calls just like we do in Linux:
readableSrc
  .pipe(transformStream1)
  .pipe(transformStream2)
  .pipe(finalWrtitableDest)
The pipe method returns the destination stream, which
enabled us to do the chaining above. For streams a
(readable), b and c (duplex), and
d (writable), we can:
a.pipe(b).pipe(c).pipe(d)Which is equivalent to:
a.pipe(b)
b.pipe(c)
c.pipe(d)
Which, in Linux, is equivalent to:
$ a | b | c | dThe pipe method is the easiest way to consume streams.
It’s generally recommended to either use the pipe method or
consume streams with events, but avoid mixing these two. Usually when
you’re using the pipe method you don’t need to use events,
but if you need to consume the streams in more custom ways, events would
be the way to go.
Beside reading from a readable stream source and writing to a
writable destination, the pipe method automatically manages
a few things along the way. For example, it handles errors,
end-of-files, and the cases when one stream is slower or faster than the
other.
However, streams can also be consumed with events directly. Here’s
the simplified event-equivalent code of what the pipe
method mainly does to read and write data:
readable.pipe(writable)readable.on('data', (chunk) => {
writable.write(chunk);
});readable.on('end', () => {
writable.end();
});Here’s a list of the important events and functions that can be used with readable and writable streams:
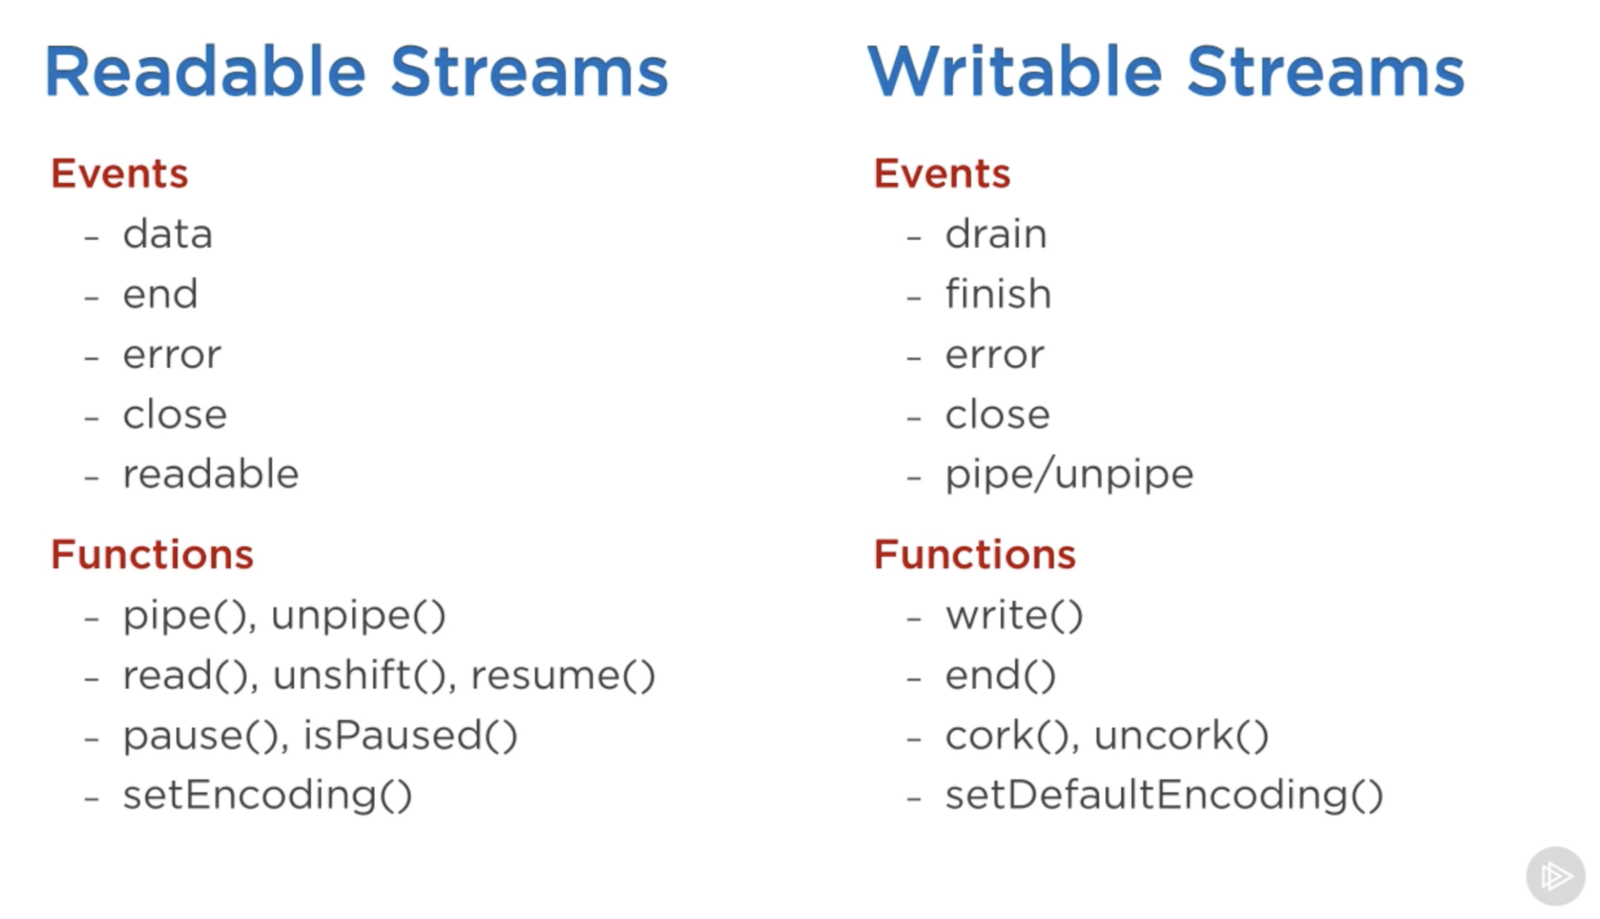
The events and functions are somehow related because they are usually used together.
The most important events on a readable stream are:
data event, which is emitted whenever the stream
passes a chunk of data to the consumerend event, which is emitted when there is no more
data to be consumed from the stream.The most important events on a writable stream are:
drain event, which is a signal that the writable
stream can receive more data.finish event, which is emitted when all data has
been flushed to the underlying system.Events and functions can be combined to make for a custom and
optimized use of streams. To consume a readable stream, we can use the
pipe/unpipe methods, or the
read/unshift/resume methods. To
consume a writable stream, we can make it the destination of
pipe/unpipe, or just write to it with the
write method and call the end method when
we’re done.
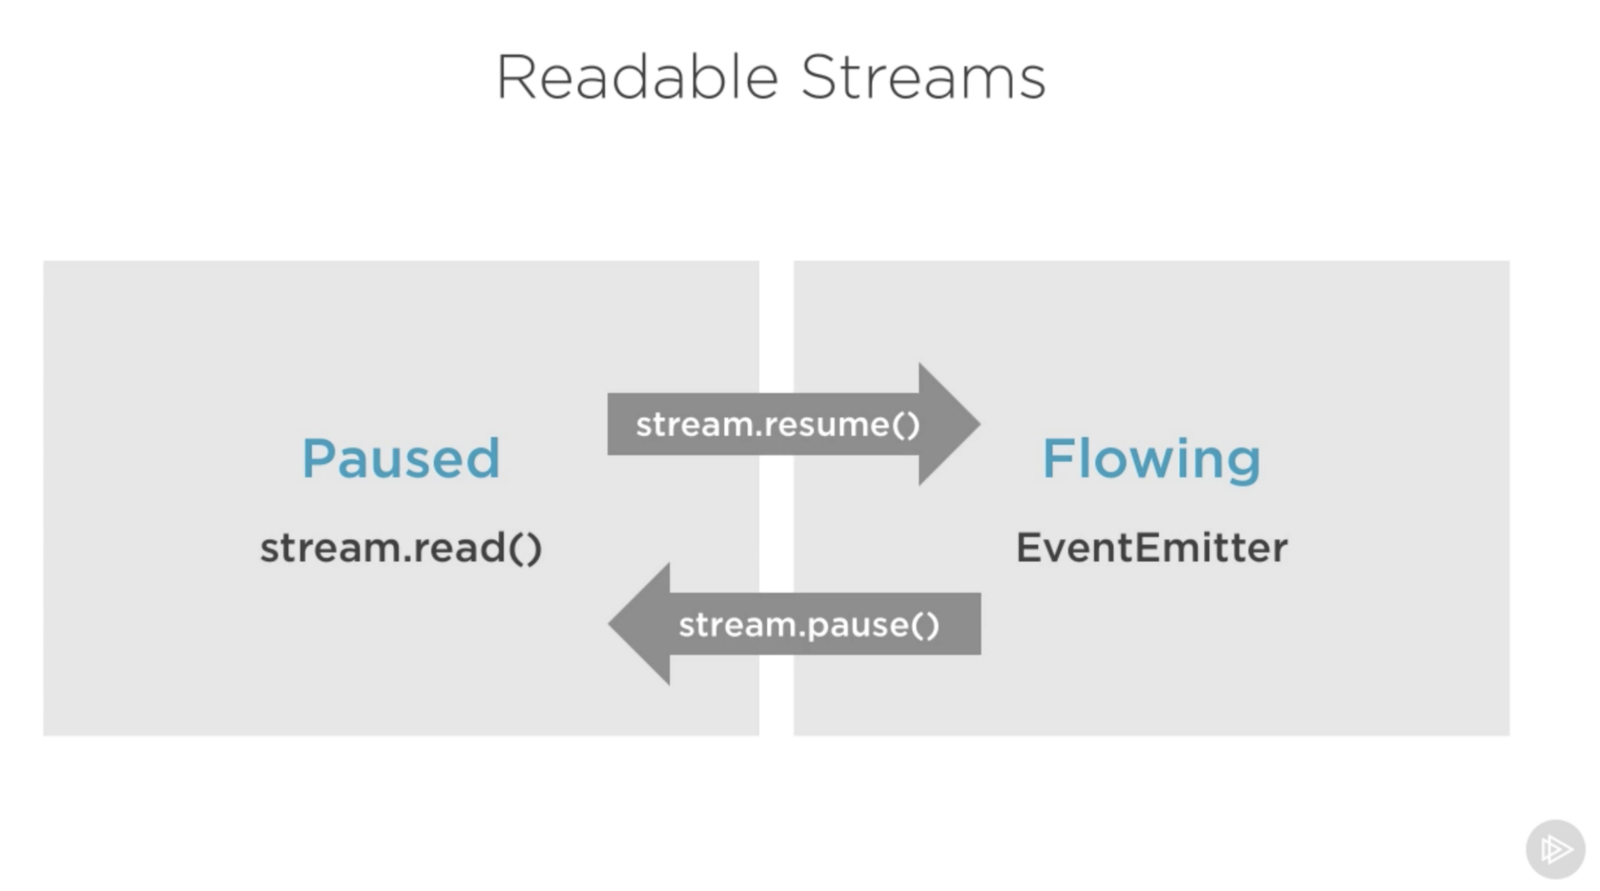
Readable streams have two main modes that affect the way we can consume them:
Those modes are sometimes referred to as pull and push modes.
All readable streams start in the paused mode by default but they can be easily switched to flowing and back to paused when needed. Sometimes, the switching happens automatically.
When a readable stream is in the paused mode, we can use the
read() method to read from the stream on demand, however,
for a readable stream in the flowing mode, the data is continuously
flowing and we have to listen to events to consume it.
In the flowing mode, data can actually be lost if no consumers are
available to handle it. This is why, when we have a readable stream in
flowing mode, we need a data event handler. In fact, just
adding a data event handler switches a paused stream into
flowing mode and removing the data event handler switches
the stream back to paused mode. Some of this is done for backward
compatibility with the older Node streams interface.
To manually switch between these two stream modes, you can use the
resume() and pause() methods.
When consuming readable streams using the pipe method,
we don’t have to worry about these modes as pipe manages
them automatically.
When we talk about streams in Node.js, there are two main different tasks:
So far we’ve been talking about only consuming streams. Let’s implement some!
Stream implementers are usually the ones who require the
stream module.
To implement a writable stream, we need to to use the
Writable constructor from the stream module.
const { Writable } = require('stream');We can implement a writable stream in many ways. We can, for example,
extend the Writable constructor if we want
class myWritableStream extends Writable {
}
However, I prefer the simpler constructor approach. We just create an
object from the Writable constructor and pass it a number
of options. The only required option is a write function
which exposes the chunk of data to be written.
const { Writable } = require('stream');const outStream = new Writable({
write(chunk, encoding, callback) {
console.log(chunk.toString());
callback();
}
});
process.stdin.pipe(outStream);This write method takes three arguments.
In outStream, we simply console.log the
chunk as a string and call the callback after that without
an error to indicate success. This is a very simple and probably not so
useful echo stream. It will echo back anything it receives.
To consume this stream, we can simply use it with
process.stdin, which is a readable stream, so we can just
pipe process.stdin into our outStream.
When we run the code above, anything we type into
process.stdin will be echoed back using the
outStream console.log line.
This is not a very useful stream to implement because it’s actually
already implemented and built-in. This is very much equivalent to
process.stdout. We can just pipe stdin into
stdout and we’ll get the exact same echo feature with this
single line:
process.stdin.pipe(process.stdout);To implement a readable stream, we require the Readable
interface and construct an object from it:
const { Readable } = require('stream');const inStream = new Readable({});There is a simple way to implement readable streams. We can just
directly push the data that we want the consumers to
consume.
const { Readable } = require('stream'); const inStream = new Readable();inStream.push('ABCDEFGHIJKLM');
inStream.push('NOPQRSTUVWXYZ');inStream.push(null); // No more datainStream.pipe(process.stdout);When we push a null object, that means we
want to signal that the stream does not have any more data.
To consume this simple readable stream, we can simply pipe it into
the writable stream process.stdout.
When we run the code above, we’ll be reading all the data from
inStream and echoing it to the standard out. Very simple,
but also not very efficient.
We’re basically pushing all the data in the stream before
piping it to process.stdout. The much better way is to push
data on demand, when a consumer asks for it. We can do that by
implementing the read() method in a readable stream
configuration:
const inStream = new Readable({
  read(size) {
    // there is a demand on the data... Someone wants to read it.
  }
});
When the read method is called on a readable stream, the implementation can push partial data to the queue. For example, we can push one letter at a time, starting with character code 65 (which represents A), and incrementing that on every push:
const inStream = new Readable({
  read(size) {
    this.push(String.fromCharCode(this.currentCharCode++));
    if (this.currentCharCode > 90) {
      this.push(null);
    }
  }
});inStream.currentCharCode = 65;inStream.pipe(process.stdout);While the consumer is reading a readable stream, the
read method will continue to fire, and we’ll push more
letters. We need to stop this cycle somewhere, and that’s why an if
statement to push null when the currentCharCode is greater than 90
(which represents Z).
This code is equivalent to the simpler one we started with but now we’re pushing data on demand when the consumer asks for it. You should always do that.
With Duplex streams, we can implement both readable and writable streams with the same object. It’s as if we inherit from both interfaces.
Here’s an example duplex stream that combines the two writable and readable examples implemented above:
const { Duplex } = require('stream');

const inoutStream = new Duplex({
  write(chunk, encoding, callback) {
    console.log(chunk.toString());
    callback();
  },

  read(size) {
    this.push(String.fromCharCode(this.currentCharCode++));
    if (this.currentCharCode > 90) {
      this.push(null);
    }
  }
});

inoutStream.currentCharCode = 65;process.stdin.pipe(inoutStream).pipe(process.stdout);By combining the methods, we can use this duplex stream to read the
letters from A to Z and we can also use it for its echo feature. We pipe
the readable stdin stream into this duplex stream to use
the echo feature and we pipe the duplex stream itself into the writable
stdout stream to see the letters A through Z.
It’s important to understand that the readable and writable sides of a duplex stream operate completely independently from one another. This is merely a grouping of two features into an object.
A transform stream is the more interesting duplex stream because its output is computed from its input.
For a transform stream, we don’t have to implement the
read or write methods, we only need to
implement a transform method, which combines both of them.
It has the signature of the write method and we can use it
to push data as well.
Here’s a simple transform stream which echoes back anything you type into it after transforming it to upper case format:
const { Transform } = require('stream');

const upperCaseTr = new Transform({
  transform(chunk, encoding, callback) {
    this.push(chunk.toString().toUpperCase());
    callback();
  }
});

process.stdin.pipe(upperCaseTr).pipe(process.stdout);
In this transform stream, which we’re consuming exactly like the
previous duplex stream example, we only implemented a
transform() method. In that method, we convert the
chunk into its upper case version and then
push that version as the readable part.
By default, streams expect Buffer/String values. There is an
objectMode flag that we can set to have the stream accept
any JavaScript object.
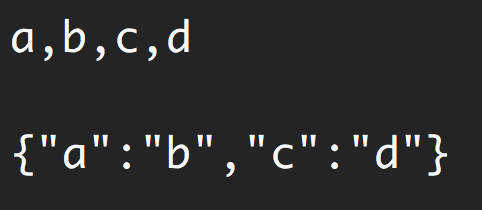
Here’s a simple example to demonstrate that. The following
combination of transform streams makes for a feature to map a string of
comma-separated values into a JavaScript object. So
“a,b,c,d” becomes {a: b, c: d}.
const { Transform } = require('stream');const commaSplitter = new Transform({
readableObjectMode: true, transform(chunk, encoding, callback) {
this.push(chunk.toString().trim().split(','));
callback();
}
});const arrayToObject = new Transform({
readableObjectMode: true,
writableObjectMode: true, transform(chunk, encoding, callback) {
const obj = {};
for(let i=0; i < chunk.length; i+=2) {
obj[chunk[i]] = chunk[i+1];
}
this.push(obj);
callback();
}
});const objectToString = new Transform({
writableObjectMode: true, transform(chunk, encoding, callback) {
this.push(JSON.stringify(chunk) + '\n');
callback();
}
});process.stdin
.pipe(commaSplitter)
.pipe(arrayToObject)
.pipe(objectToString)
.pipe(process.stdout)We pass the input string (for example, “a,b,c,d”)
through commaSplitter which pushes an array as its readable
data ([“a”, “b”, “c”, “d”]). Adding the
readableObjectMode flag on that stream is necessary because
we’re pushing an object there, not a string.
We then take the array and pipe it into the
arrayToObject stream. We need a
writableObjectMode flag to make that stream accept an
object. It’ll also push an object (the input array mapped into an
object) and that’s why we also needed the
readableObjectMode flag there as well. The last
objectToString stream accepts an object but pushes out a
string, and that’s why we only needed a writableObjectMode
flag there. The readable part is a normal string (the stringified
object).
Node has a few very useful built-in transform streams. Namely, the zlib and crypto streams.
Here’s an example that uses the zlib.createGzip() stream
combined with the fs readable/writable streams to create a
file-compression script:
const fs = require('fs');
const zlib = require('zlib');
const file = process.argv[2];

fs.createReadStream(file)
  .pipe(zlib.createGzip())
  .pipe(fs.createWriteStream(file + '.gz'));
You can use this script to gzip any file you pass as the argument. We’re piping a readable stream for that file into the zlib built-in transform stream and then into a writable stream for the new gzipped file. Simple.
The cool thing about using pipes is that we can actually combine them
with events if we need to. Say, for example, I want the user to see a
progress indicator while the script is working and a “Done” message when
the script is done. Since the pipe method returns the
destination stream, we can chain the registration of events handlers as
well:
const fs = require('fs');
const zlib = require('zlib');
const file = process.argv[2];

fs.createReadStream(file)
  .pipe(zlib.createGzip())
  .on('data', () => process.stdout.write('.'))
  .pipe(fs.createWriteStream(file + '.zz'))
  .on('finish', () => console.log('Done'));
So with the pipe method, we get to easily consume
streams, but we can still further customize our interaction with those
streams using events where needed.
What’s great about the pipe method though is that we can
use it to compose our program piece by piece, in a much
readable way. For example, instead of listening to the data
event above, we can simply create a transform stream to report progress,
and replace the .on() call with
another .pipe() call:
const fs = require('fs');
const zlib = require('zlib');
const file = process.argv[2];

const { Transform } = require('stream');

const reportProgress = new Transform({
  transform(chunk, encoding, callback) {
    process.stdout.write('.');
    callback(null, chunk);
  }
});

fs.createReadStream(file)
  .pipe(zlib.createGzip())
  .pipe(reportProgress)
  .pipe(fs.createWriteStream(file + '.zz'))
  .on('finish', () => console.log('Done'));
This reportProgress stream is a simple pass-through
stream, but it reports the progress to standard out as well. Note how I
used the second argument in the callback() function to push
the data inside the transform() method. This is equivalent
to pushing the data first.
The applications of combining streams are endless. For example, if we
need to encrypt the file before or after we gzip it, all we need to do
is pipe another transform stream in that exact order that we needed. We
can use Node’s crypto module for that:
const crypto = require('crypto');
// ...fs.createReadStream(file)
.pipe(zlib.createGzip())
.pipe(crypto.createCipher('aes192', 'a_secret'))
.pipe(reportProgress)
.pipe(fs.createWriteStream(file + '.zz'))
.on('finish', () => console.log('Done'));The script above compresses and then encrypts the passed file and only those who have the secret can use the outputted file. We can’t unzip this file with the normal unzip utilities because it’s encrypted.
To actually be able to unzip anything zipped with the script above, we need to use the opposite streams for crypto and zlib in a reverse order, which is simple:
fs.createReadStream(file)
  .pipe(crypto.createDecipher('aes192', 'a_secret'))
  .pipe(zlib.createGunzip())
  .pipe(reportProgress)
  .pipe(fs.createWriteStream(file.slice(0, -3)))
  .on('finish', () => console.log('Done'));
Assuming the passed file is the compressed version, the code above
will create a read stream from that, pipe it into the crypto
createDecipher() stream (using the same secret), pipe the
output of that into the zlib createGunzip() stream, and
then write things out back to a file without the extension part.
That’s all I have for this topic. Thanks for reading! Until next time!